
Send an SMS
Send Single SMS, Bulk SMS, and Group SMS messages from SmsPlus SGN Client.
Send SMS messages from SmsPlus SGN Client using Single SMS, Bulk SMS, or Group SMS based on how you want to provide recipients.
Messaging modes
SmsPlus SGN Client provides three modes for sending messages. Choose the mode based on how you want to enter or manage recipient numbers.
| Mode | Explanation |
|---|---|
| Single SMS | Send messages to up to 250,000 mobile numbers with country code in comma-separated format. |
| Bulk SMS | Upload a file containing mobile numbers with country code into the portal. |
| Group SMS | Send messages by selecting contacts from groups or distribution lists created in the address book. |
All three modes support message scheduling and duplicate removal. You can add Acculync only when sending Bulk SMS and Group SMS. All three modes show the character count and the number of SMS messages created by your typed message.
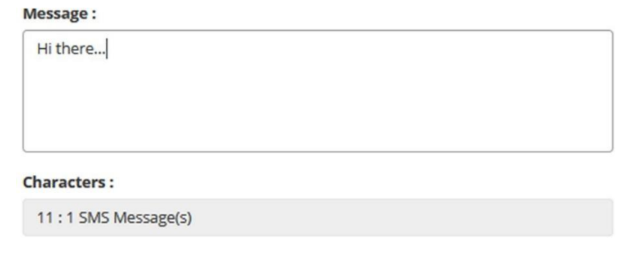
Character Count
Preview your message as it will appear on a mobile phone before sending. Click the preview icon to generate the preview.
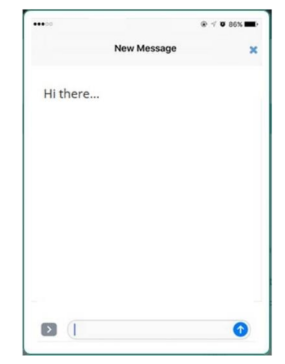
Preview your Message
Send a Single SMS
Use Single SMS to send messages to up to 250,000 mobile numbers with country code in comma-separated format.
- From the Send SMS menu, click Single SMS.
- Enter the mobile numbers and message.
- Select the sender ID.
- Select the message type.
- Click Send.
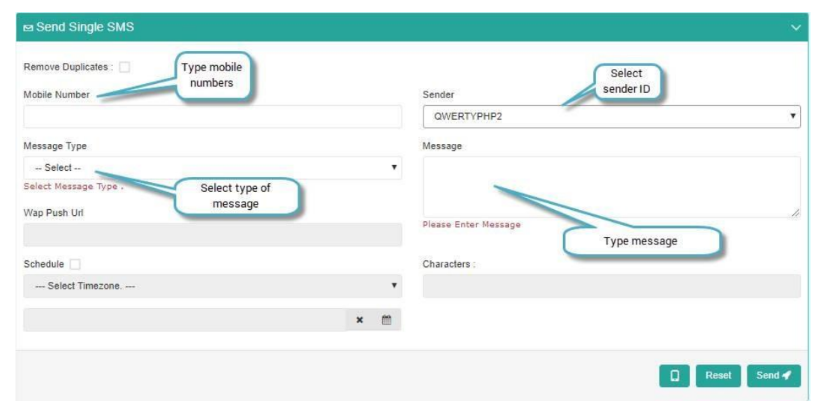
Send a Single SMS
Send Bulk SMS
Use Bulk SMS to send messages to multiple users by uploading a file that contains recipient numbers.
File Upload
Upload a file containing mobile numbers with country code. You can use a text file, comma-separated values file, or MS Excel workbook. The file should contain mobile numbers with country code in line-separated format.
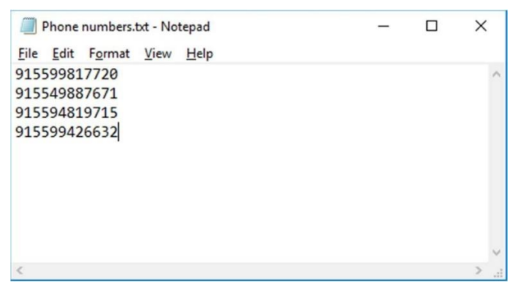
Number in Line-Separated Format
- From the Send SMS menu, click Bulk SMS.
- Select the file to upload.
- Confirm that the Upload File box shows the selected filename.
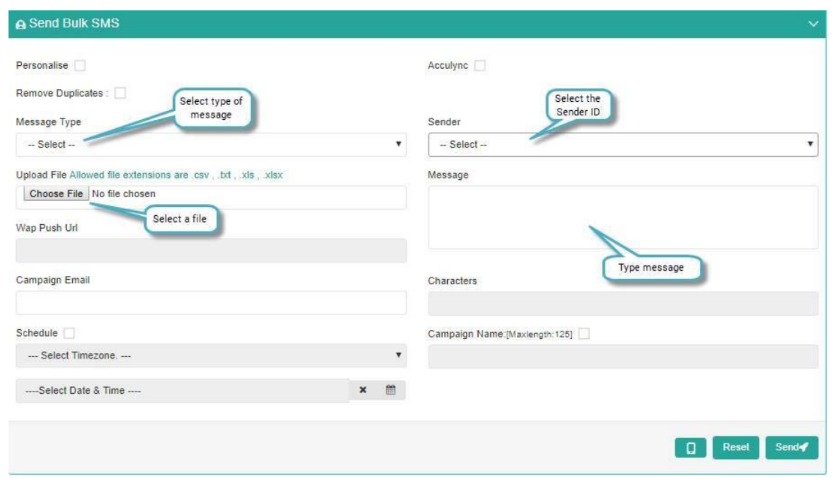
Send Bulk SMS with File Upload
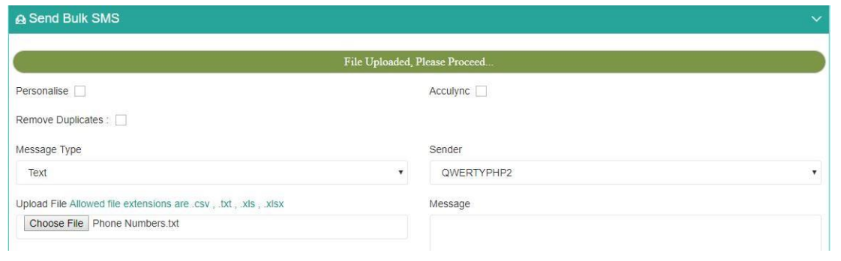
Uploaded File
Personalised Bulk SMS
Personalised Bulk SMS is a sub-feature of Bulk SMS with file upload. It lets you customise messages by adding column headers and message text in your upload file.
The uploaded file must follow this structure:
- The top row contains column headers.
- Phone numbers with country code are always in the first column.
- Other columns are identified by their headers and can contain message data.
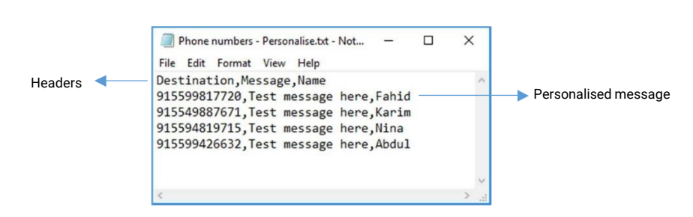
Personalised Message Format for Text Files
To send a personalised Bulk SMS:
- Select the Personalise checkbox.
- Upload the file.
- Review the Add Field list under the Message box. This list shows the column headers from the uploaded file as fields.
The first column header related to phone numbers does not appear in the Add Field list.
- Click the fields to add them to the Message box in the required order.
- Add any additional text directly in the Message box.
The system appends the text associated with the selected fields to the mobile number from the file to create a custom message.
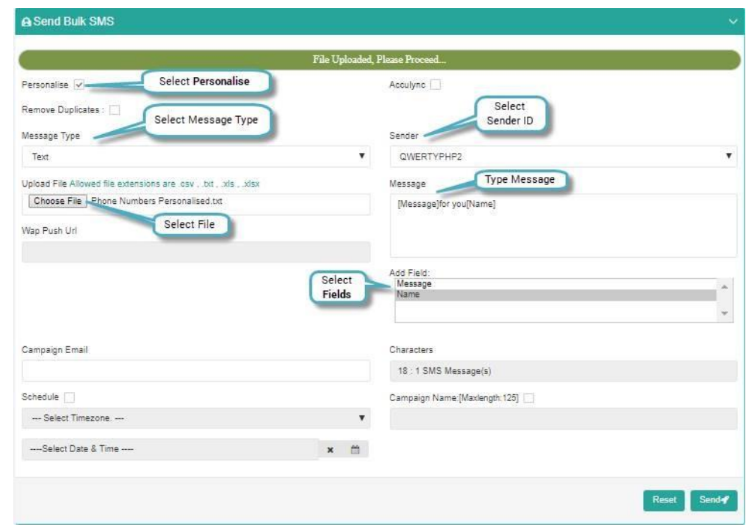
Personalised Bulk SMS
Use the message format option to create the message format for text files, comma-separated values files, and MS Excel workbooks.
Send Group SMS
Use Group SMS to send messages to a specific set of contacts. A contact consists of a name and mobile number. Group SMS works in a similar way to Bulk SMS, but recipients are selected from address book groups or distribution lists.
Manage Group
Use groups to add, edit, or delete contact names and mobile numbers with country code. Duplicate mobile numbers within a group are not permitted.
From the Address Book menu, click Group to manage groups.
Create a Group
- Enter the required group name in the Group Name box.
- Click Add to create the group.
- Review the Group Details section to view contact names and phone numbers for the selected group.
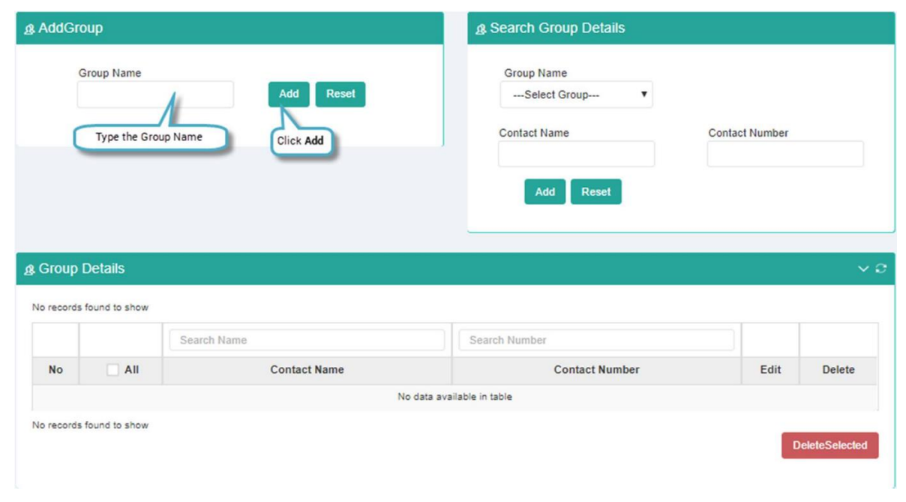
Create a Group
Click the Group Name list to view the group name after it is successfully created.
Modify the Group Name
Use the Search Group Details and Add Group sections to change a group name. You can also delete a created group.
To modify a group name:
- From the sName list, click the group name.
- Click Modify. The name appears in the Group Name box.
- Click in the Group Name box and edit the name.
- Click Save.
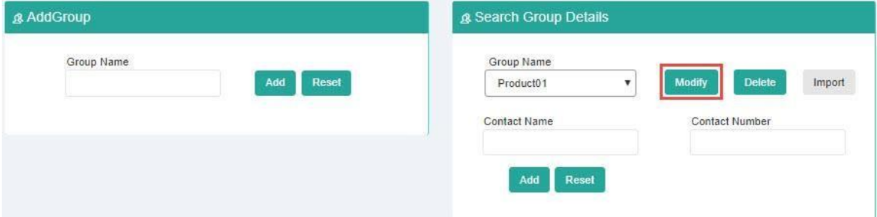
Modify the Group Name
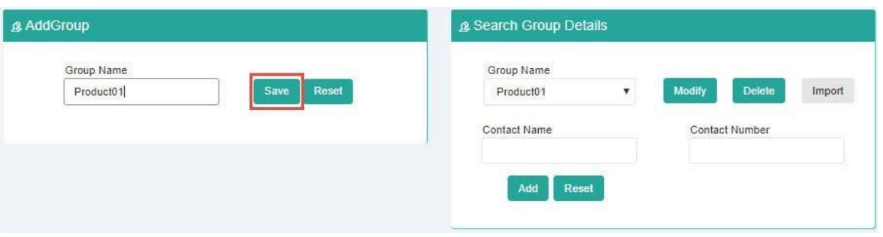
Save the New Group Name
To delete a group, select the group and click Delete. If a confirmation message appears, click OK.
Add Contacts in a Group
You can add contacts individually or import a text or comma-separated values file containing contact names and numbers. If a contact already exists in a group, the duplicate entry is removed during addition.
Add contacts by uploading a file
- From the Group Name list, click the required group.
- Click Import.
- The Address Book Import window appears.
- Perform one of the following:
- Enter each contact name and phone number separated by a comma, with each new contact on a new line.
- Click Browse and select a file containing contacts.
- Click Import to save the contacts to the group.
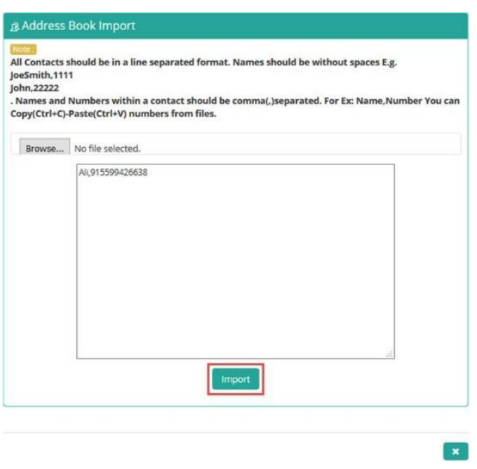
Address Book Import Window
Use the help option in the Search Group Details section to understand how to create a file containing contacts.
Add individual contacts
- From the Group Name list, click the required group.
- In the Contact Name box, enter the contact name.
- In the Contact Number box, enter the mobile number.
- Click Add to save the contact to the group.
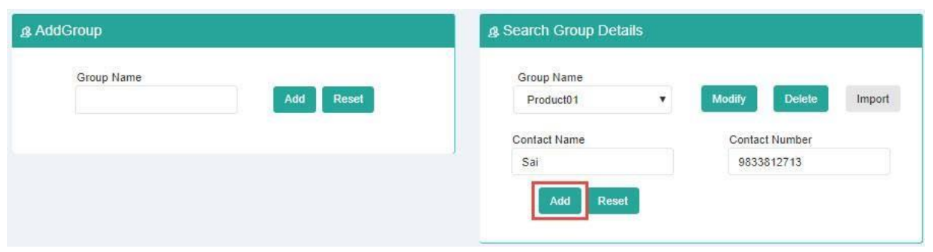
Add Individual Contacts
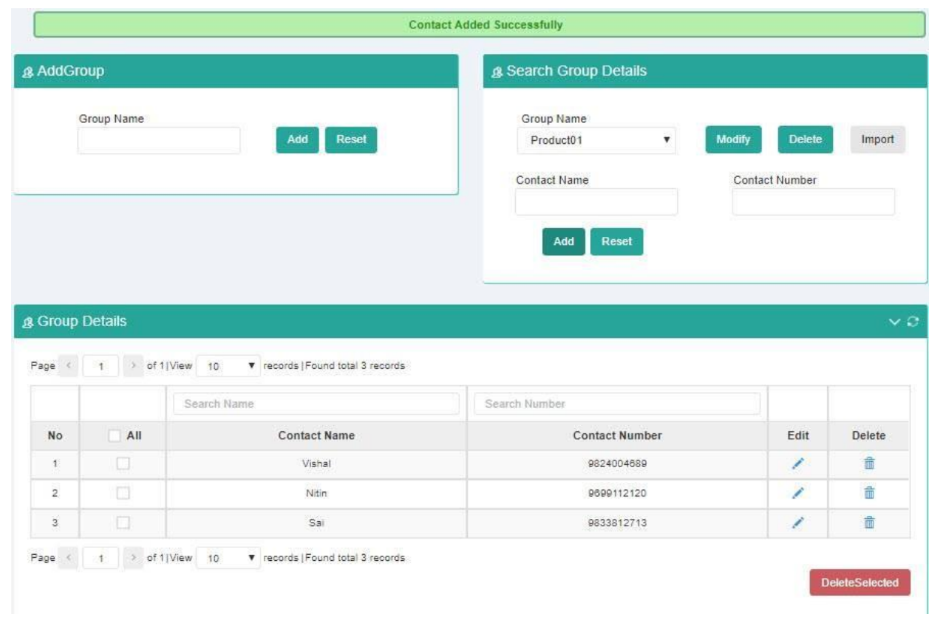
Added Contact
Edit a Contact
Edit a contact by modifying its name and phone number. Select the group that contains the contact to view contact details in the Group Details section.
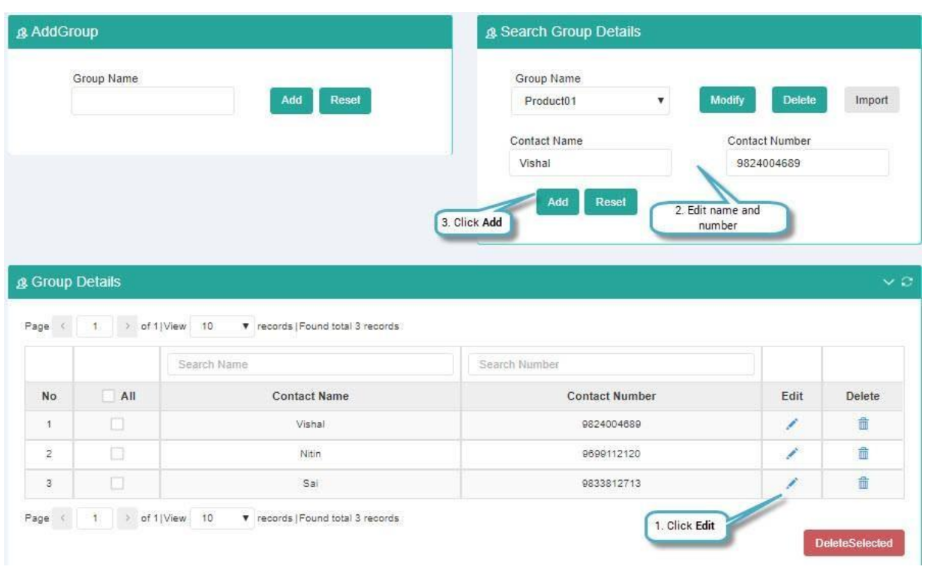
Edit a Contact
Delete Contacts
Delete contacts after selecting the group that contains them.
- To delete an individual contact, click the delete icon for that contact.
- To delete multiple contacts, select the contacts and click Delete Selected.
- If a confirmation message appears, click OK.
Select the All checkbox to select all contacts in the group.
Manage a Distribution List
A distribution list stores only mobile phone numbers with country code in line-separated format.
From the Address Book menu, click Distribution List to manage distribution lists. You can create a list, modify a list name, add numbers, and delete numbers from a list.
You cannot add individual numbers to a distribution list. Add numbers only by importing a file or by entering them in the List Number Import box.
The procedures for distribution list management are similar to group management.
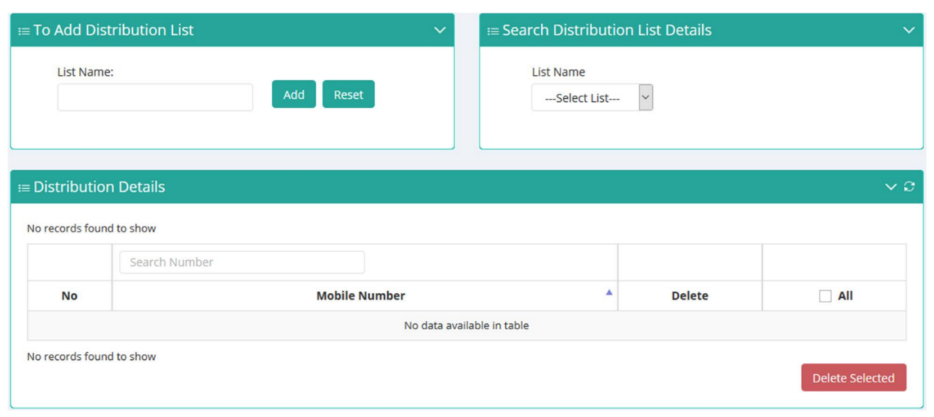
Manage Distribution List Page
The line-separated format for entering mobile numbers in a selected list is shown below.
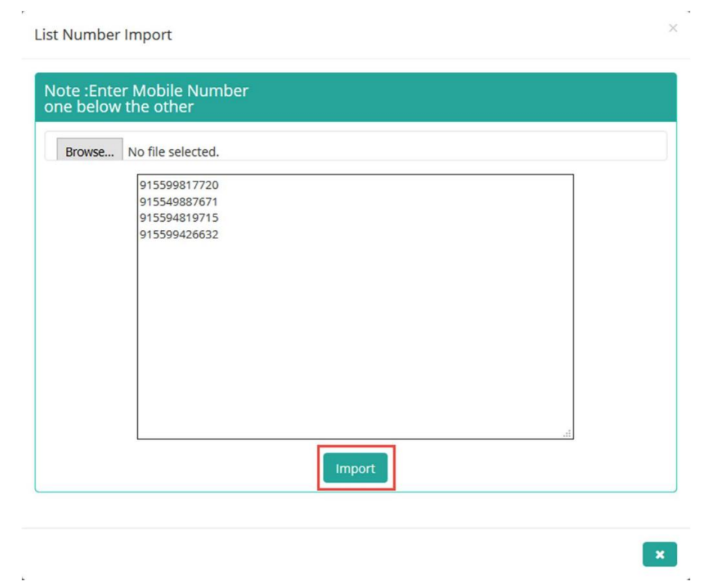
List Number Import Window
Send a Group SMS
Group SMS provides flexible mobile number selection. You can select numbers from multiple groups or entire distribution lists.
- From the Send SMS menu, click Group SMS.
- In the Contact Name box, click Import. The Group Of window appears.
- Select contacts or a distribution list.
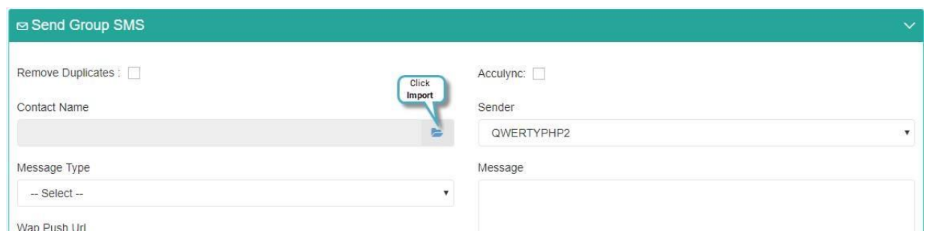
Import Icon
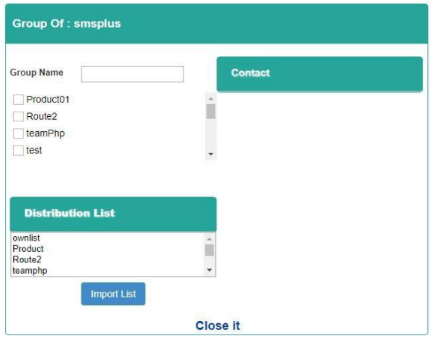
Group Of Window
Select a distribution list
- From the Distribution List list, click the required list name.
- To select multiple lists, press and hold Ctrl while selecting the list names.
- Click Import List. The list name appears in the Contact Name box.
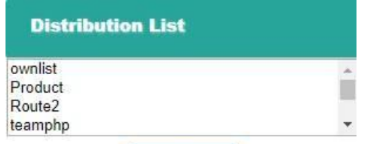
Select List Name
Select contacts from groups
- Select the checkbox for the required group name. The Name and Number columns appear under the Contact section.
- Select the checkboxes for the required contacts.
- Click Import. The selected contacts appear in the Contact Name box.
You can select multiple groups before importing contacts.
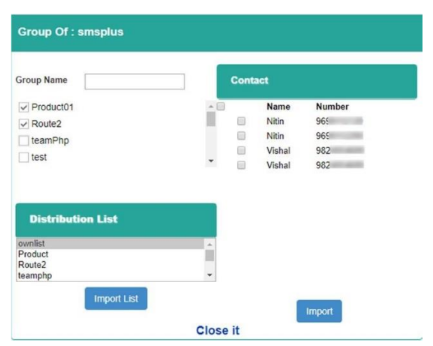
Import Multiple Contacts from Multiple Groups
To send the Group SMS, review the selected contacts and complete the message setup.
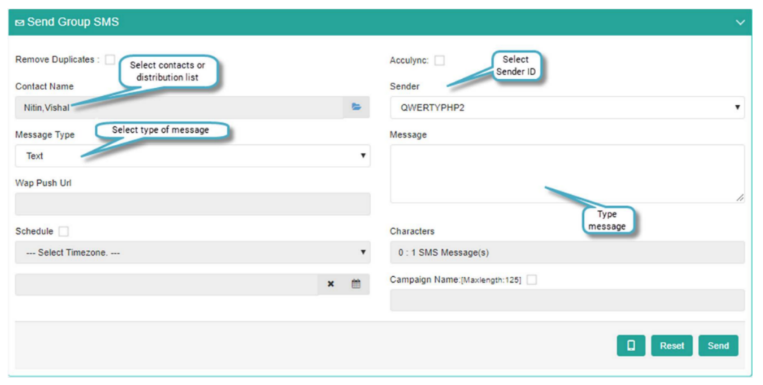
Send a Group SMS
Updated 11 days ago