
Campaigns
Use the Campaigns page to view campaign performance and create, test, send, or schedule campaigns across SMS, WhatsApp, Email, and RCS Business Messaging.
Campaigns dashboard
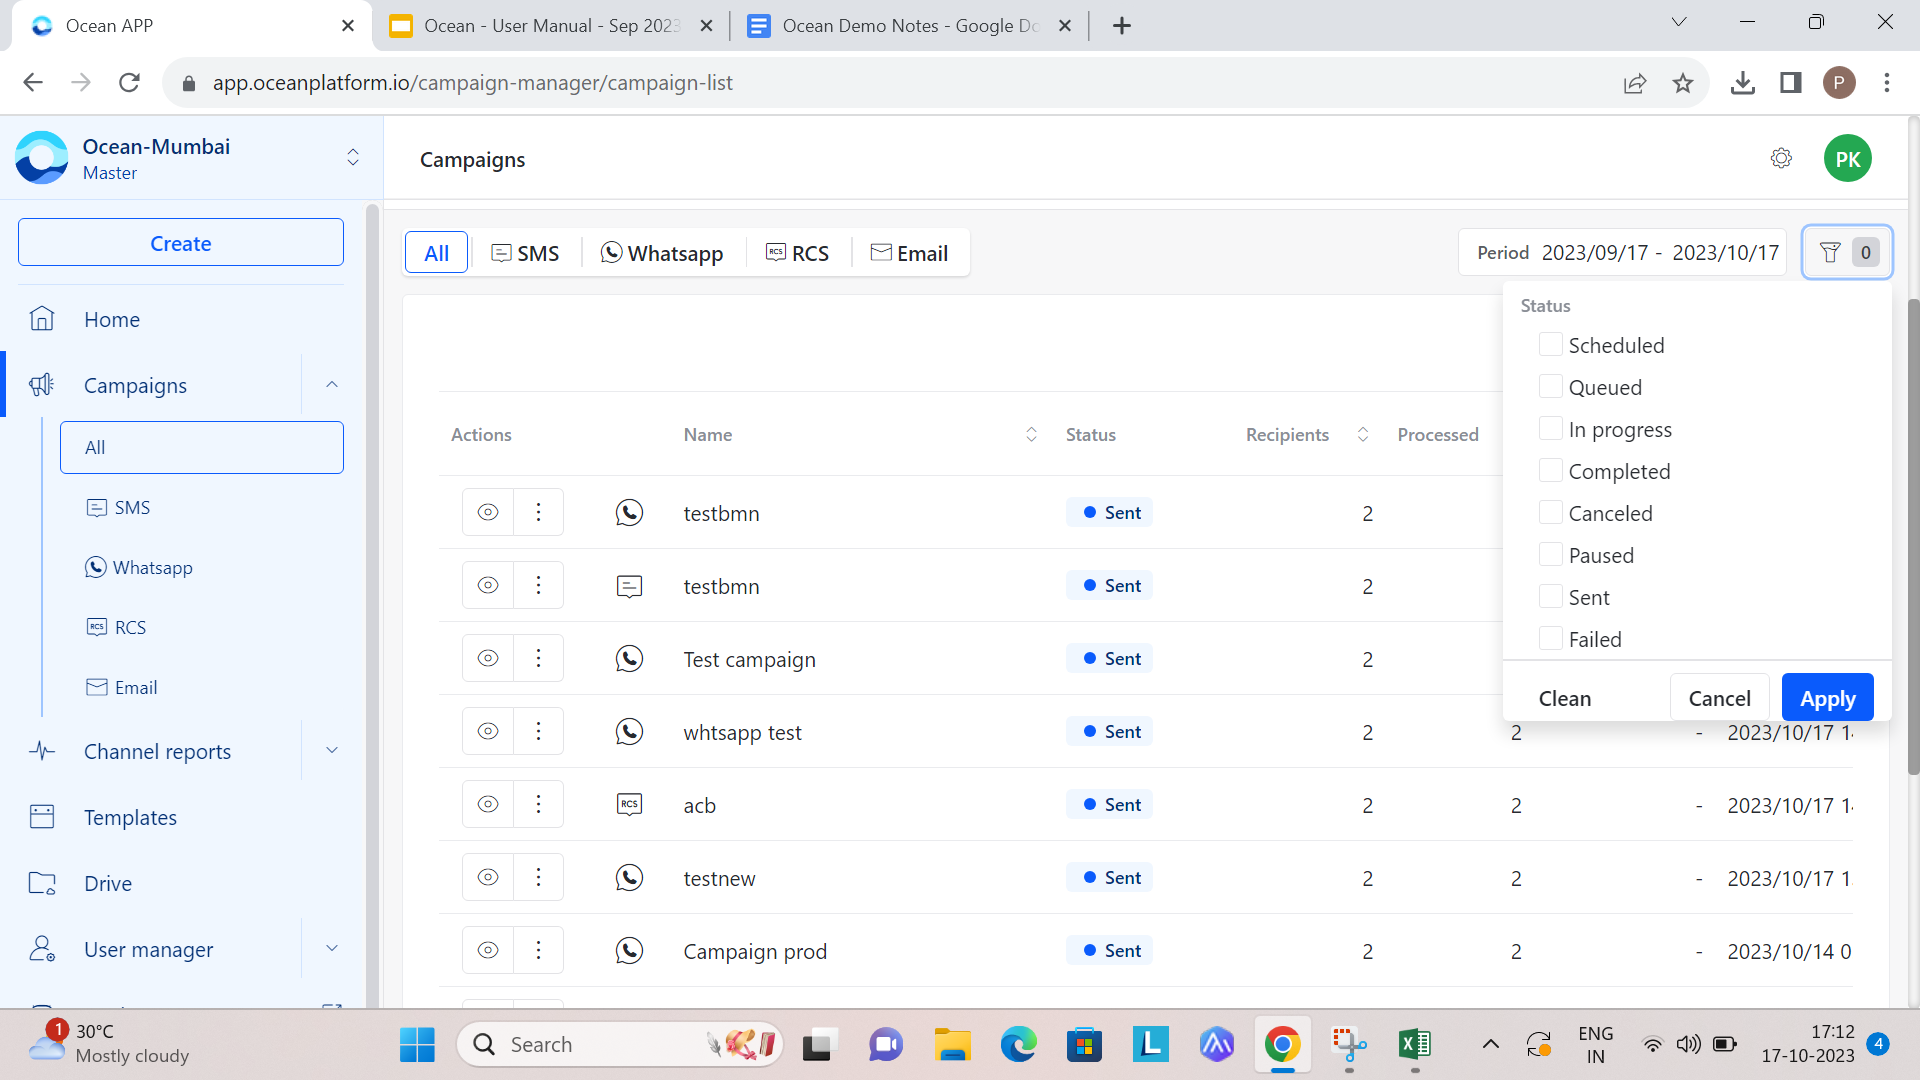
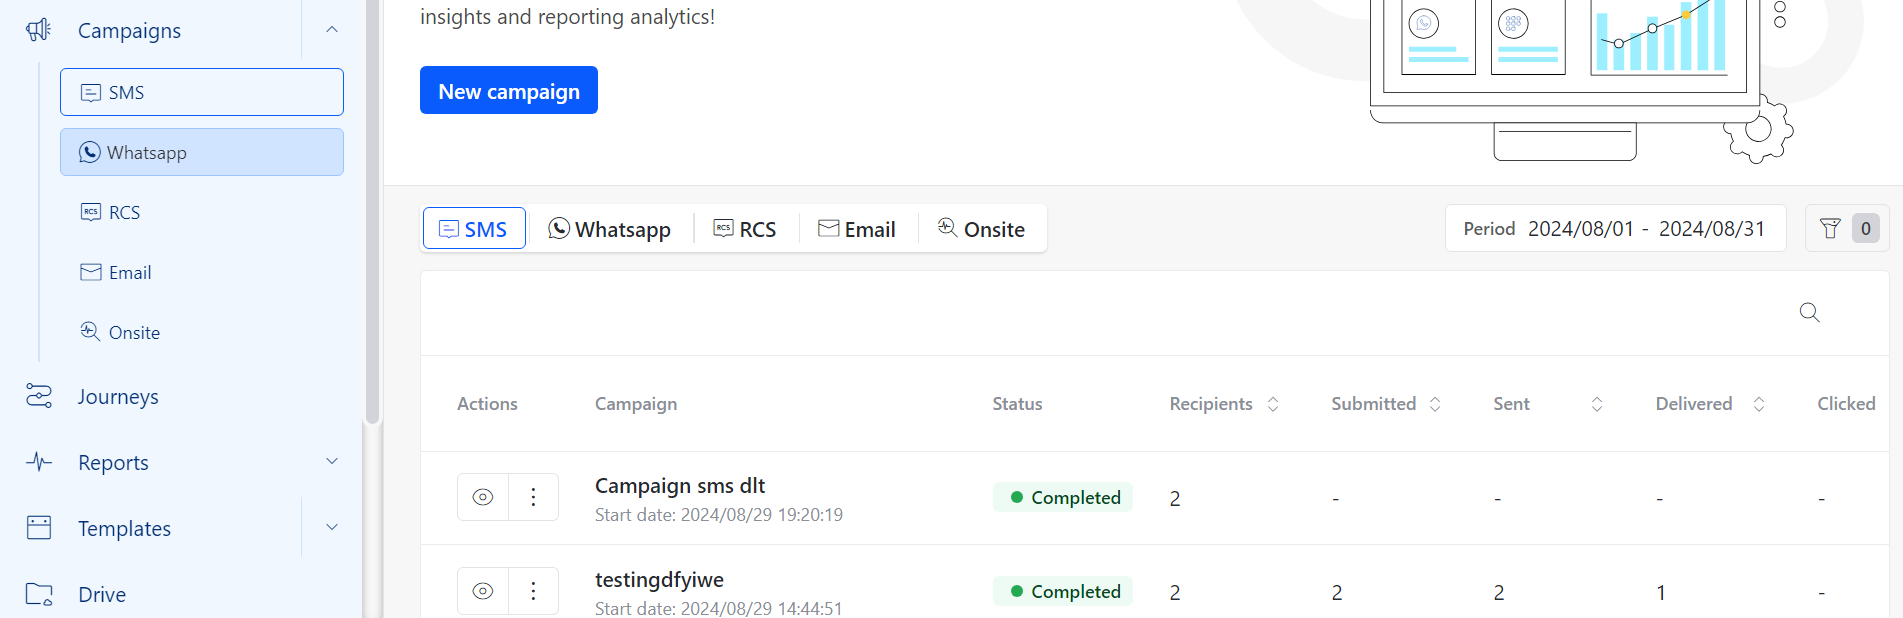
Use the Campaigns dashboard to view campaign details for a specific account.
The dashboard includes:
| Field | Description |
|---|---|
| Name | Campaign name. |
| Status | Current campaign status. |
| Recipients | Number of campaign recipients. |
| Submitted | Number of submitted messages. |
| Sent | Number of sent messages. |
| Delivered | Number of delivered messages. |
| Clicked | Number of clicked messages. |
| Actions | Options to view or download the campaign report. |
You can also use:
- Period: Select a predefined date range or custom date range.
- Filters: Filter message status for all channels or for each channel separately.
SMS campaigns
Use the SMS campaign flow to create a campaign, upload recipients, select or create message content, test the campaign, and send or schedule it.
Create an SMS campaign
To create an SMS campaign:
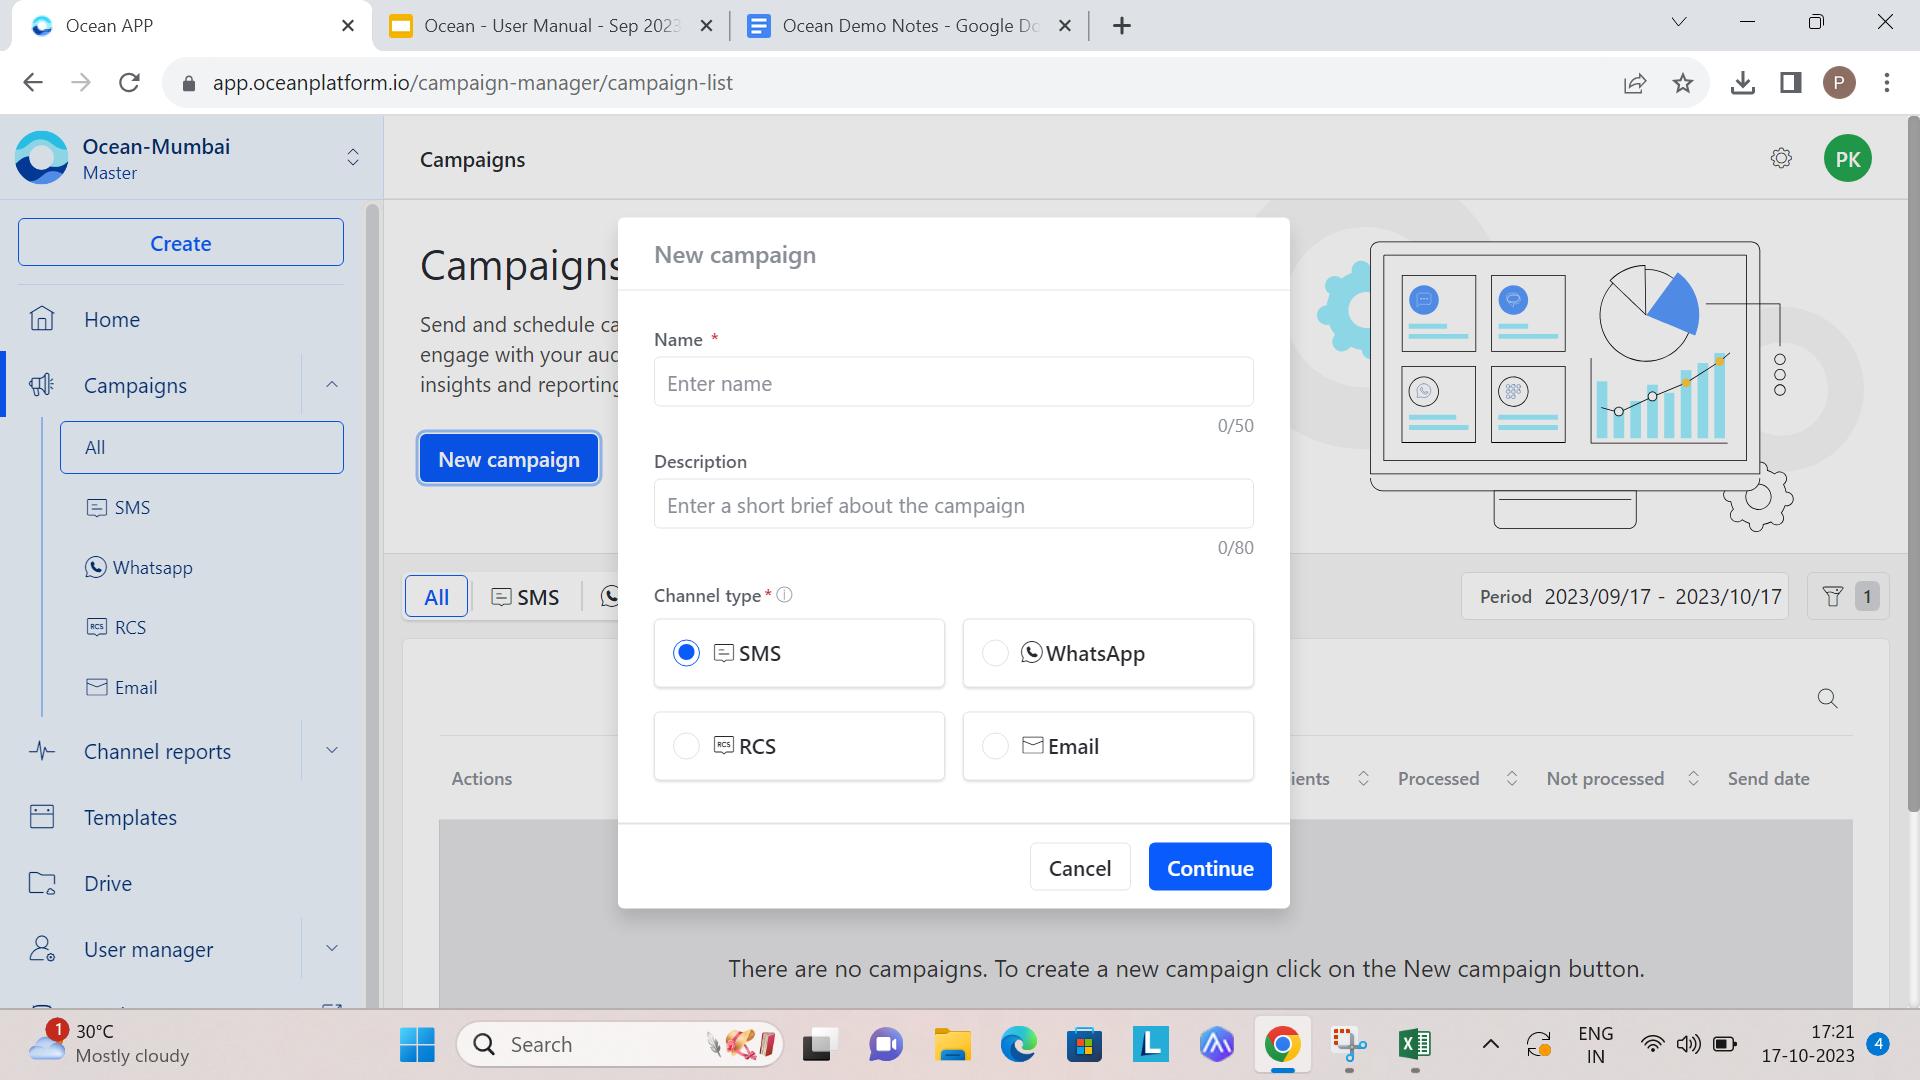
- Click Campaigns in the left panel.
- Select All.
- Click New Campaign. A popup window opens.
- Enter the Campaign name.
- Optionally, enter a short campaign description.
- Choose SMS under Channel type.
- Click Continue. A new browser window opens.
Add SMS recipient data
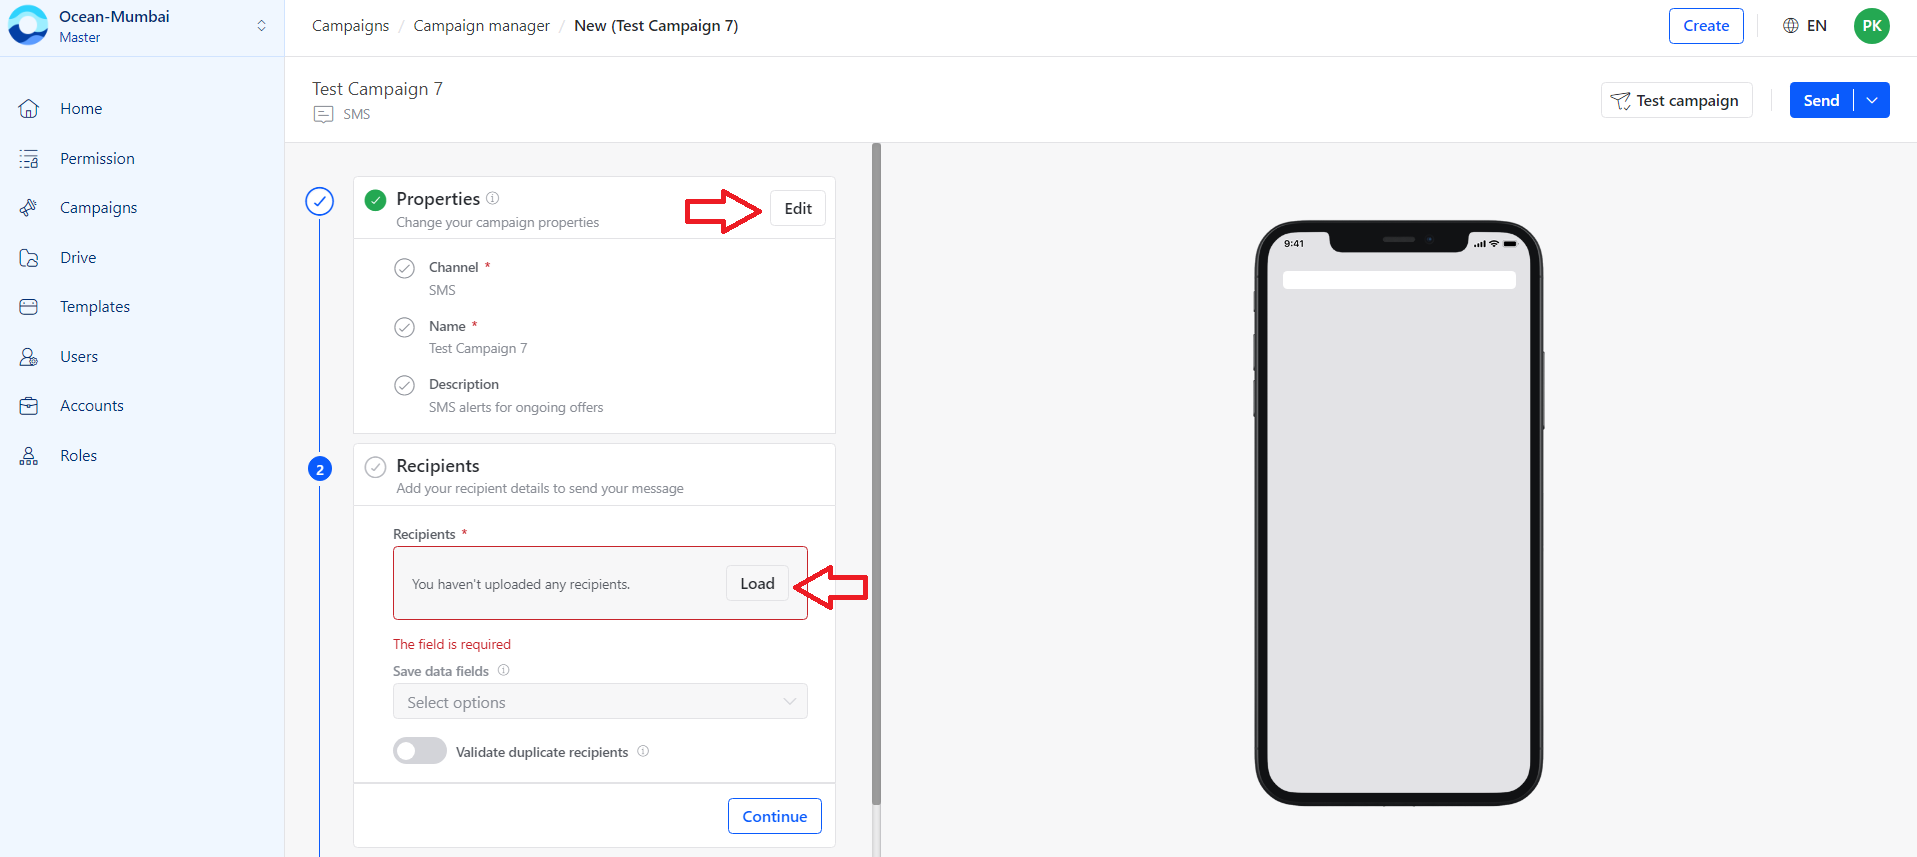
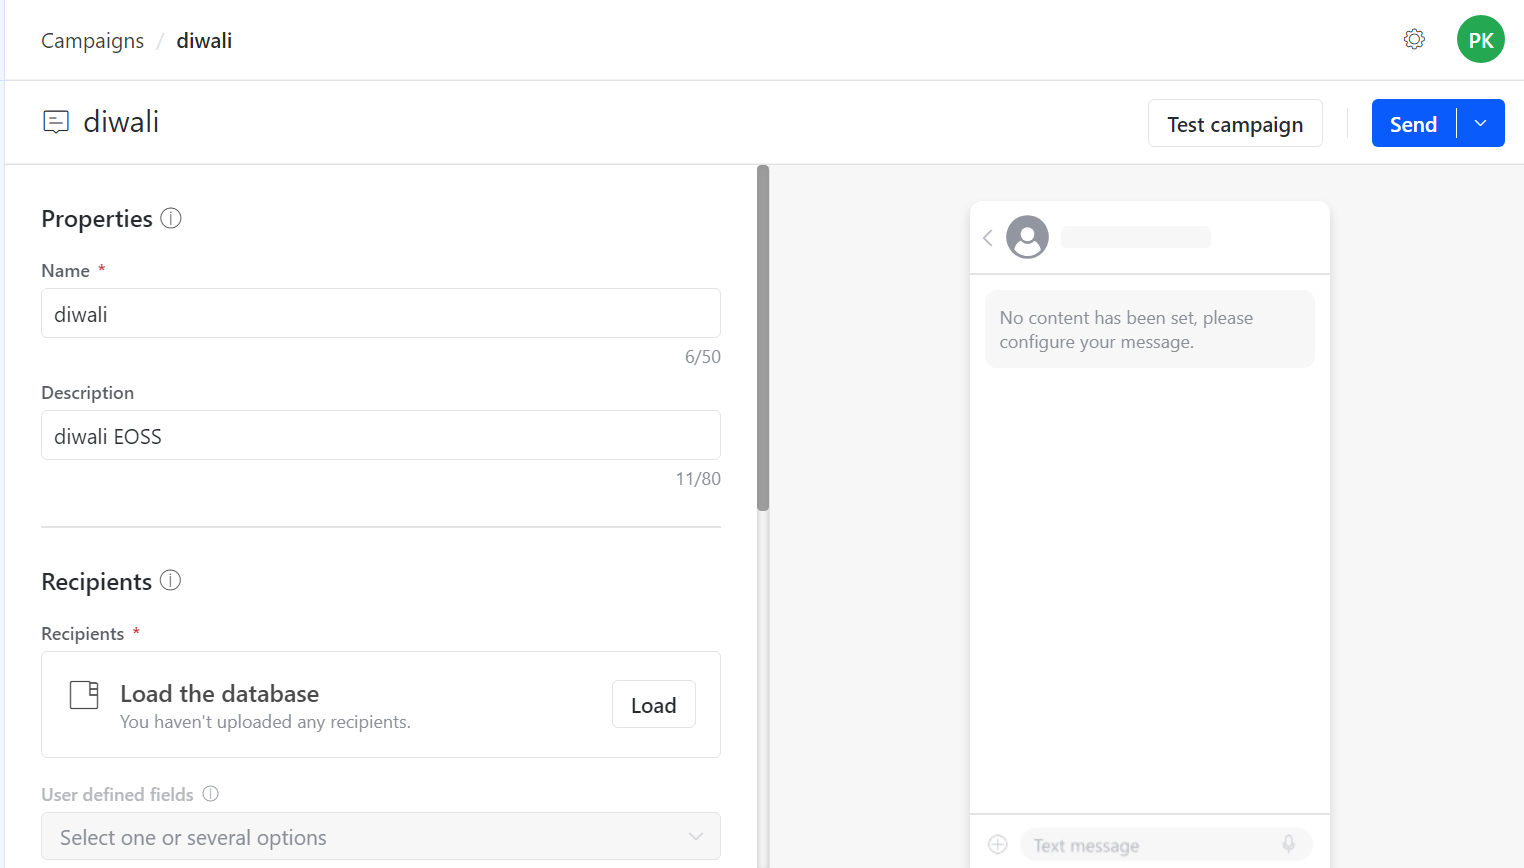
After creating the campaign, verify the details in the Properties and Description sections.
To add recipients:
- Confirm that the campaign properties are correct.
- Click Load to add recipients.
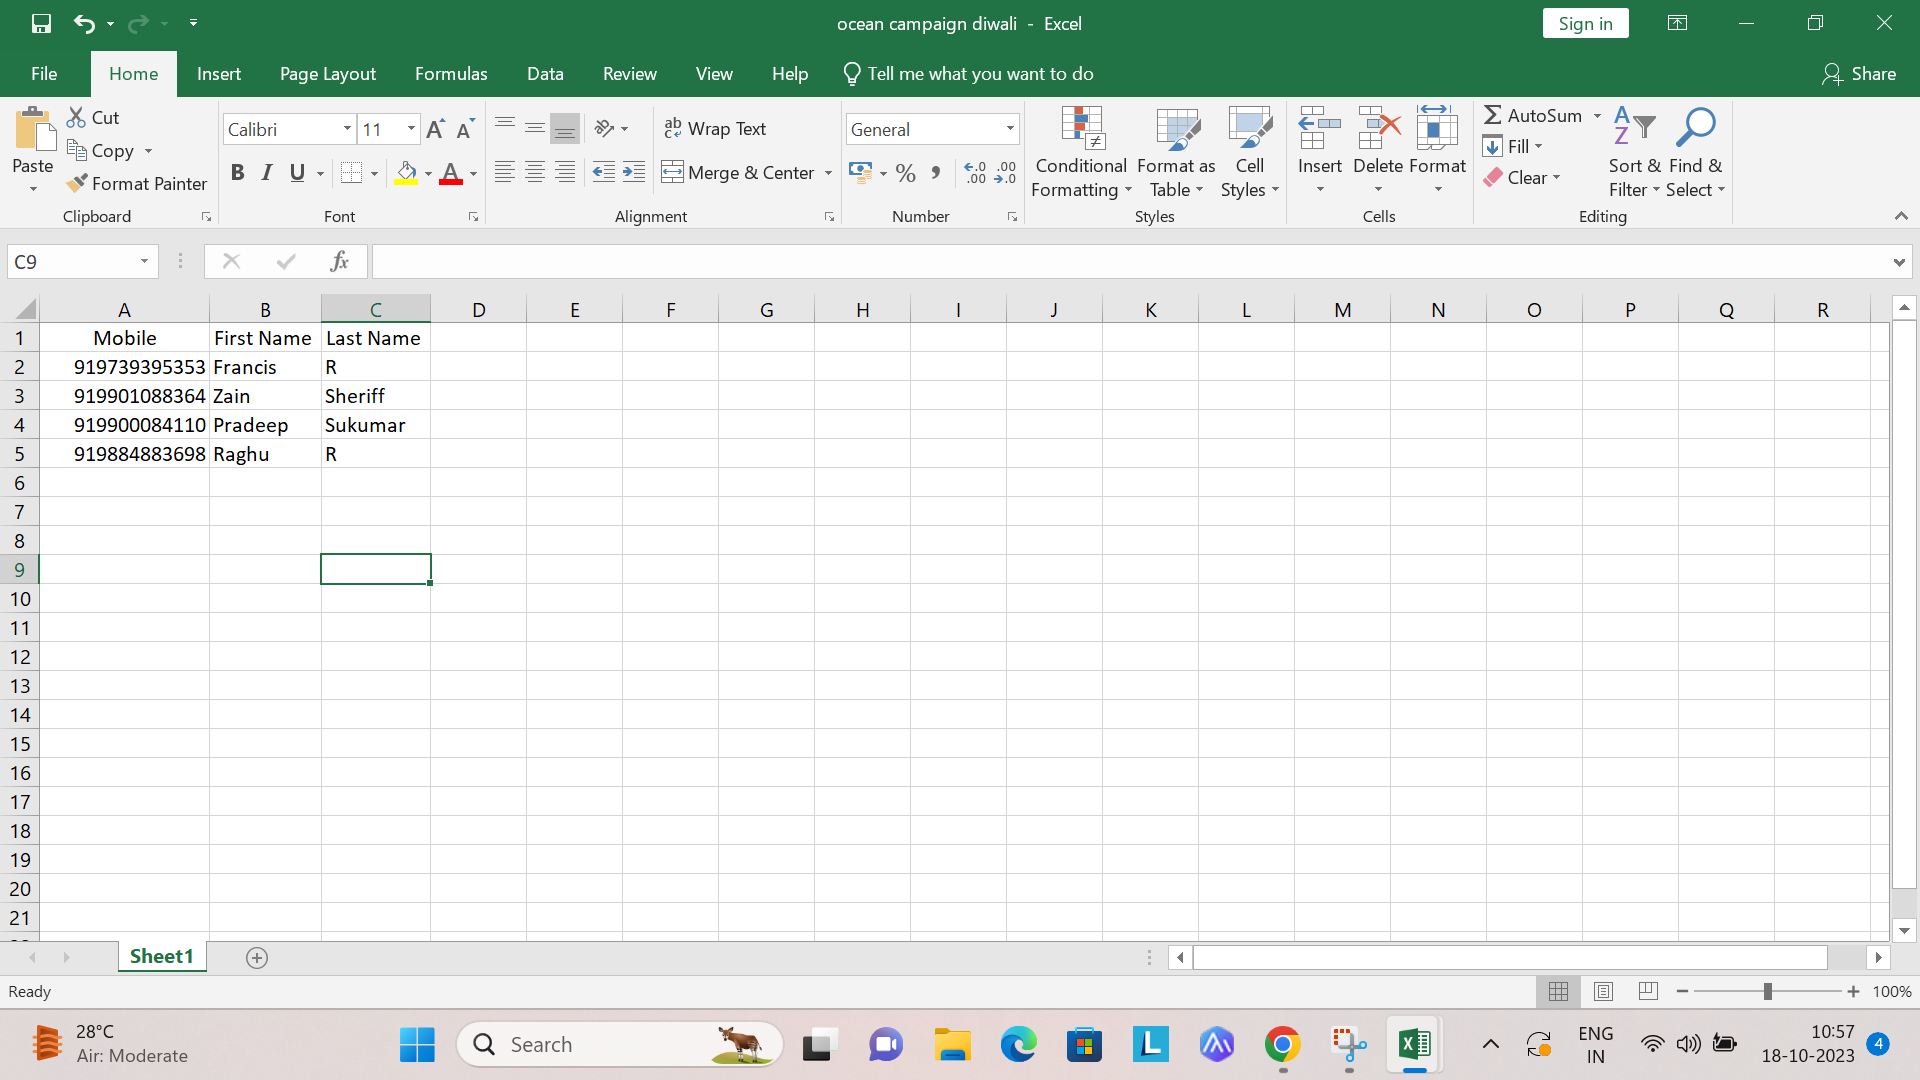
- Create an Excel or CSV file with recipients in the required format.
- Upload the file.
Load SMS recipient data
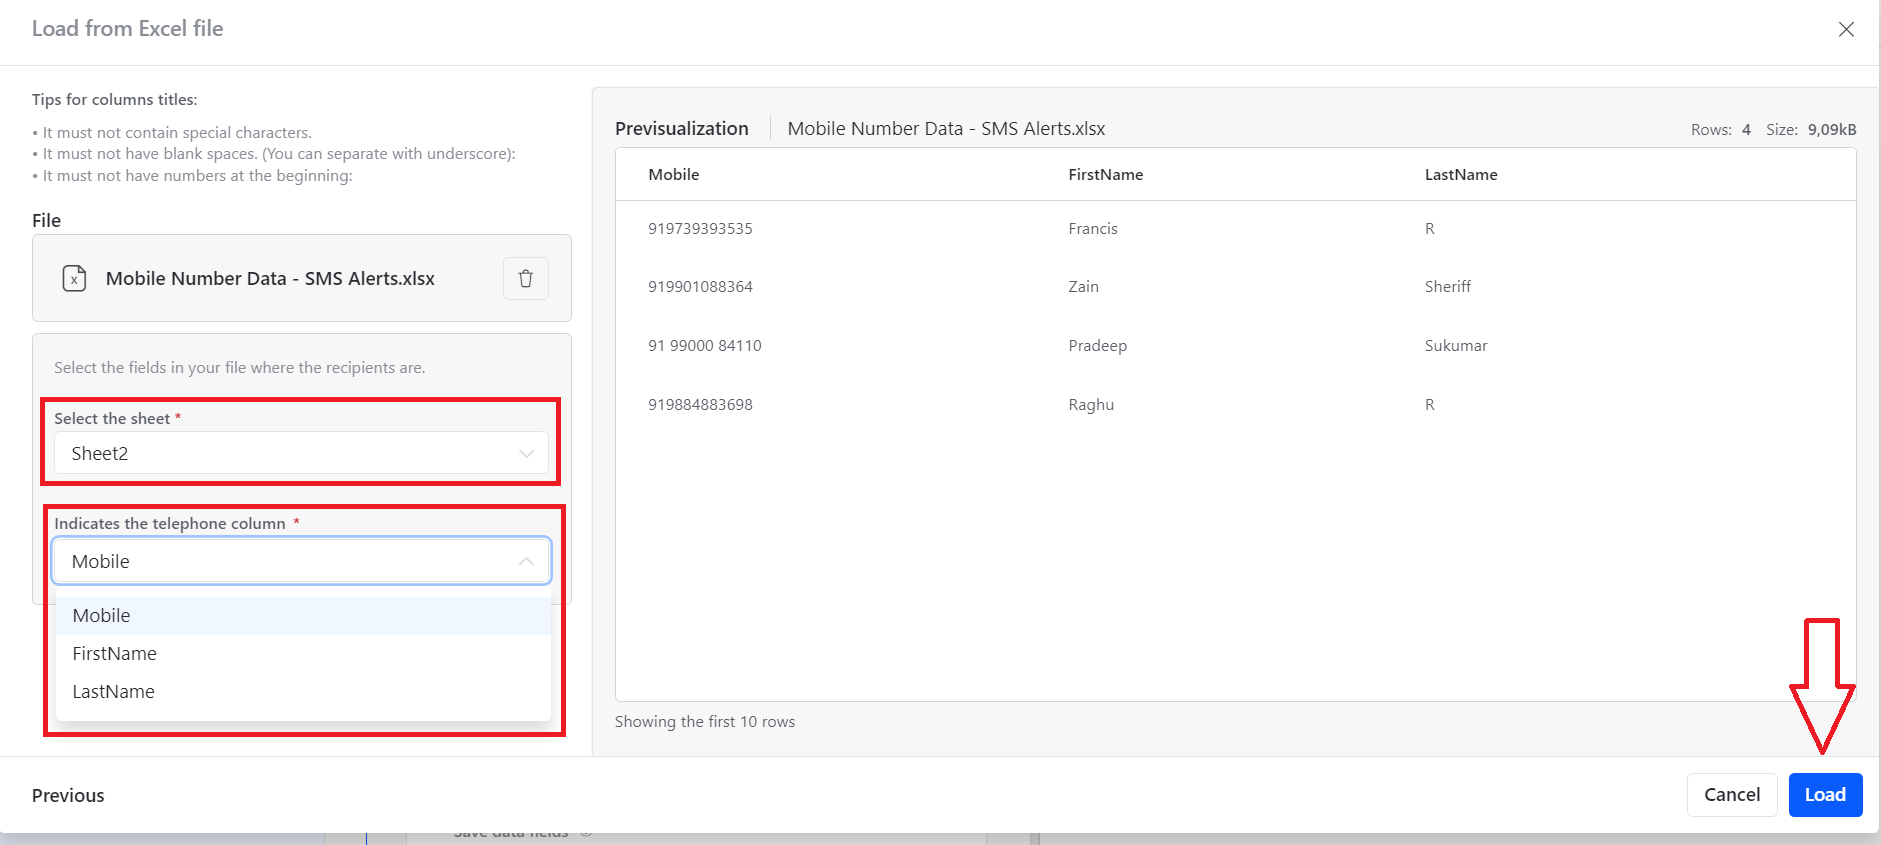
After uploading the Excel sheet, preview and verify the data before continuing.
To load recipient data:
- Click Pre Visualize to preview the uploaded data.
- Select the sheet that contains your recipient data.
- Select the telephone number column that contains mobile numbers.
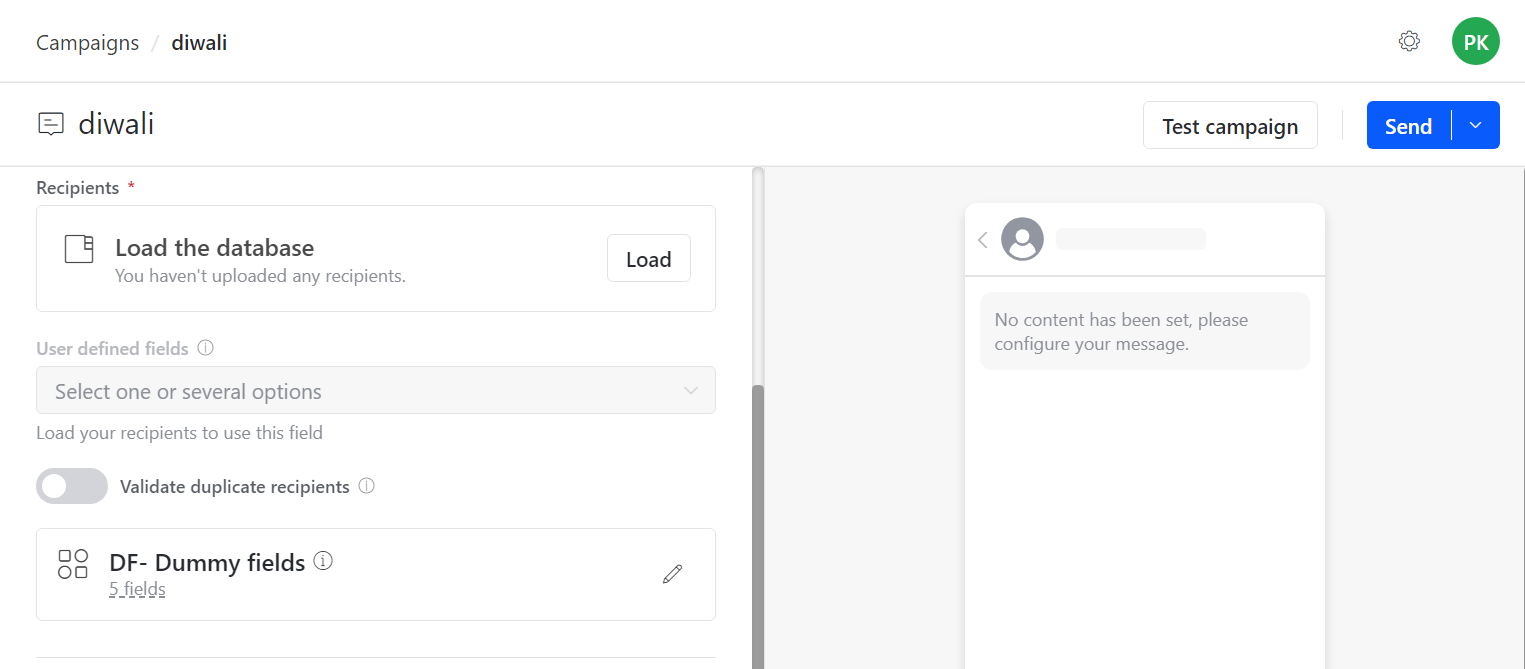
- Select user-defined fields if you want the data to appear in reports.
- Enable Validate duplicate recipients to remove duplicate entries.
Configure SMS campaign options
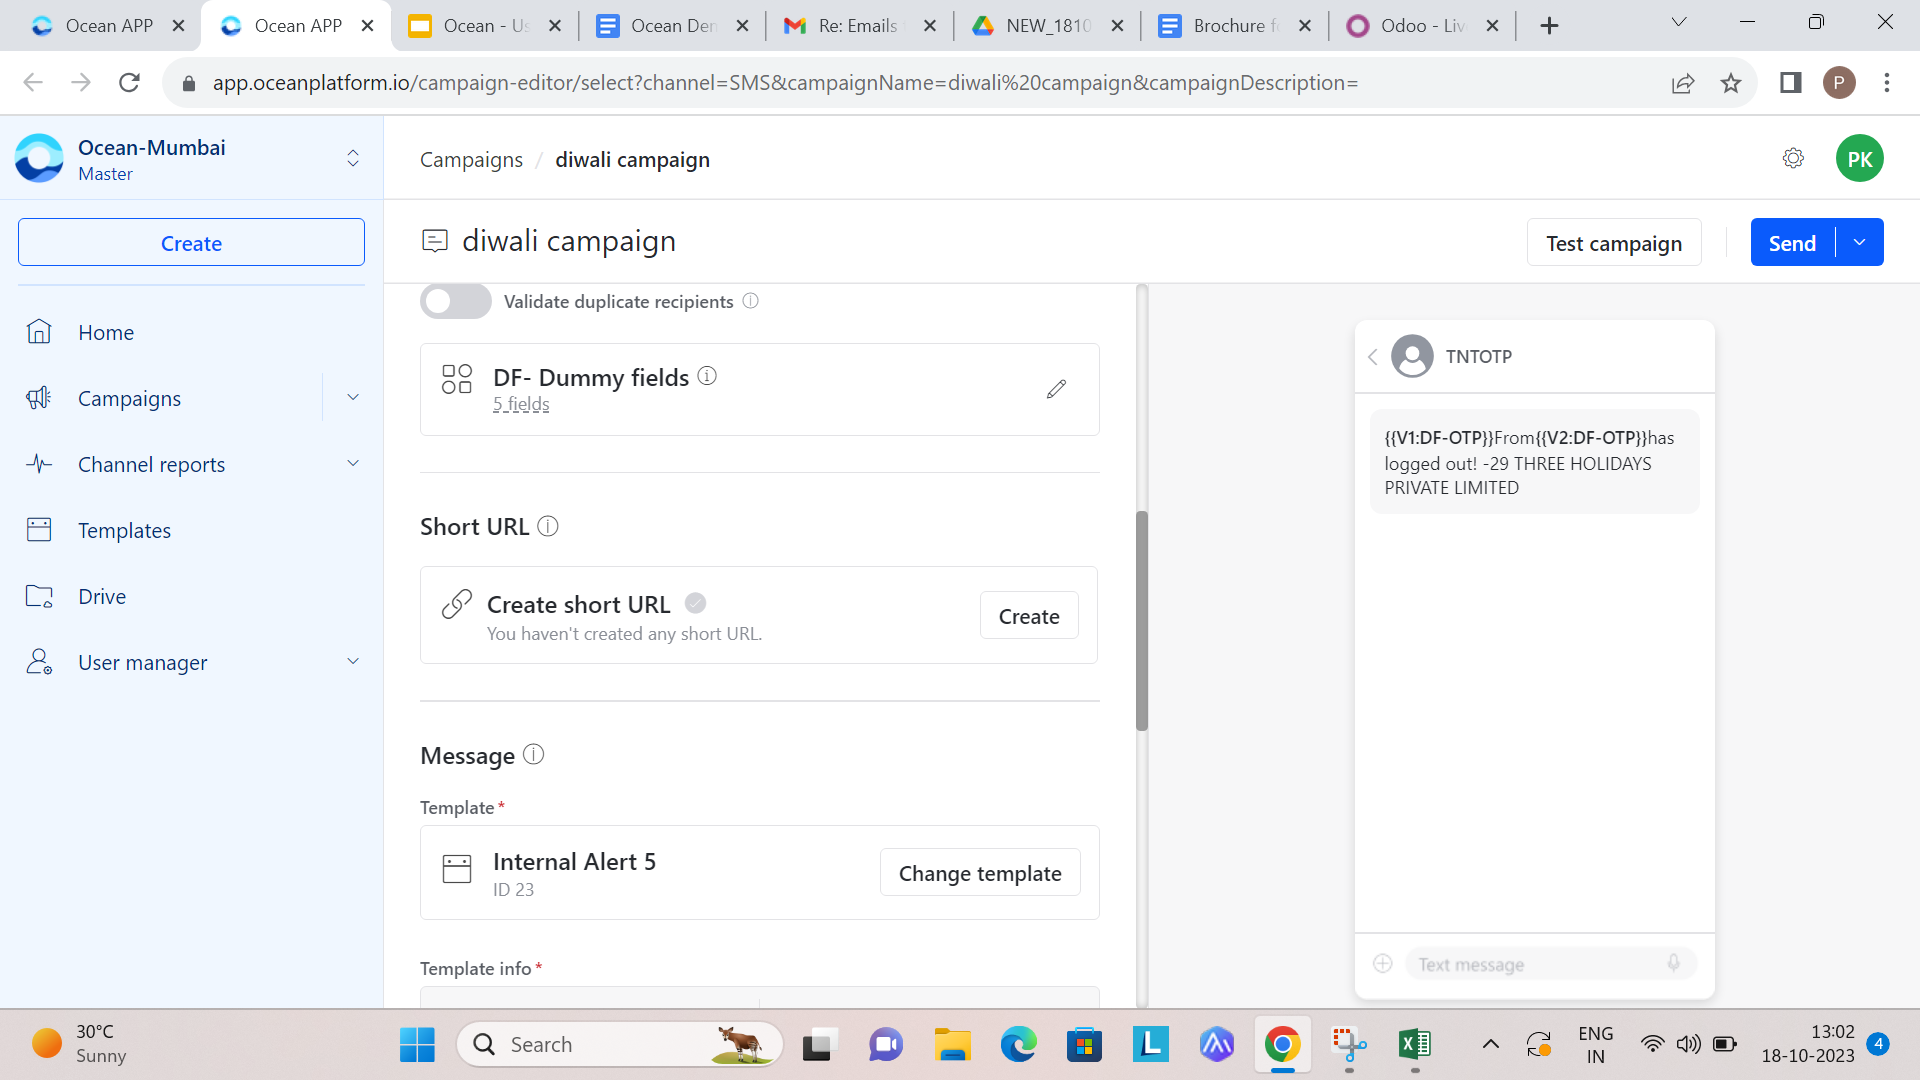
Use campaign configuration options to add dummy fields and short URLs.
- DF - Dummy fields: Enter predefined information to customise the campaign when the database has not been loaded for testing.
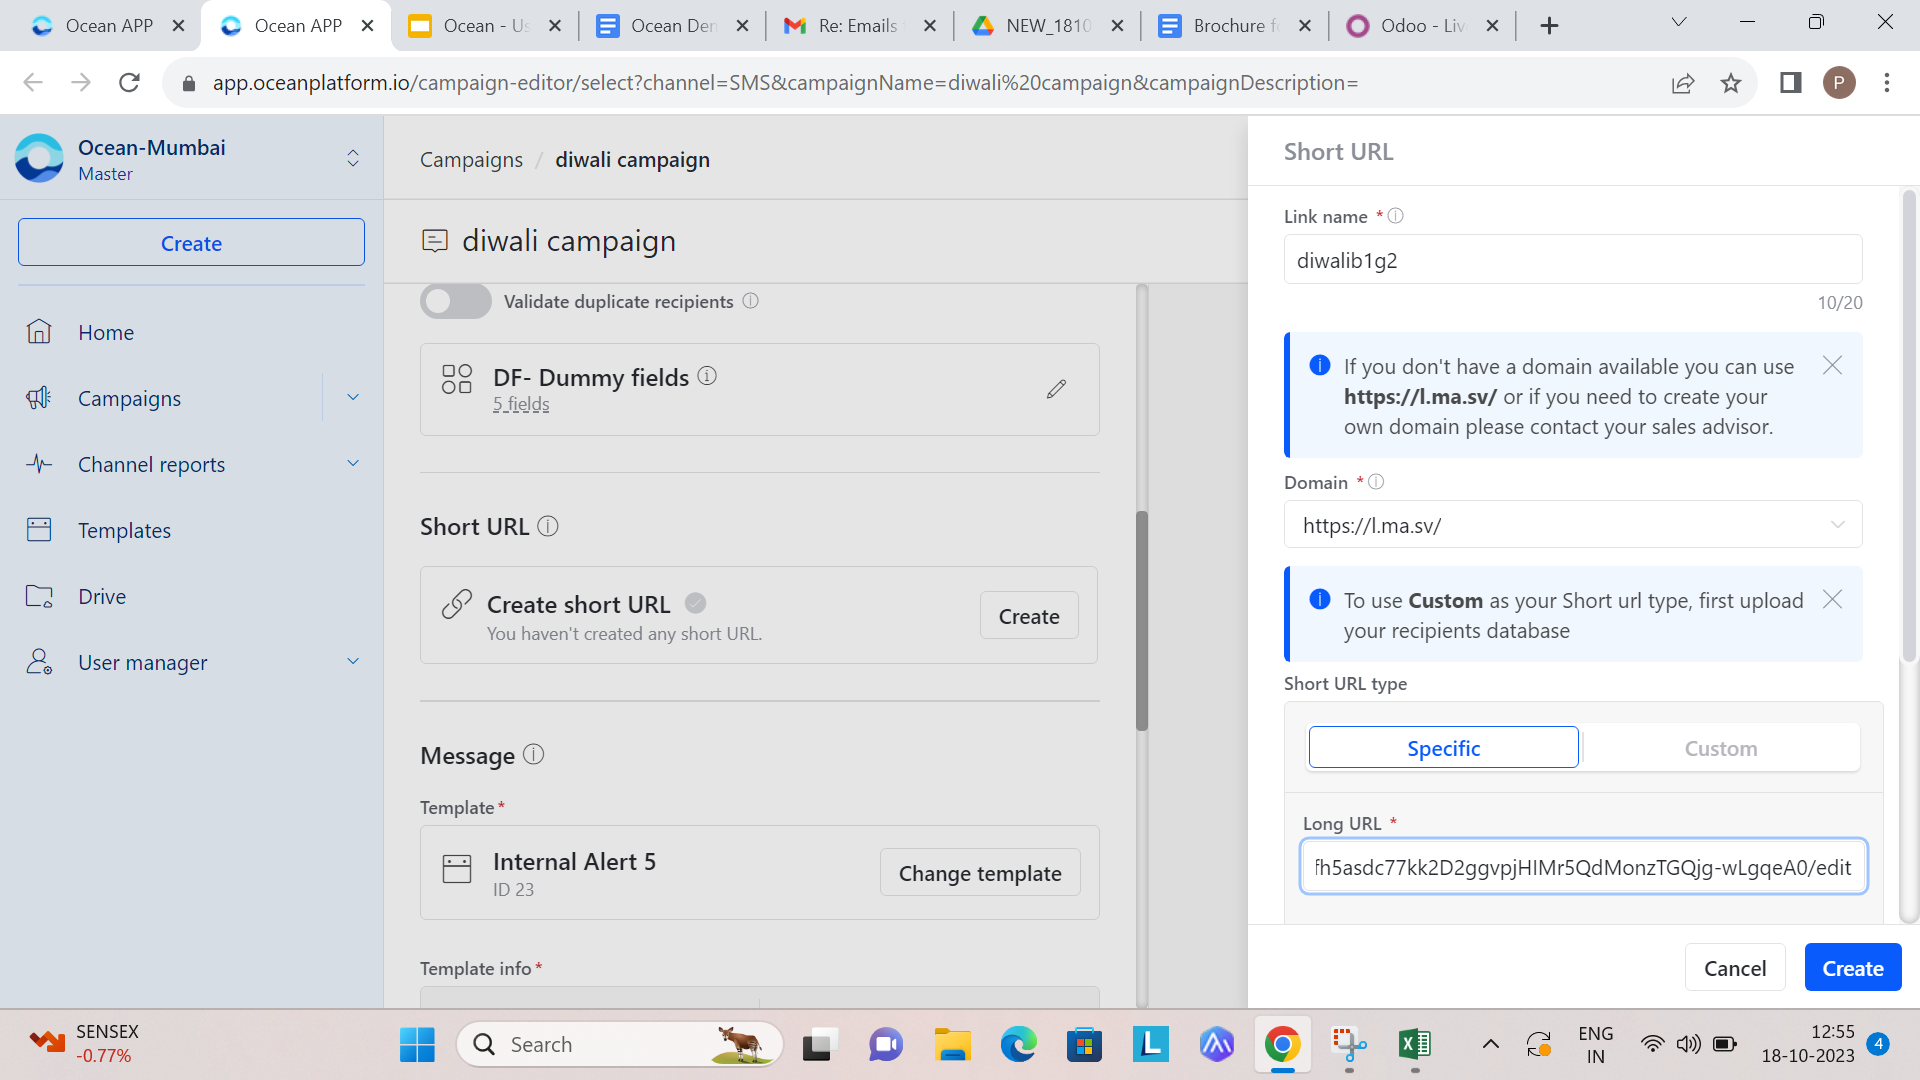
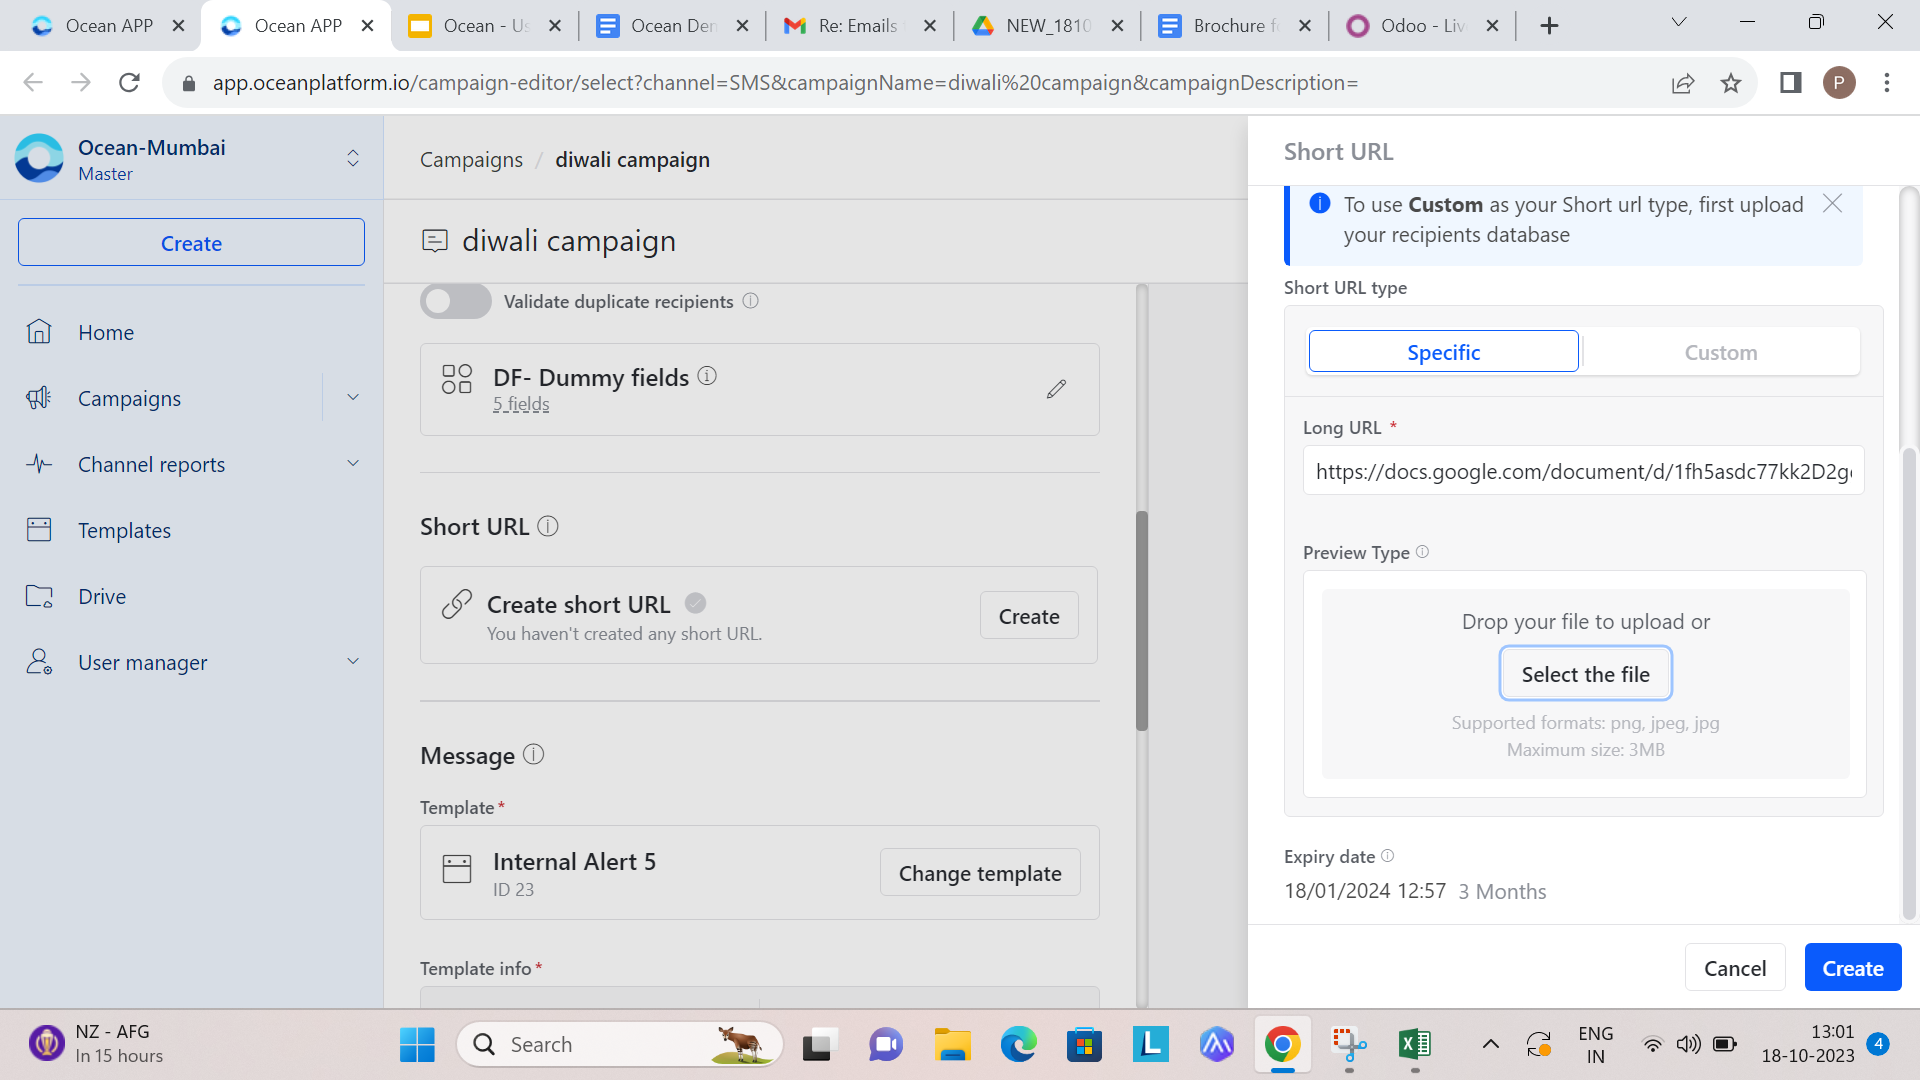
- Short URL: Create a custom short URL for the campaign.
To create a short URL:
- Click Create under Short URL.
- Enter the Link name. This name identifies the link in reports.
- Select the Domain to use for shortening the link.
- Enter the Long URL to shorten.
- Preview the link.
- Click Create.
Choose an SMS template
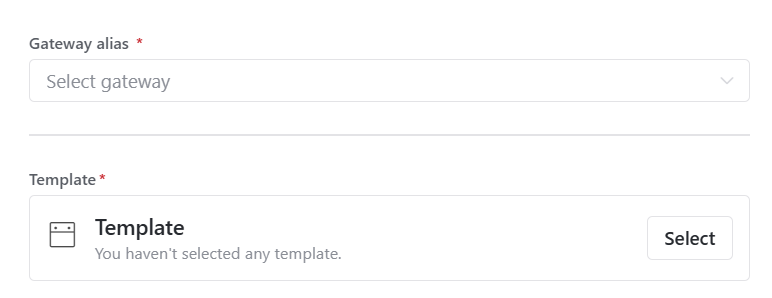
If the recipient’s country is included in the template country list, the template selection option appears.
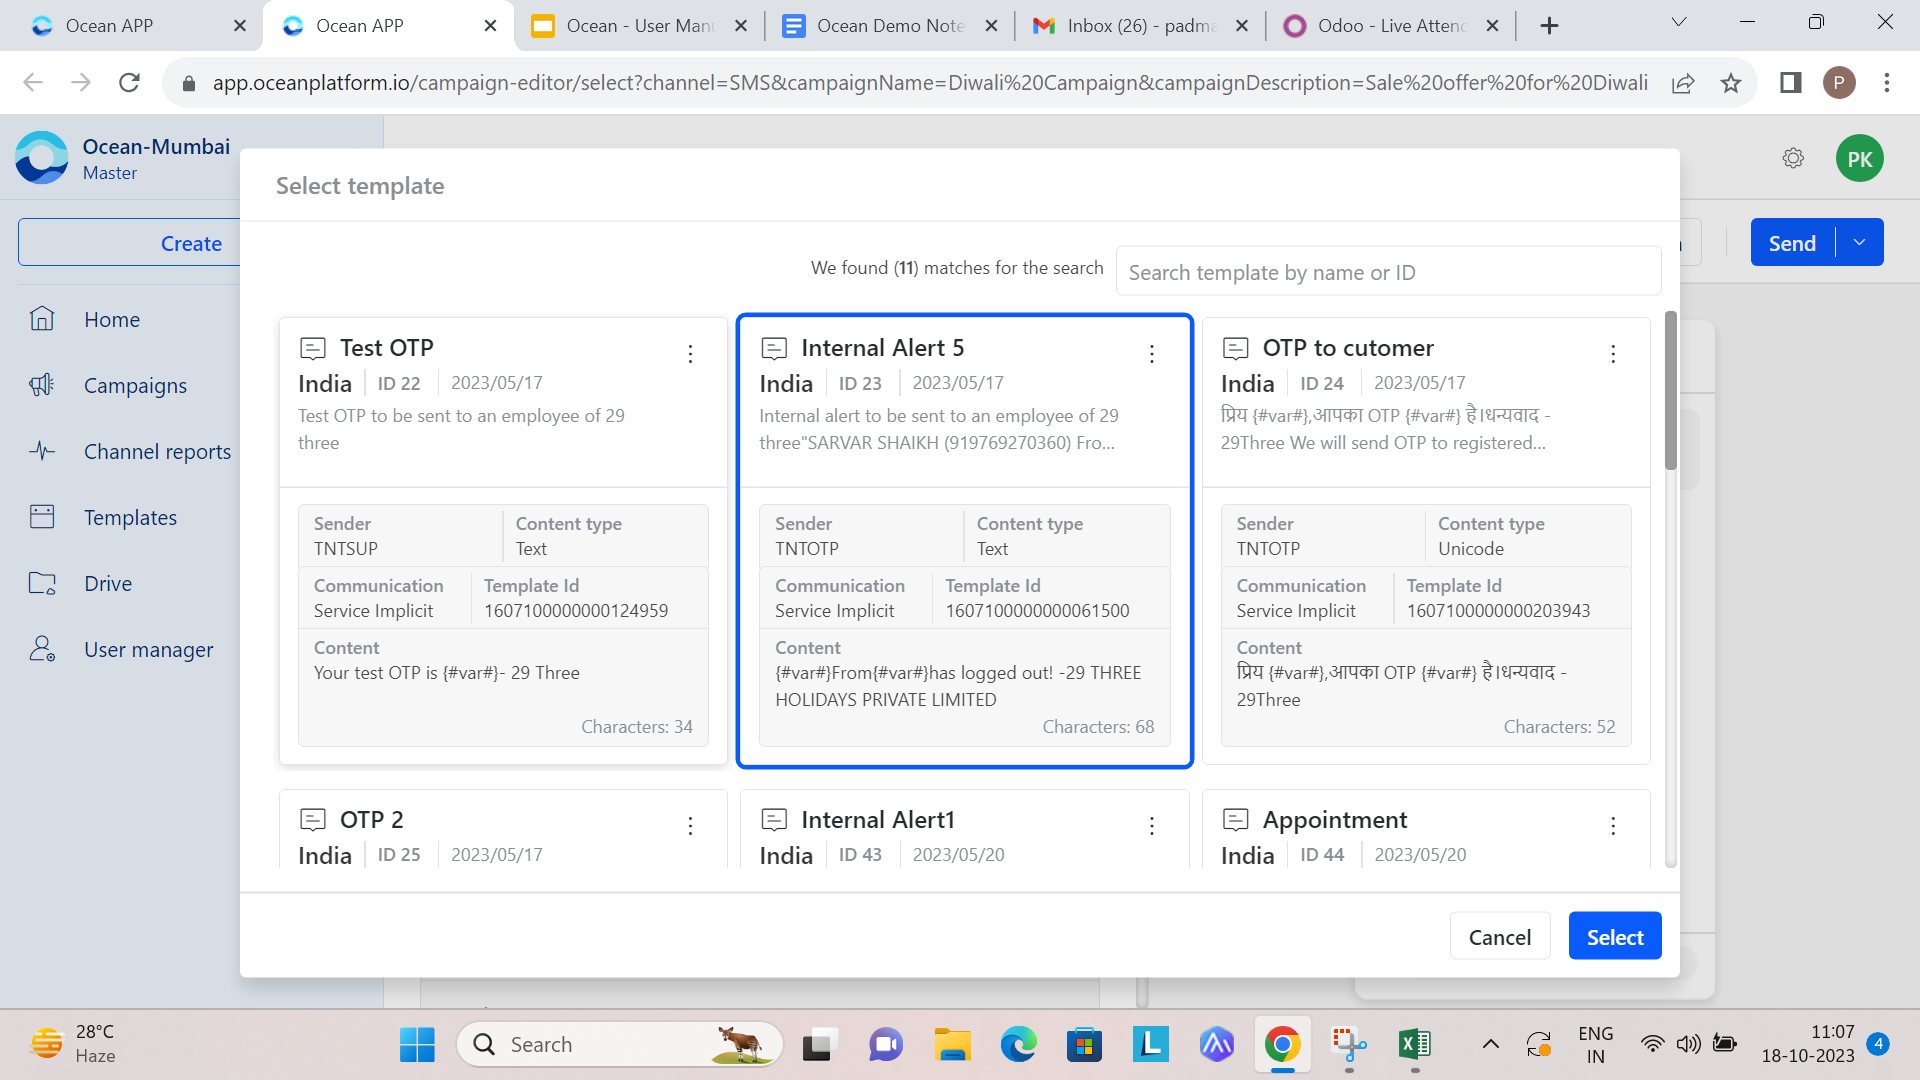
To choose a template:
- Click Select to choose the gateway and template.
- Choose the template from the Select Template window.
- Click Select.
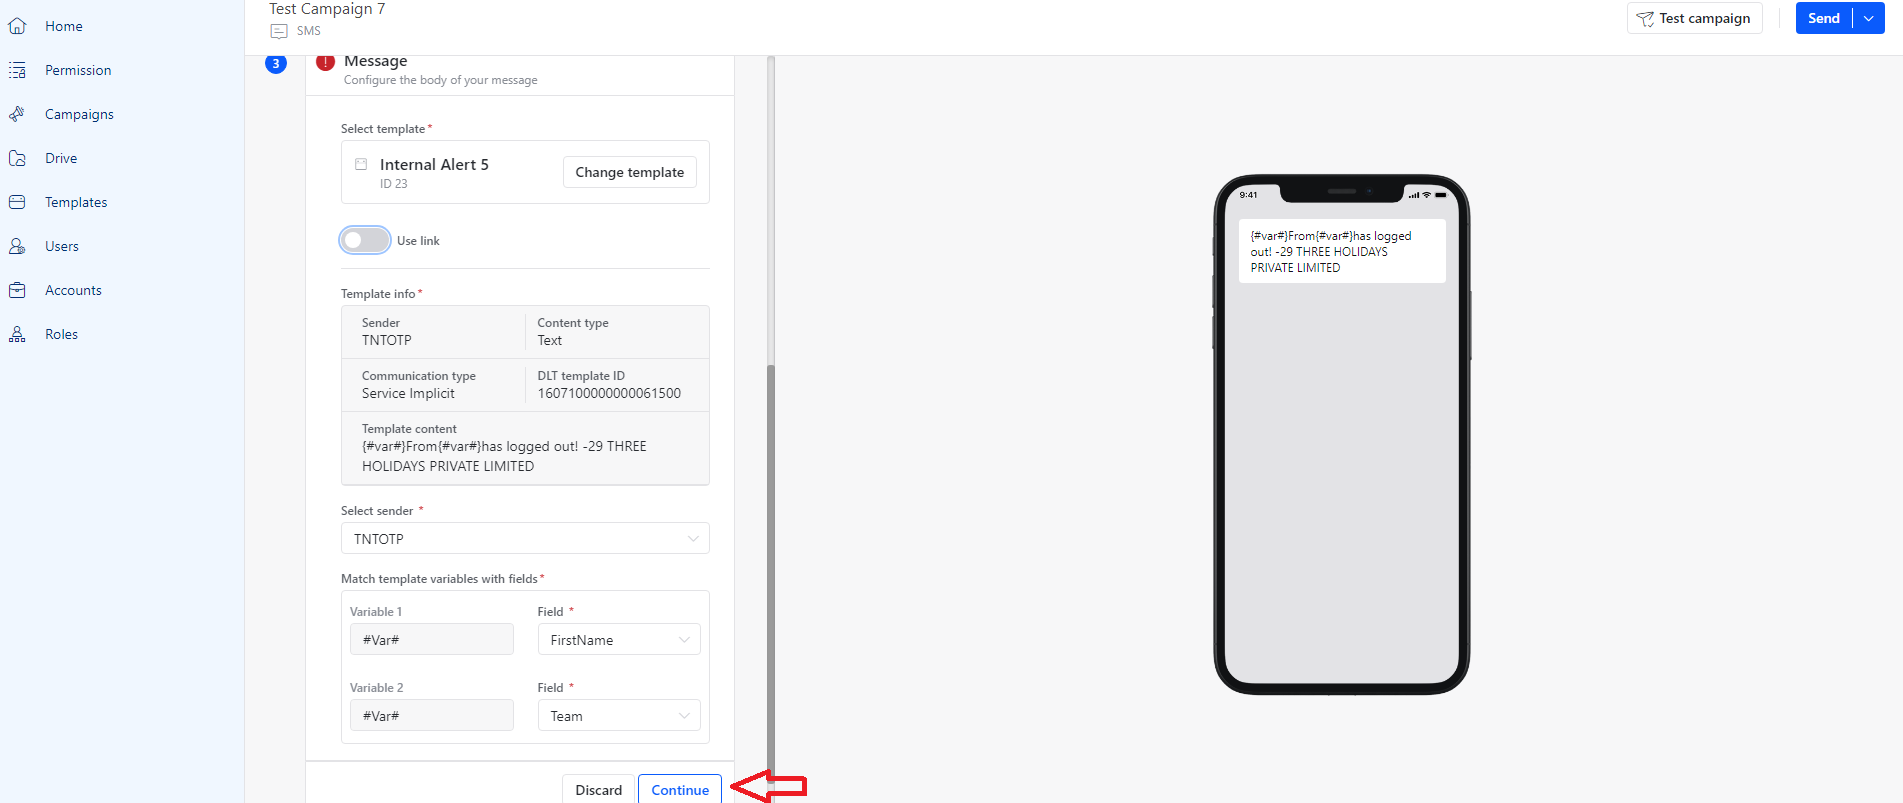
Finalize SMS template configuration
After selecting a template:
- Use Change template if you want to choose a different template.
- Verify the content under Template information.
- Select the Sender.
- Match template variables with the fields that contain variable data.
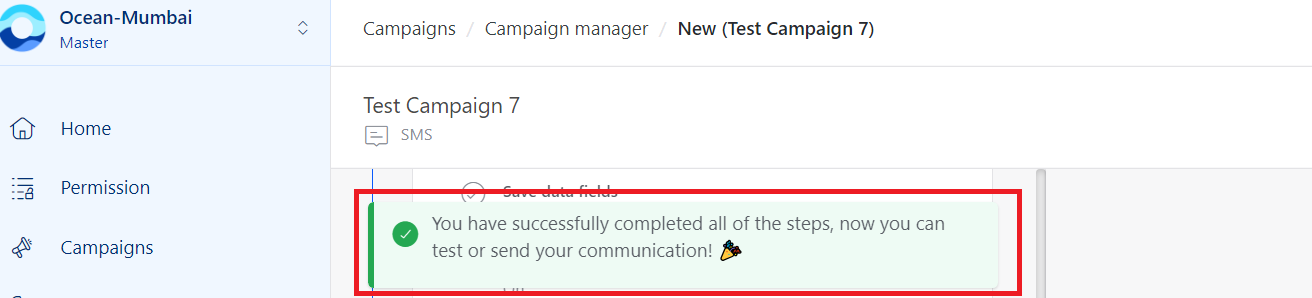
- Click Send in the top-right corner.
- Confirm the message when prompted.
Optional: Create SMS message content for non-template countries
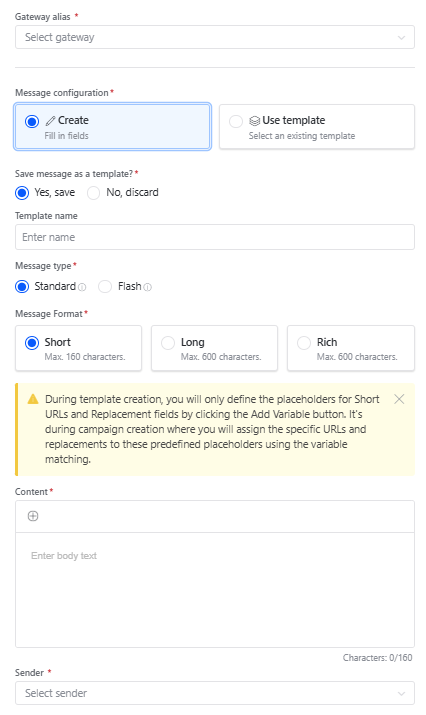
If the recipient’s country is not included in the template country list, the Create option appears in message configuration.
Use this flow to:
- Select the Gateway for campaign execution.
- Configure the message content.
- Save the newly created content as a template, if needed.
- Select the Sender for delivery.
- Click Send in the top-right corner.
- Confirm the message when prompted.
Test an SMS campaign
Test the campaign before sending it to recipients.
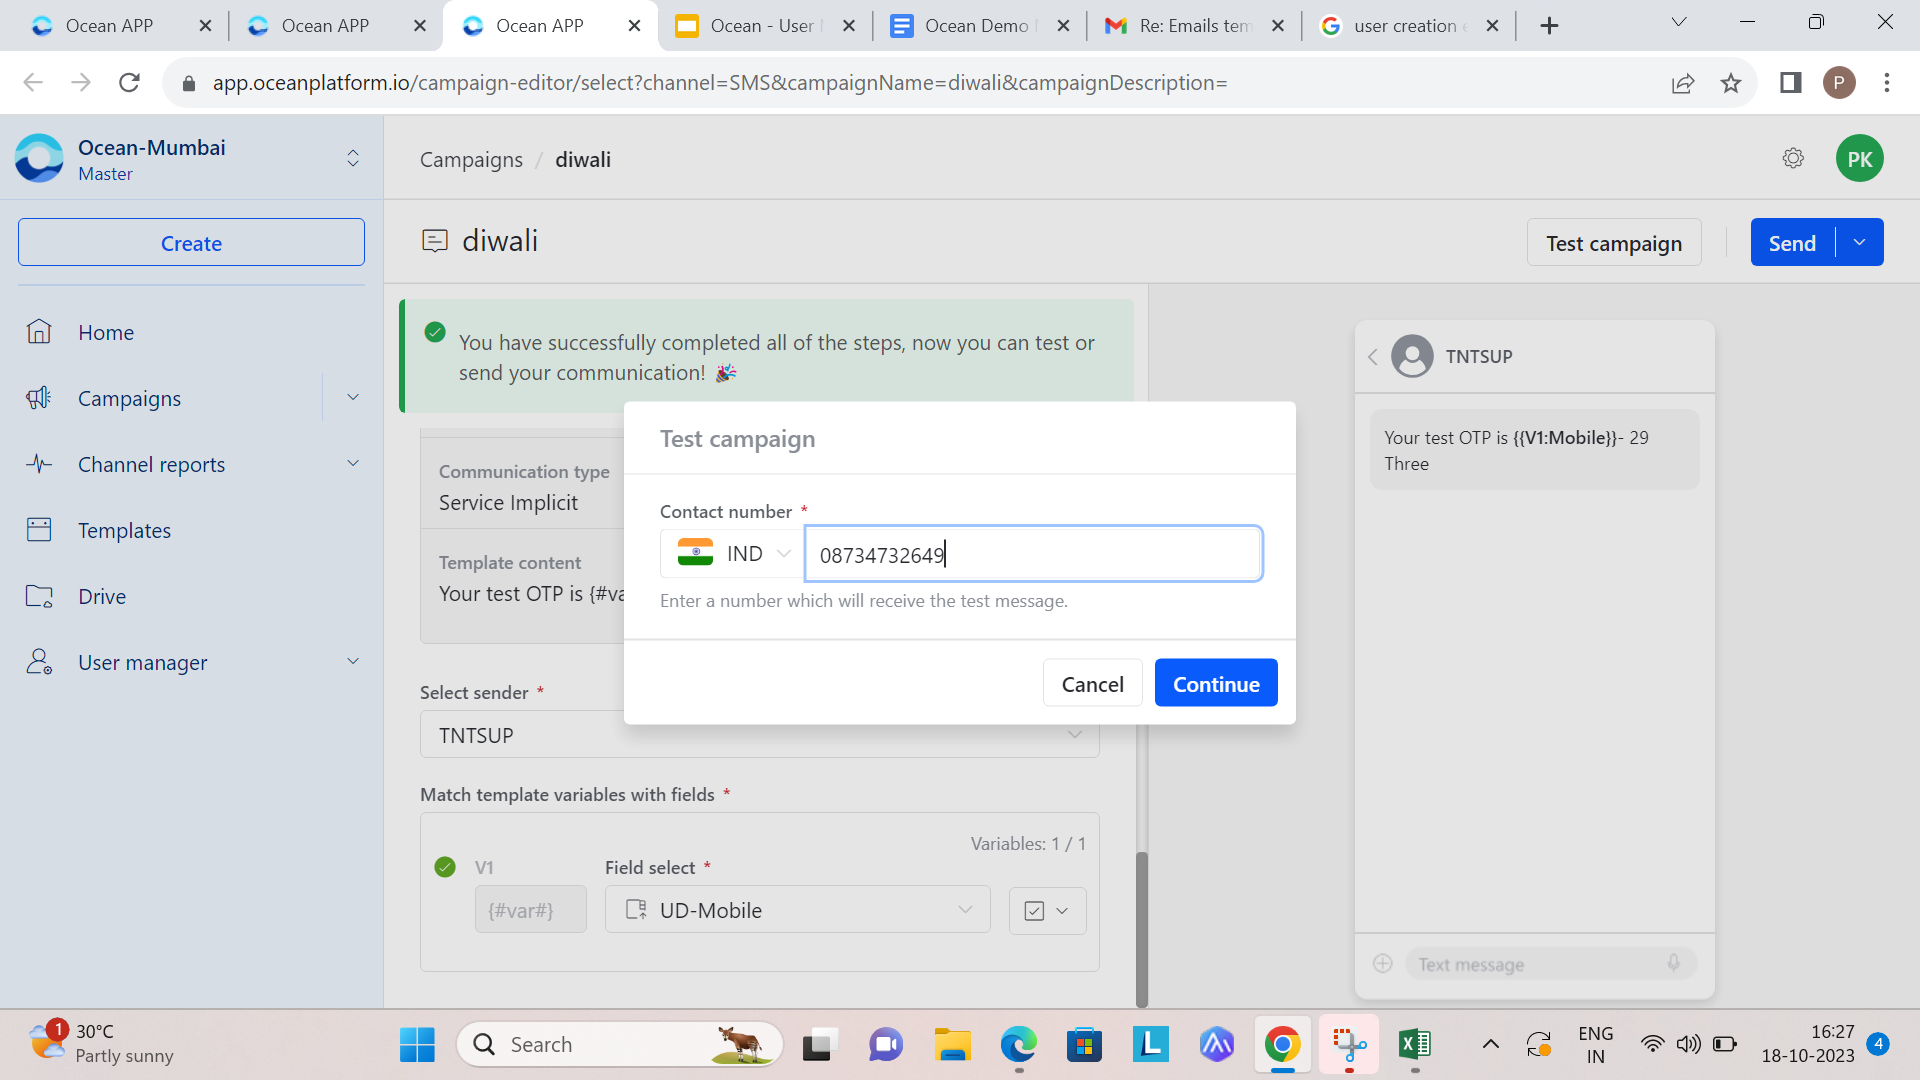
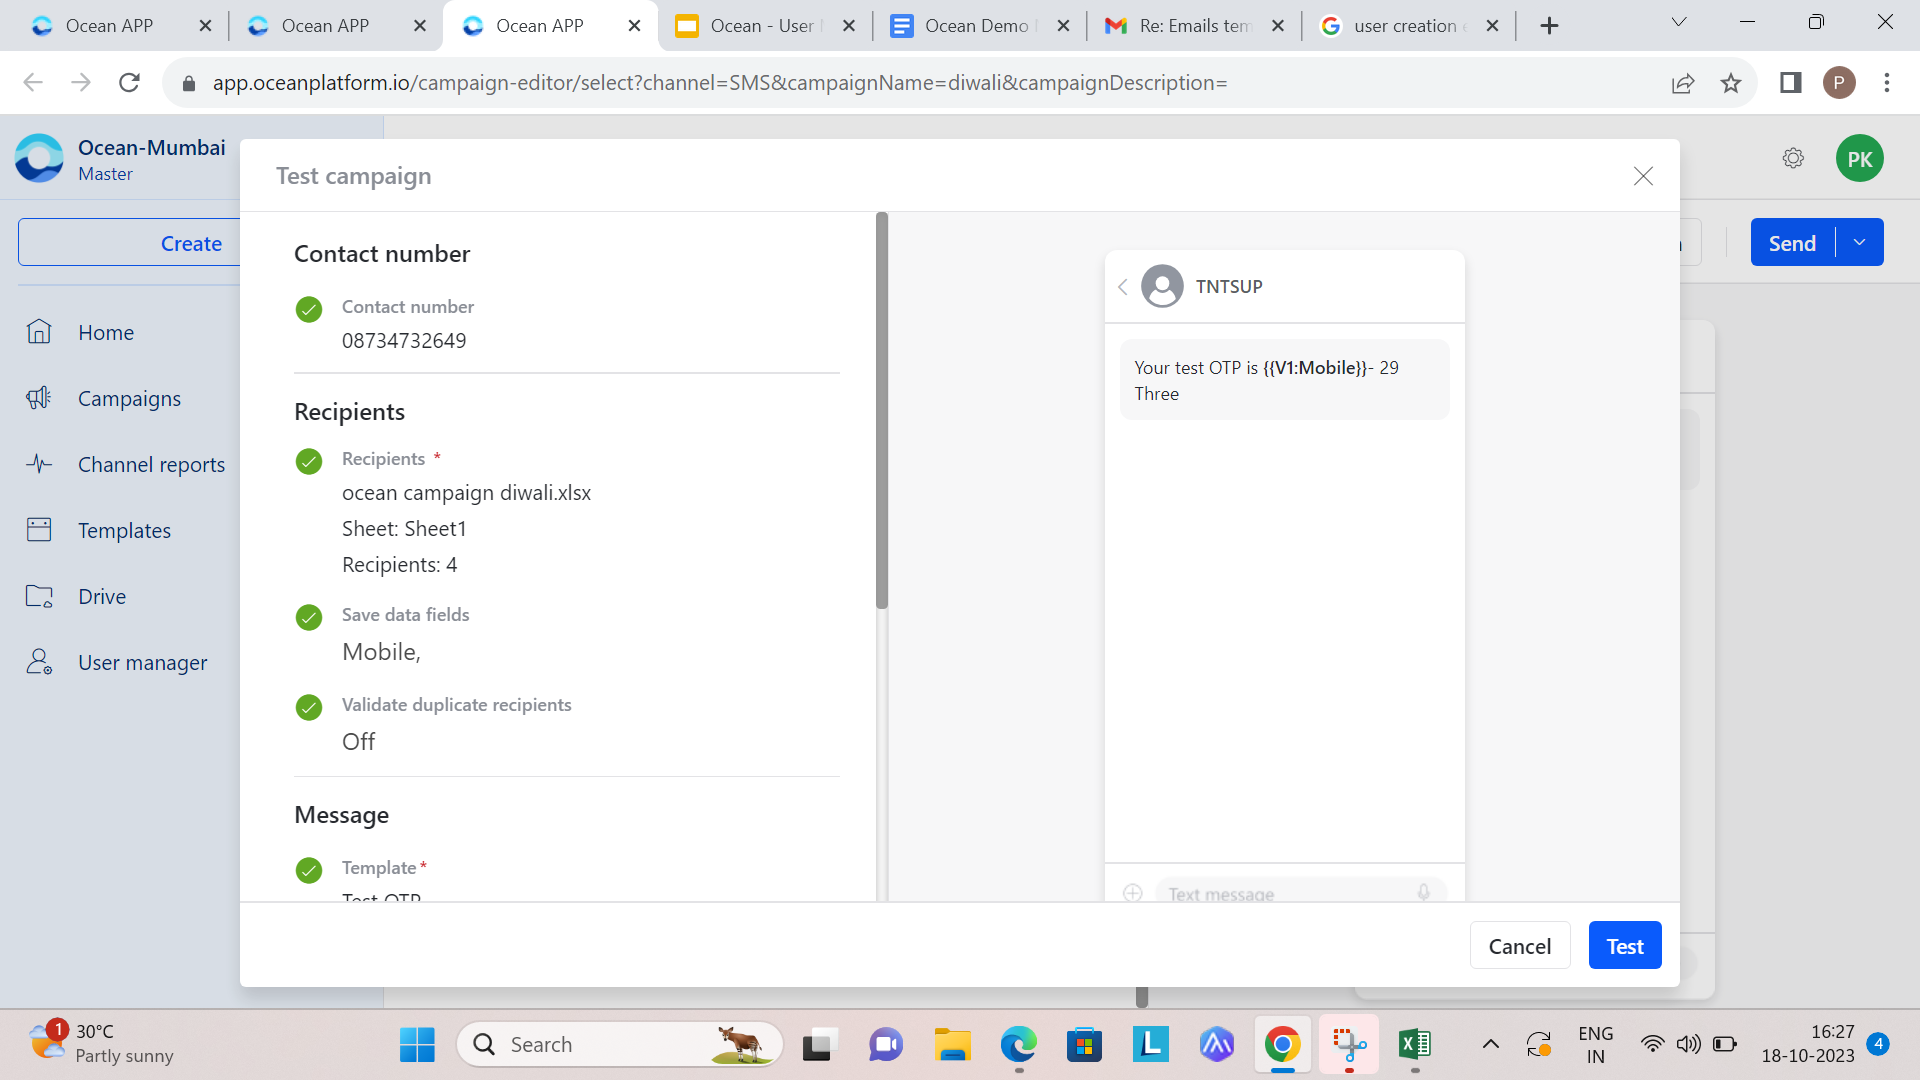
To test an SMS campaign:
- Click Test Campaign in the top-right corner.
- Select the Country from the dropdown list.
- Enter the contact number that should receive the test message.
- Click Continue.
- Verify the information in the dialog box.
- Click Test.
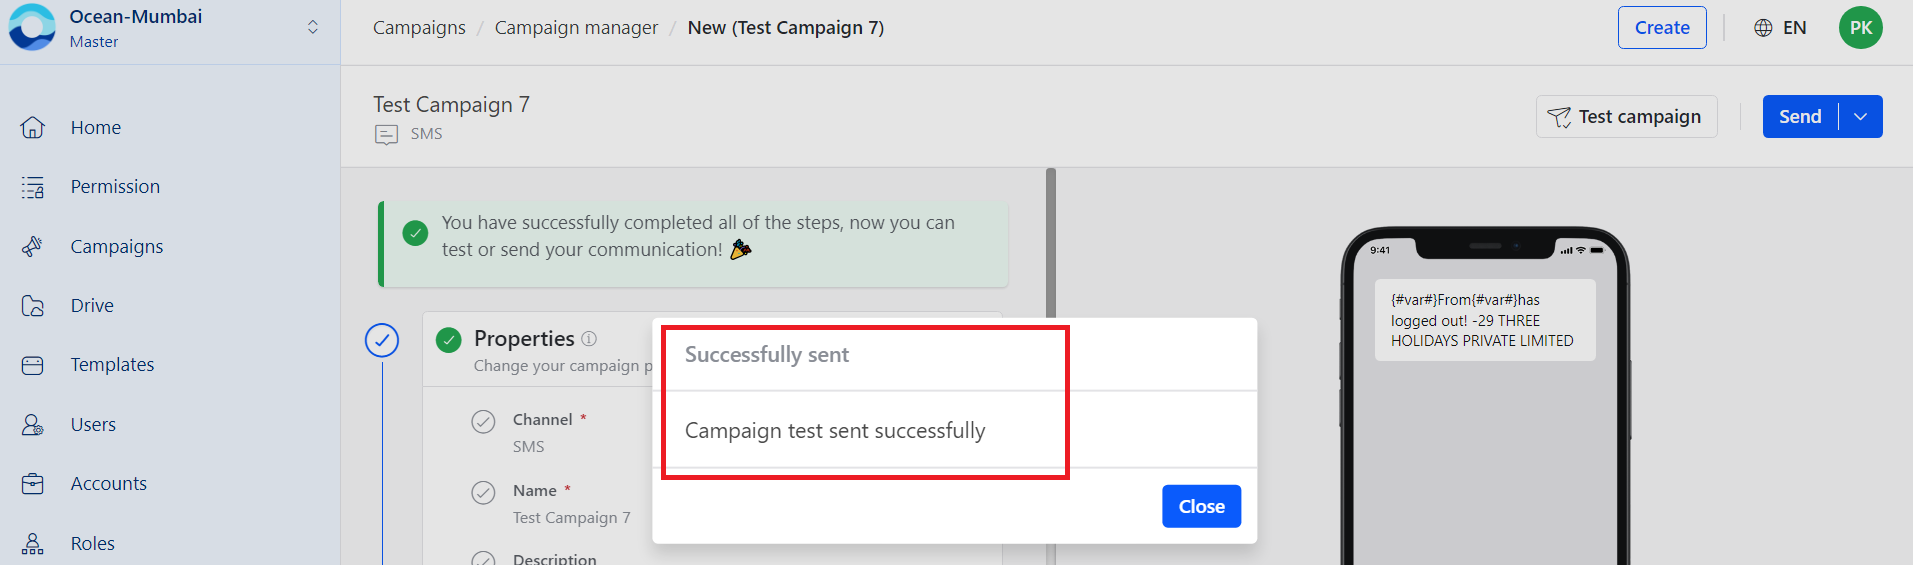
After a successful test, a confirmation message appears and the test message is delivered to the provided mobile number.
Send an SMS campaign
To send an SMS campaign immediately:
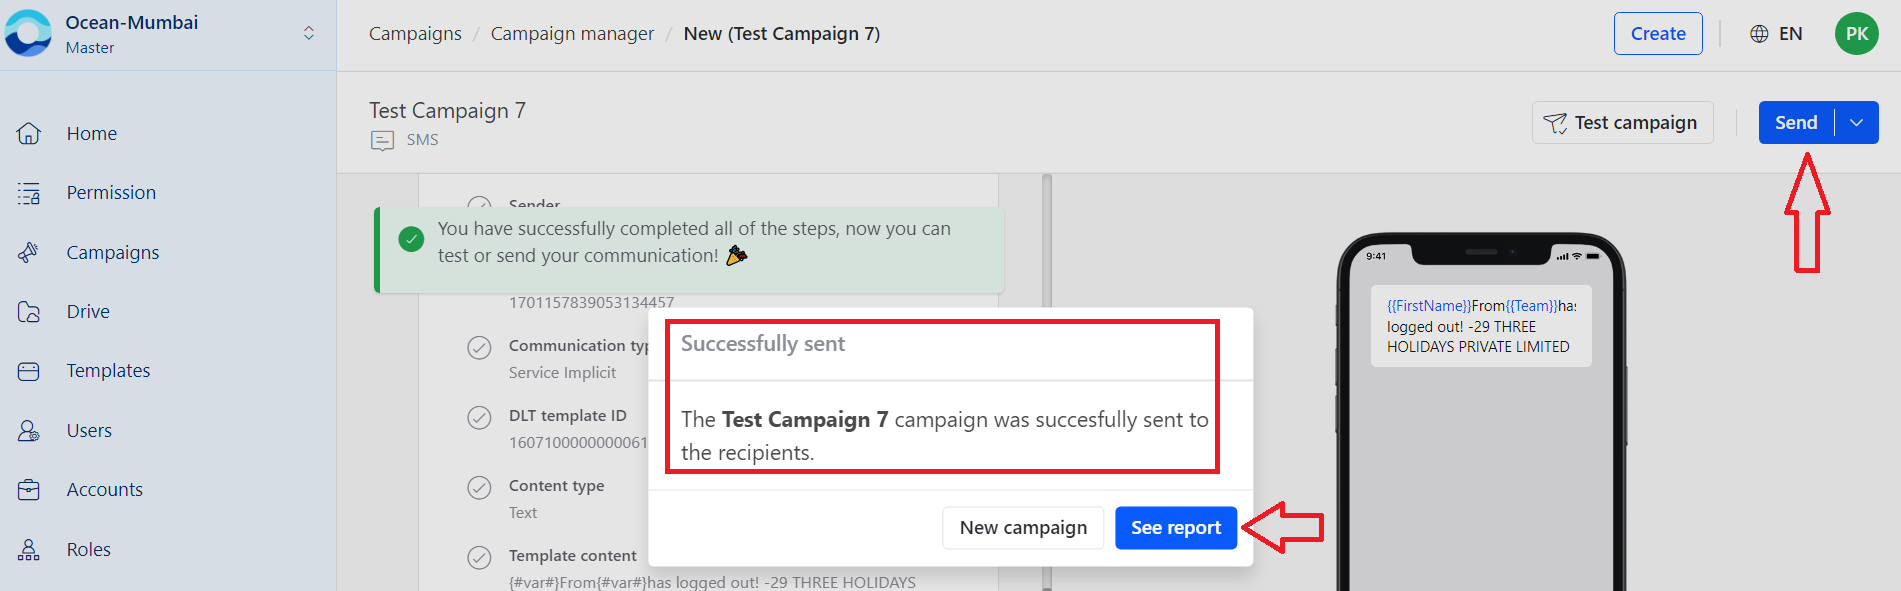
- Click Send on the right side.
- Confirm the send action in the popup window.
- Click See report to check campaign status.
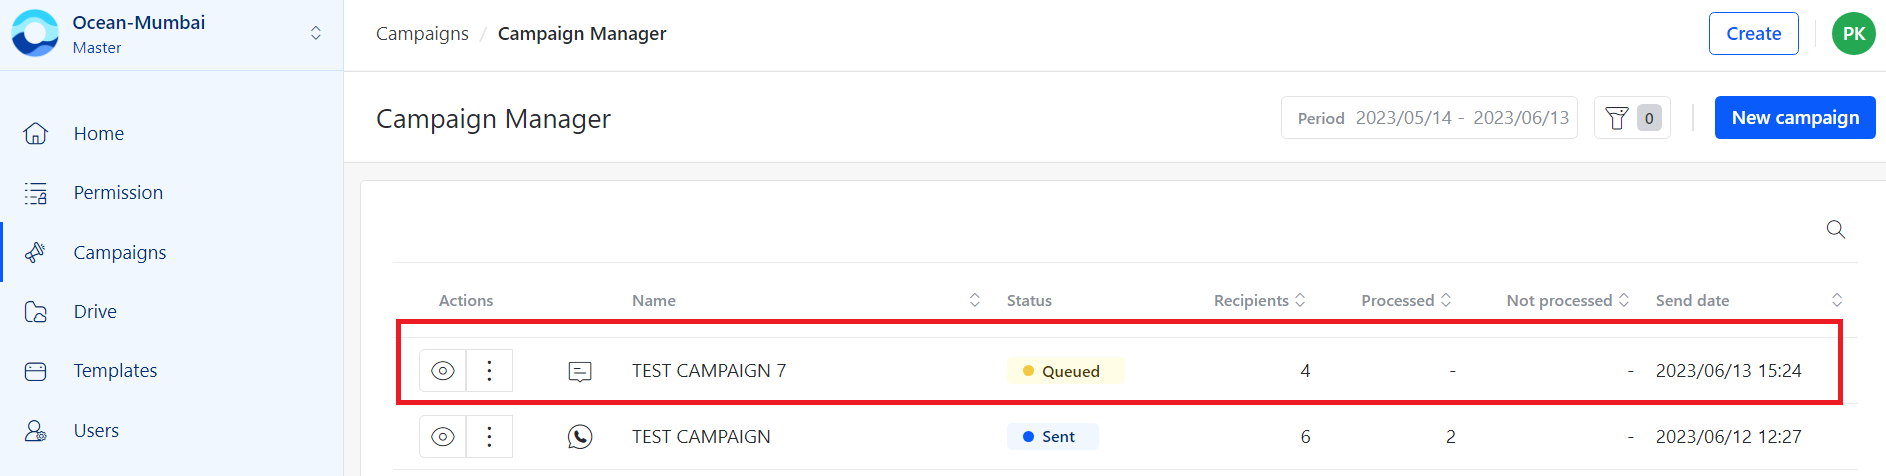
The campaign appears in the campaign manager immediately with the status Queued. The status changes to Sent after successful delivery.
Schedule an SMS campaign
Use scheduling to send a campaign at a later time.
To schedule an SMS campaign:
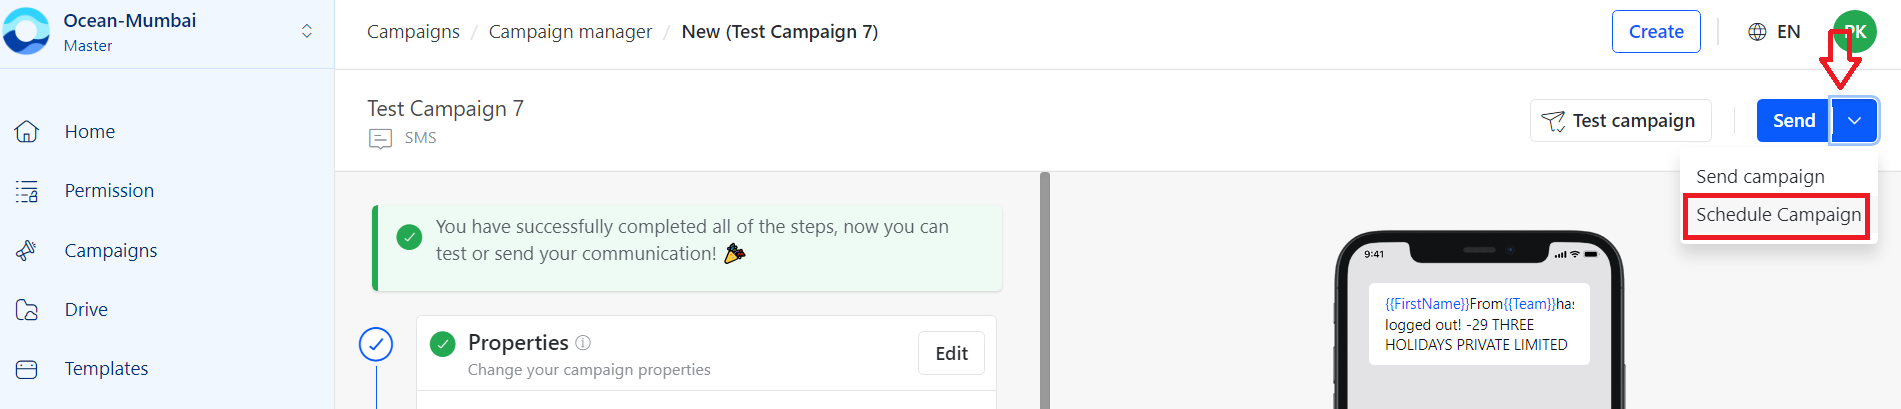
- Click the dropdown next to Send.
- Select Schedule Campaign.
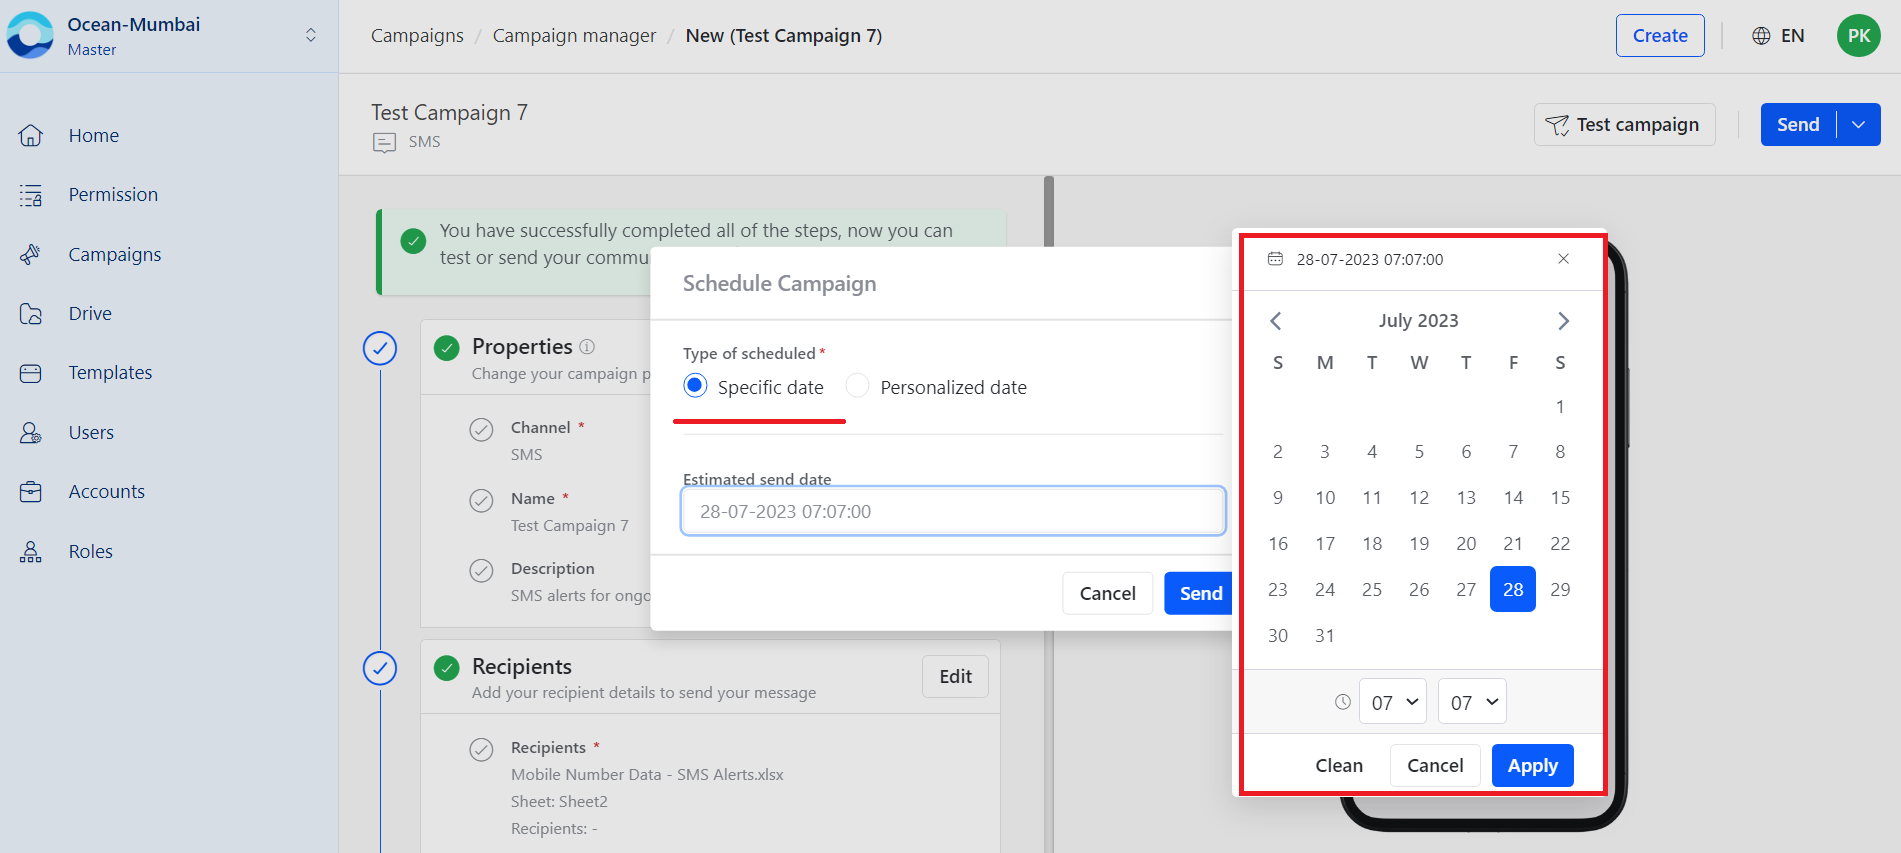
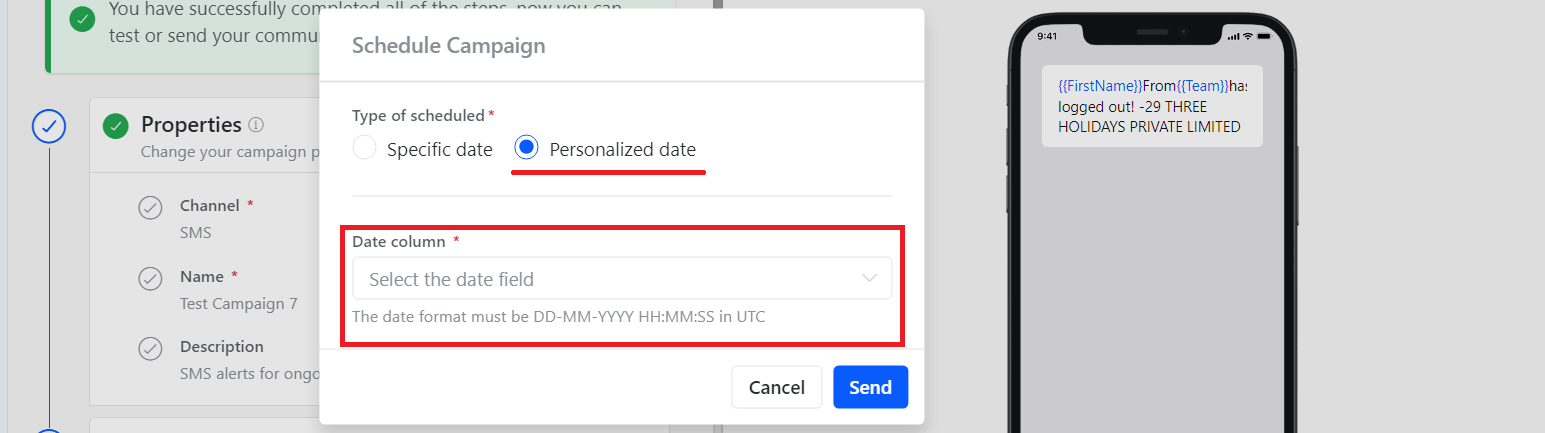
- Choose one of the schedule options:
- Specific date: Select a date from the calendar.
- Personalized date: Select the date column from the uploaded Excel sheet.
- Click Send.
The campaign appears in the campaign manager with the status Scheduled.
WhatsApp campaigns
Use the WhatsApp campaign flow to create a campaign, upload recipients, select an approved template, test the campaign, and send or schedule it.
Create a WhatsApp campaign
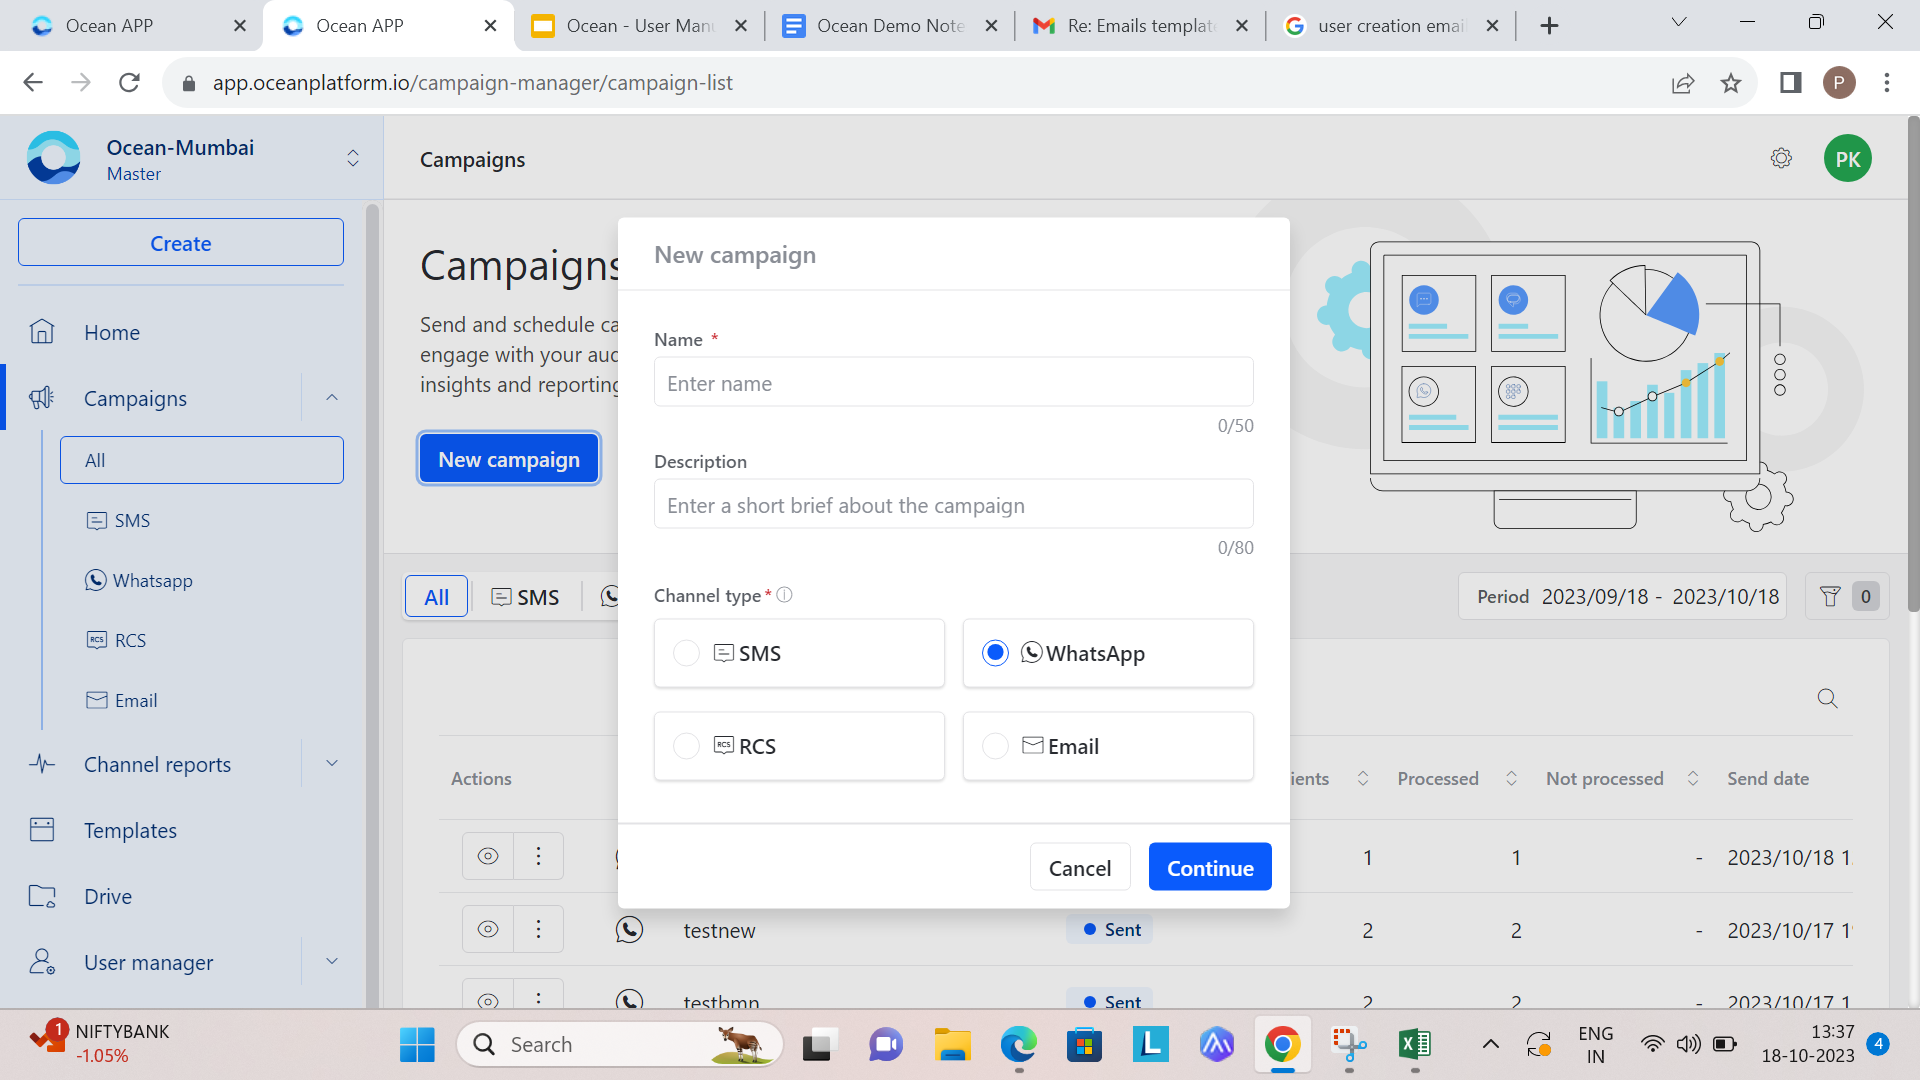
To create a WhatsApp campaign:
- Click New Campaign. A popup window opens.
- Enter the Campaign name.
- Optionally, enter a short campaign description.
- Choose WhatsApp under Channel type.
- Click Continue. A new browser window opens.
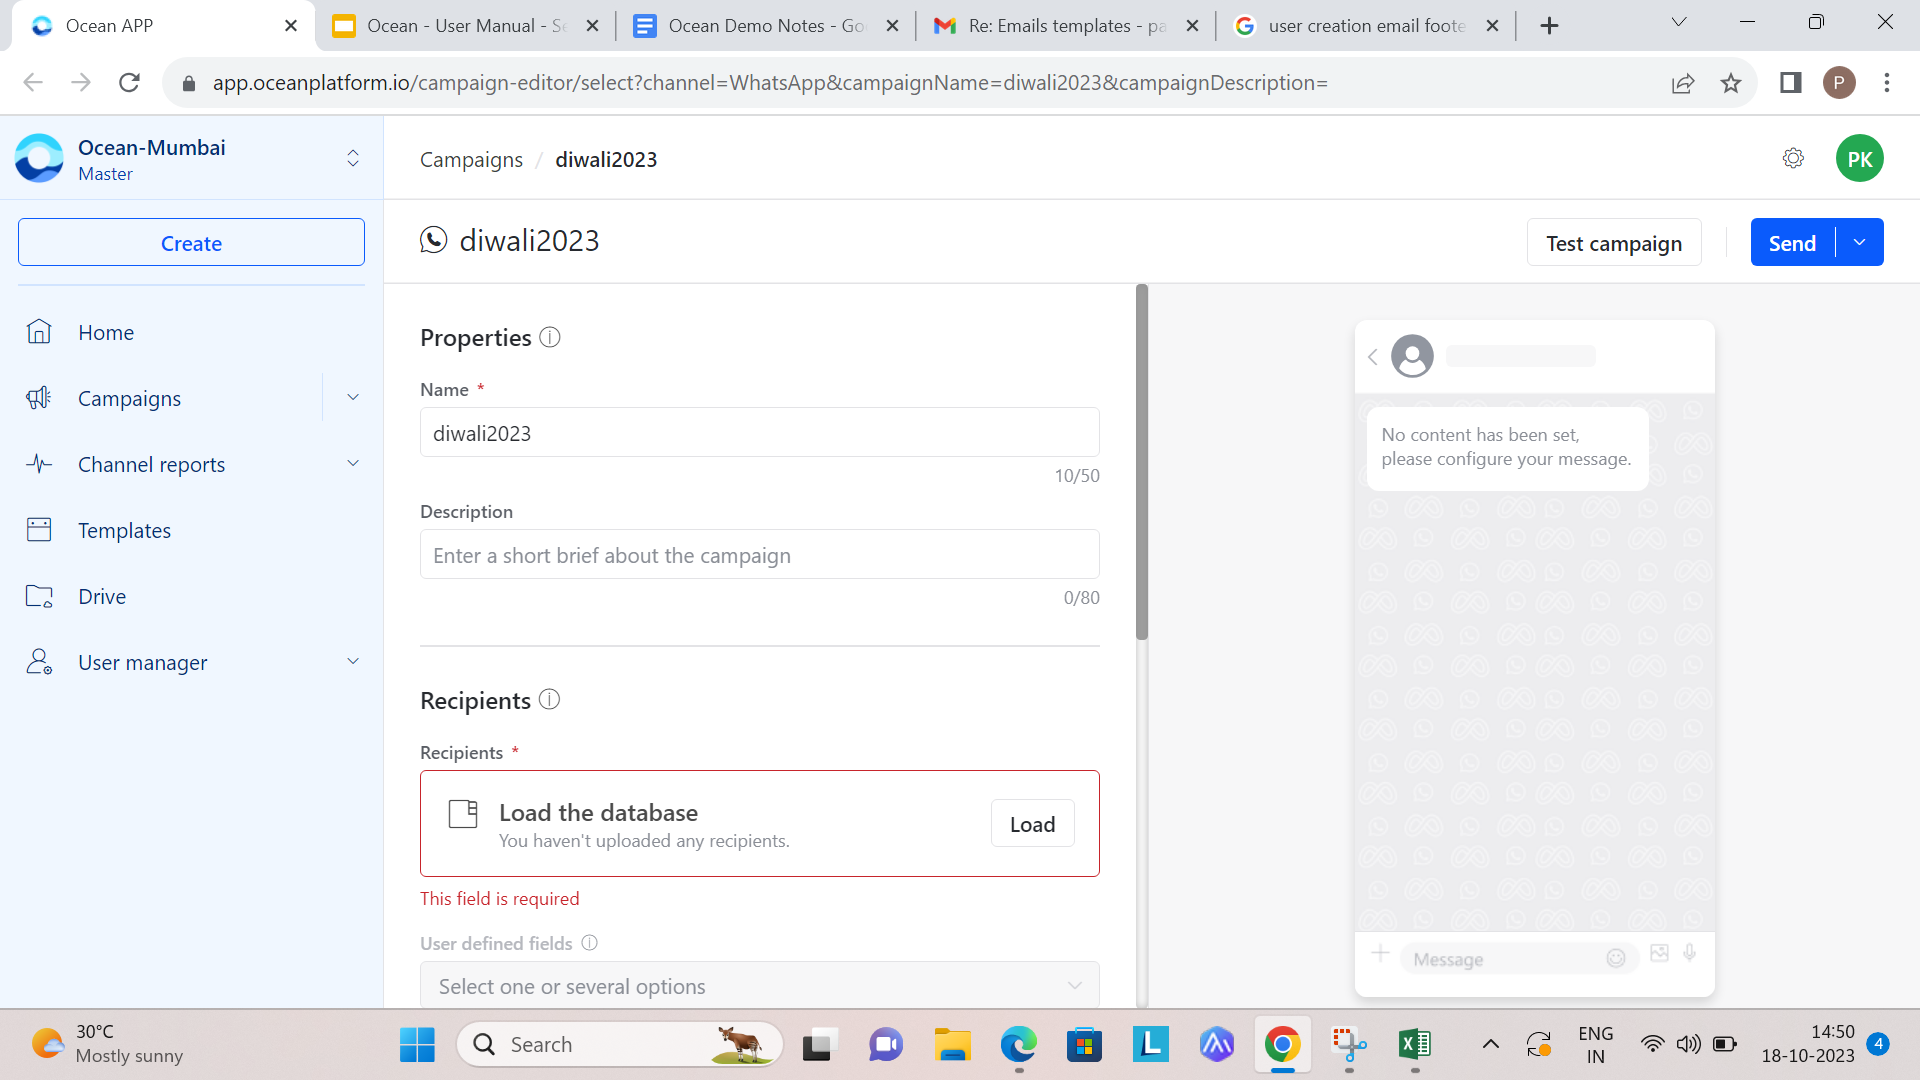
Add WhatsApp recipient data
After creating the campaign, verify the details in the Properties and Description sections.
To add recipients:
- Confirm that the campaign properties are correct.
- Click Load to add recipients.
- Create an Excel or CSV file with recipients in the required format.
- Upload the file.
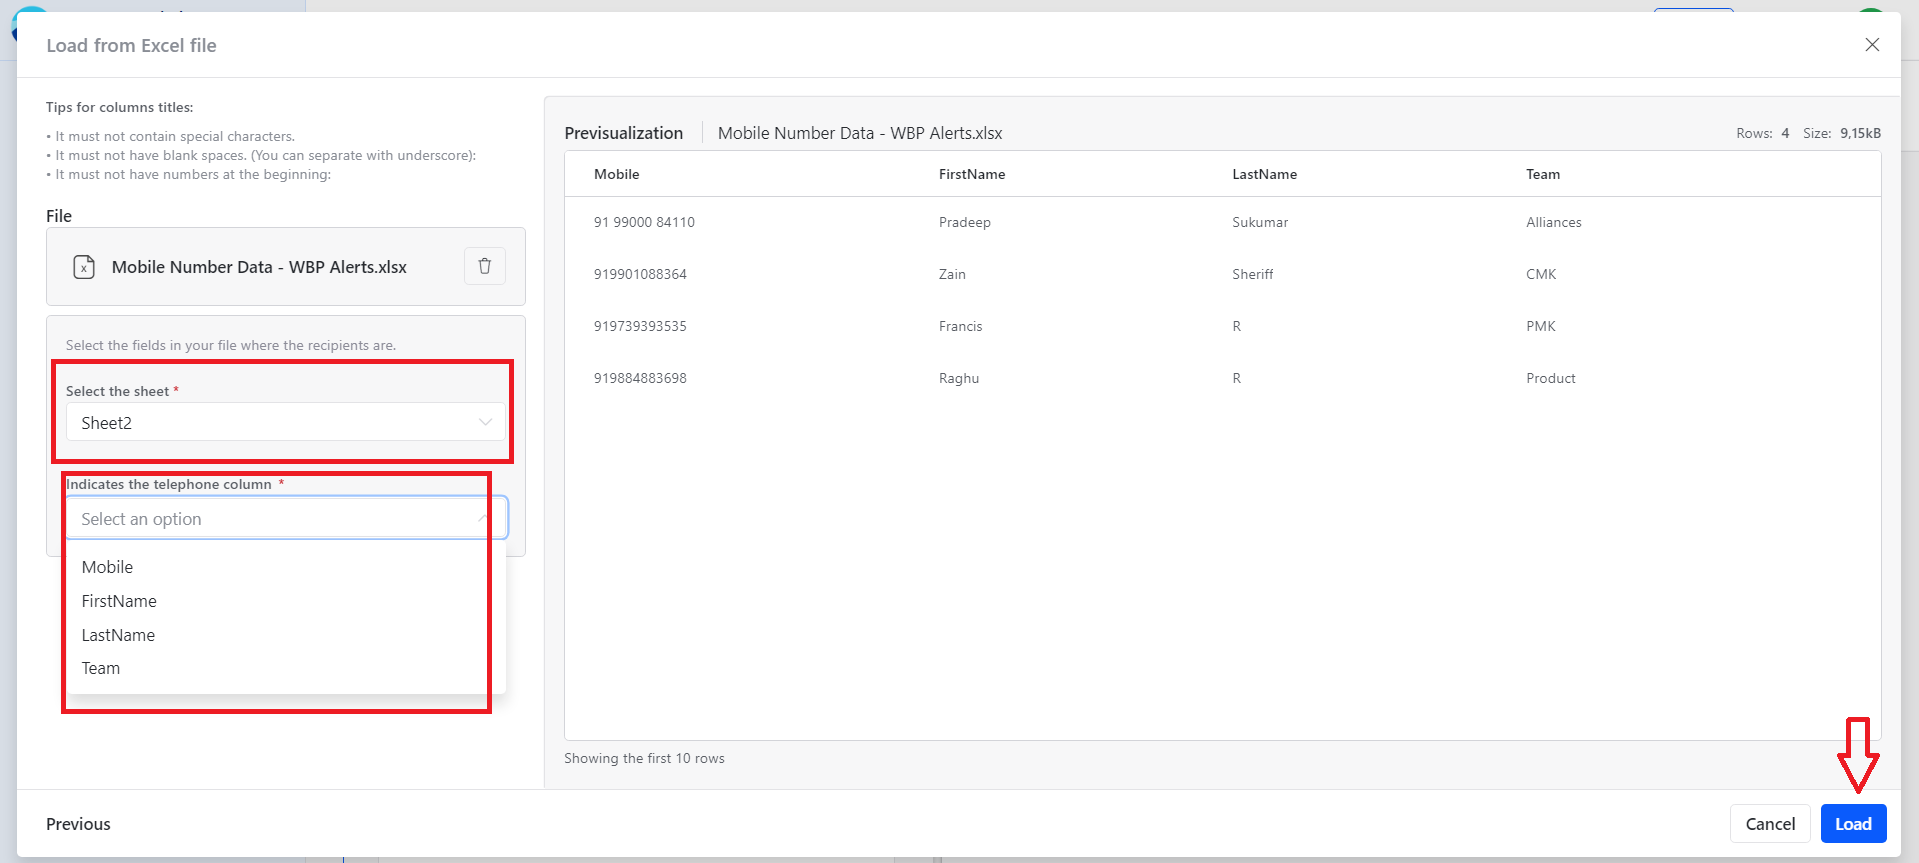
Load WhatsApp recipient data
After uploading the Excel sheet:
- Click Pre Visualize to preview the uploaded data.
- Select the sheet that contains your recipient data.
- Select the telephone number column that contains mobile numbers.
- Select user-defined fields if you want the data to appear in reports.
- Enable Validate duplicate recipients to remove duplicate entries.
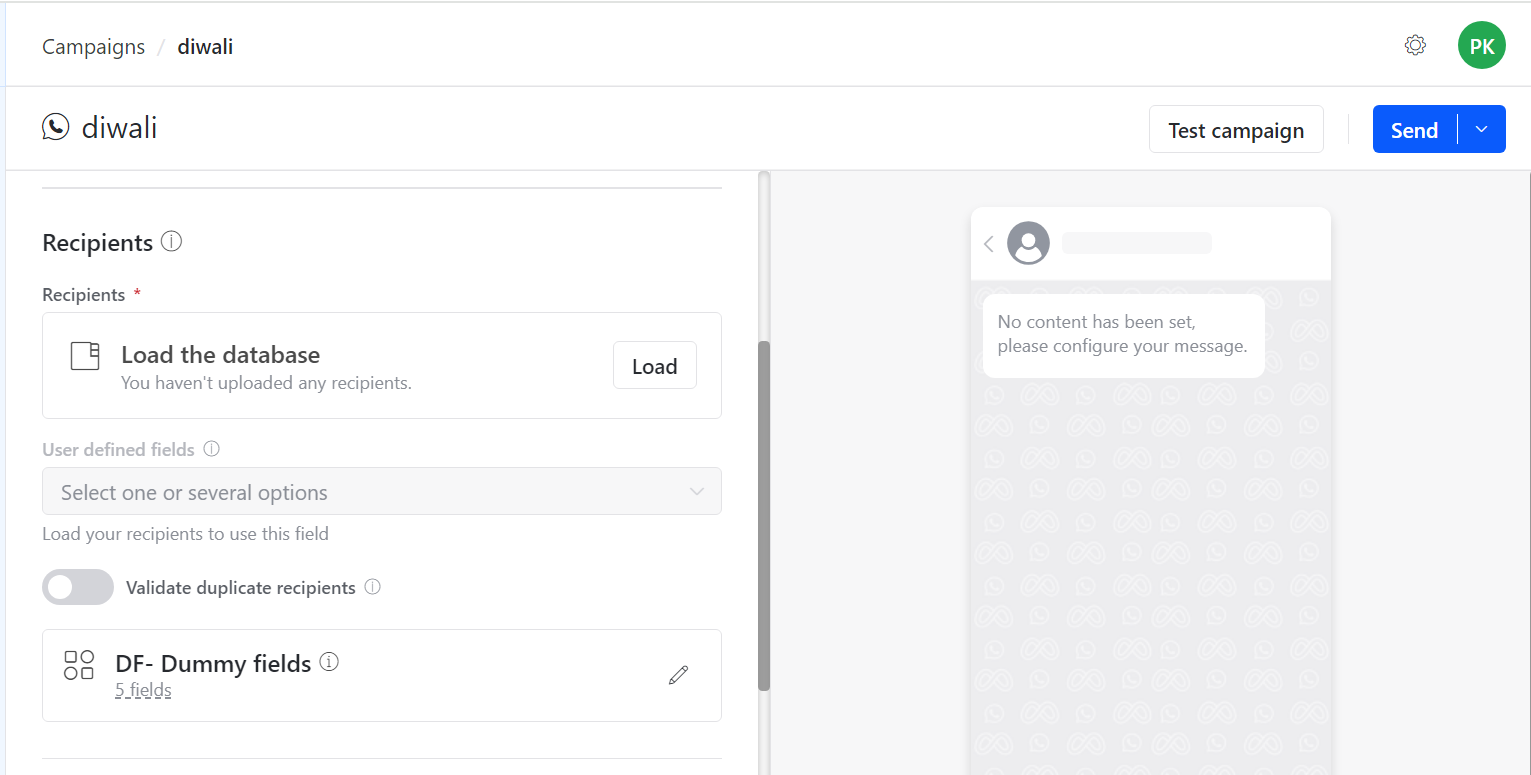
Configure WhatsApp campaign options
Use DF - Dummy fields to enter predefined information when the database has not been loaded for testing.
Use Short URL to create a custom short URL for the campaign:
- Click Create.
- Enter the Link name.
- Select the Domain.
- Enter the Long URL.
- Preview the link.
- Click Create.
Choose a WhatsApp template
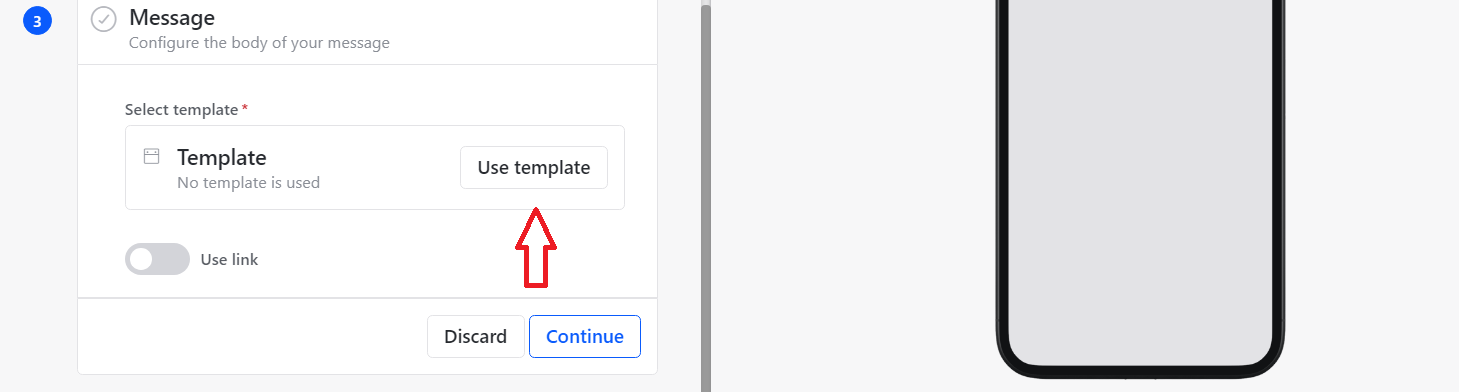
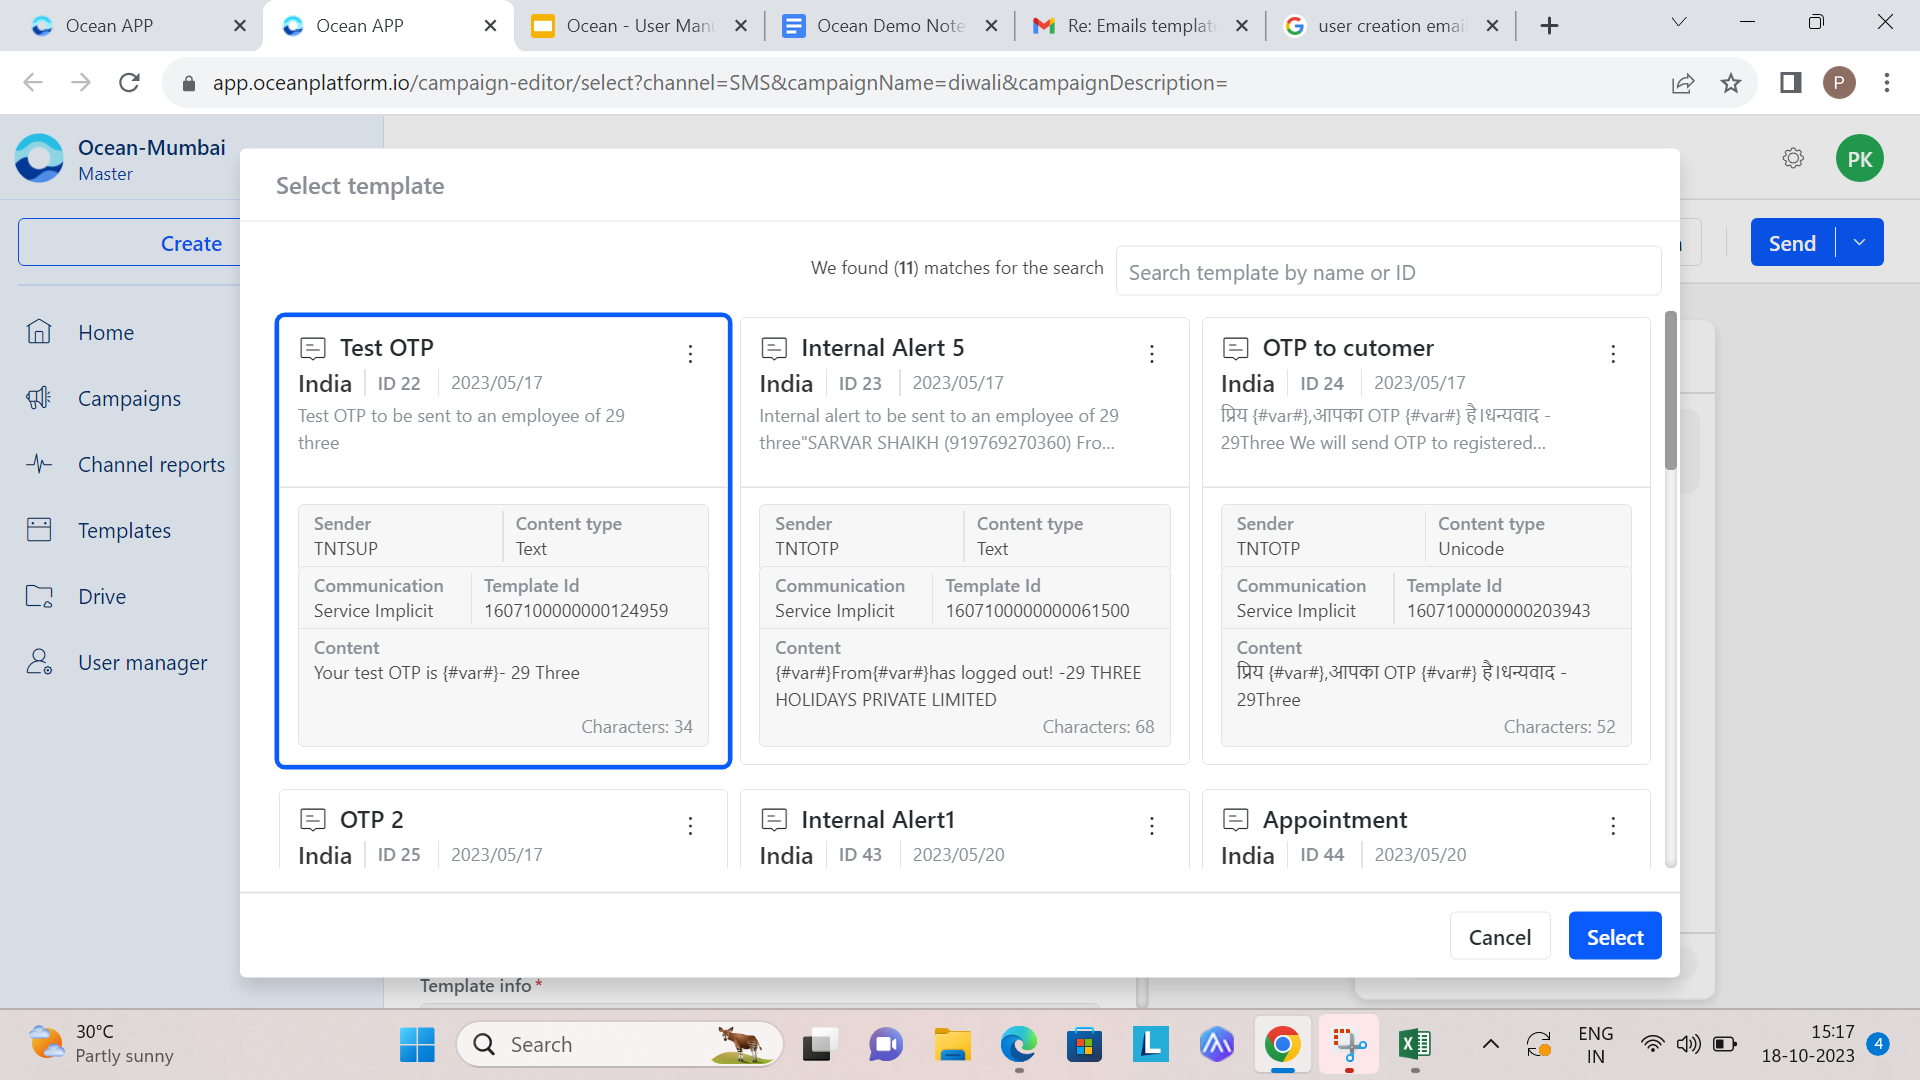
After uploading recipient data, choose an approved WhatsApp template.
To choose a template:
- Click Select.
- Search for a template by entering the template name in the search bar.
- Choose an approved template.
- Click Select.
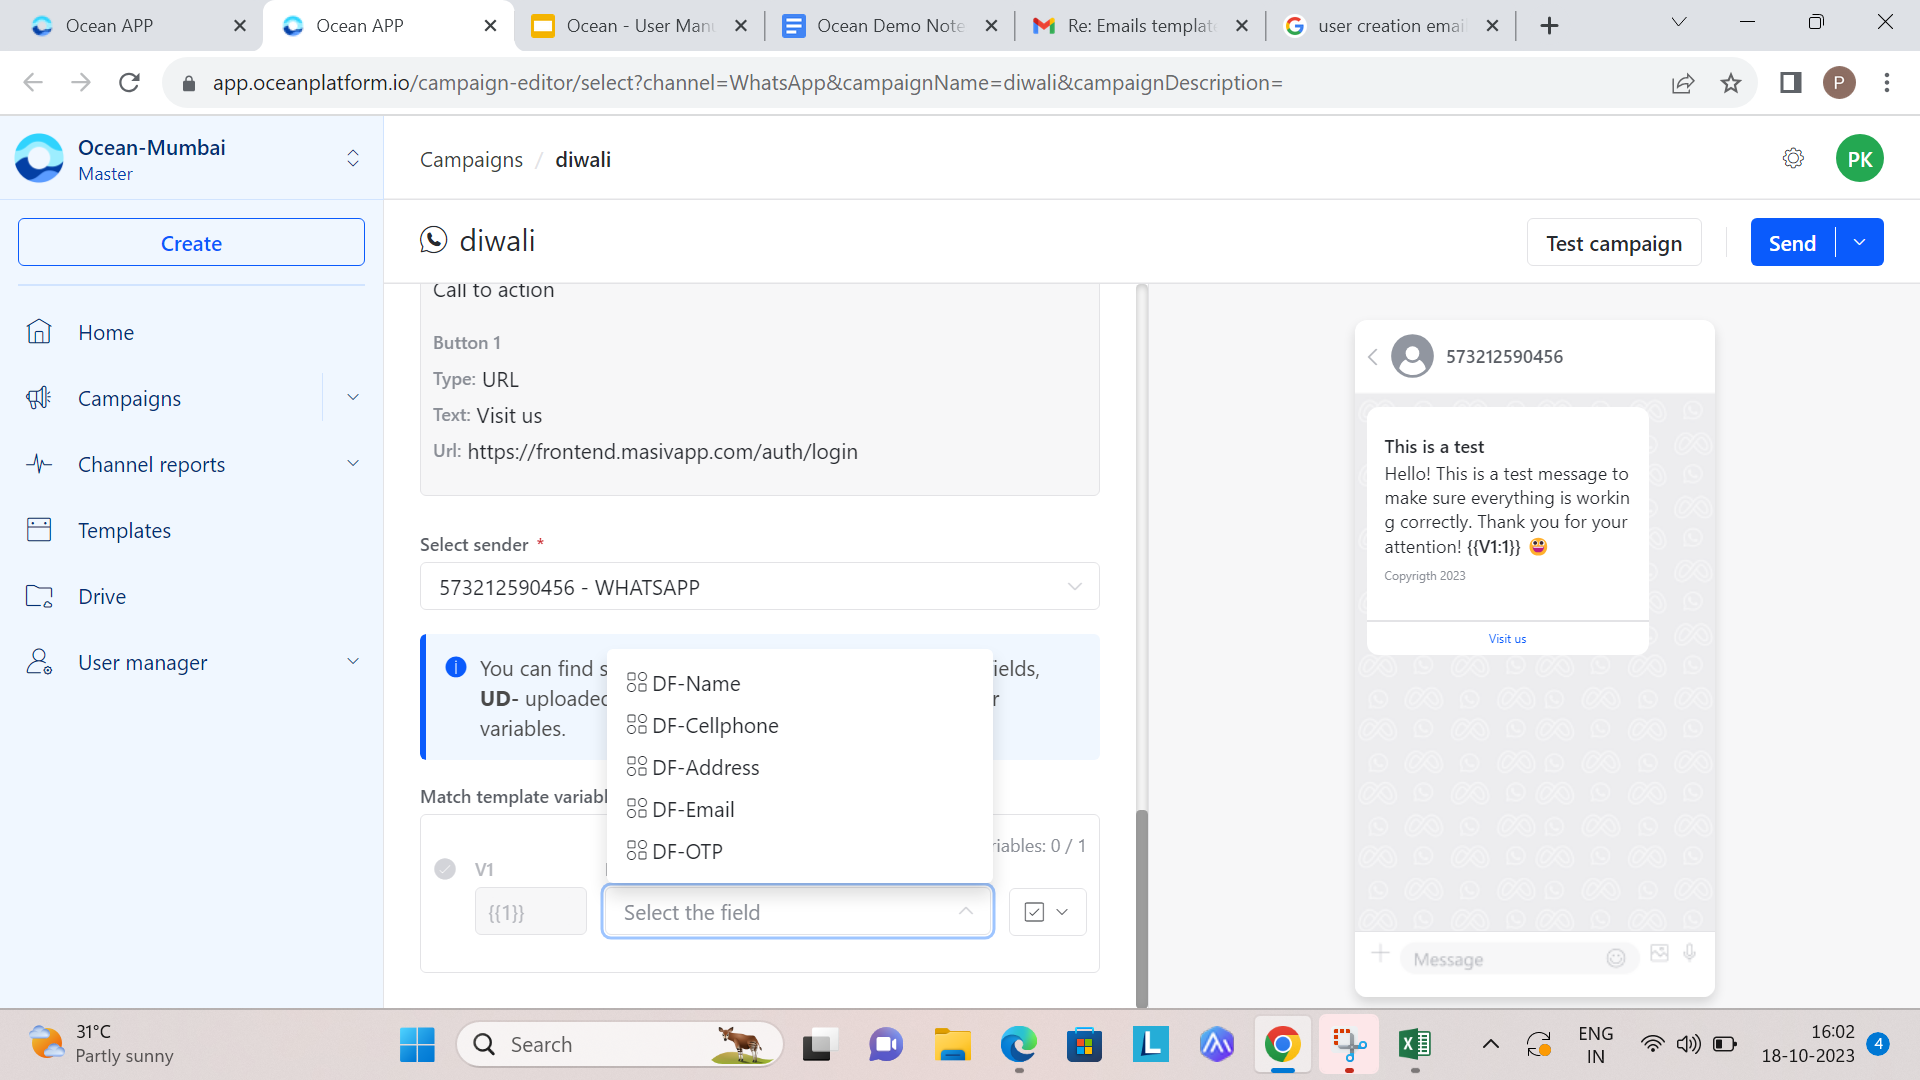
Finalize WhatsApp template configuration
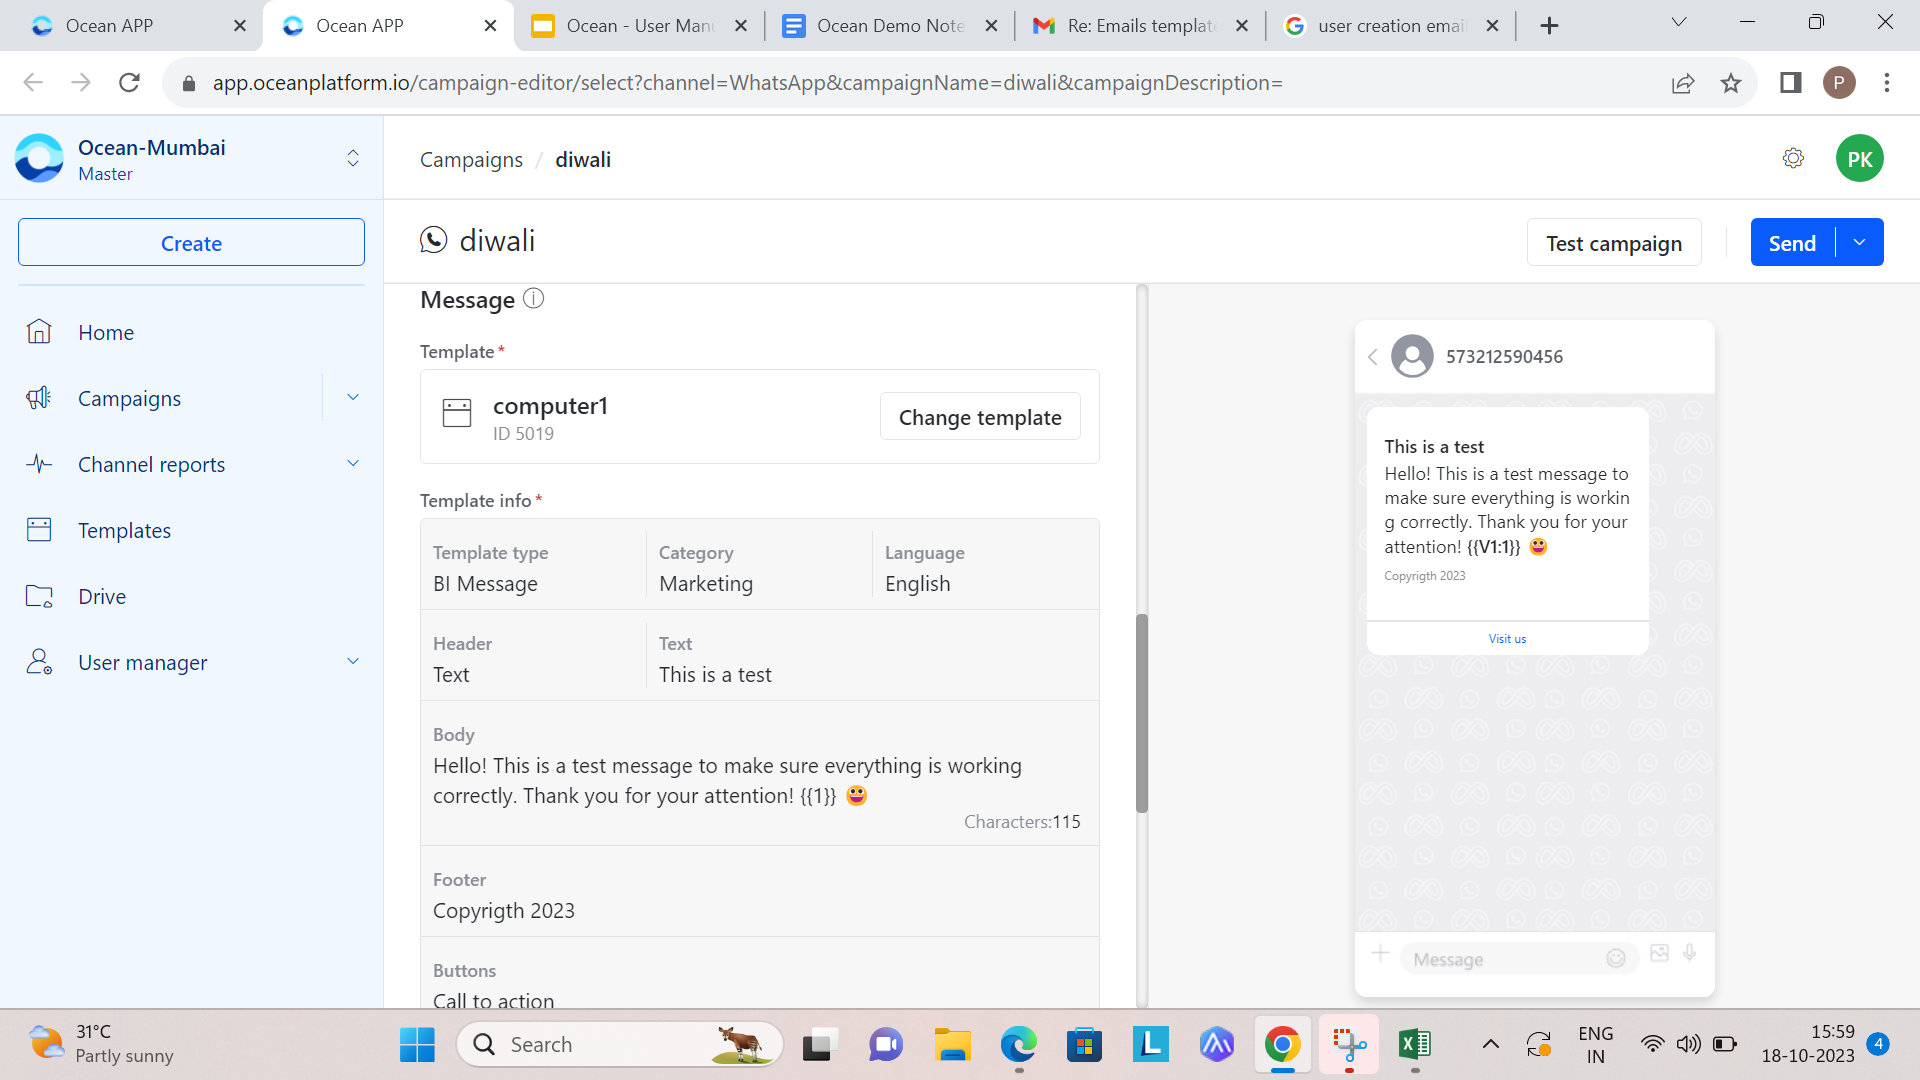
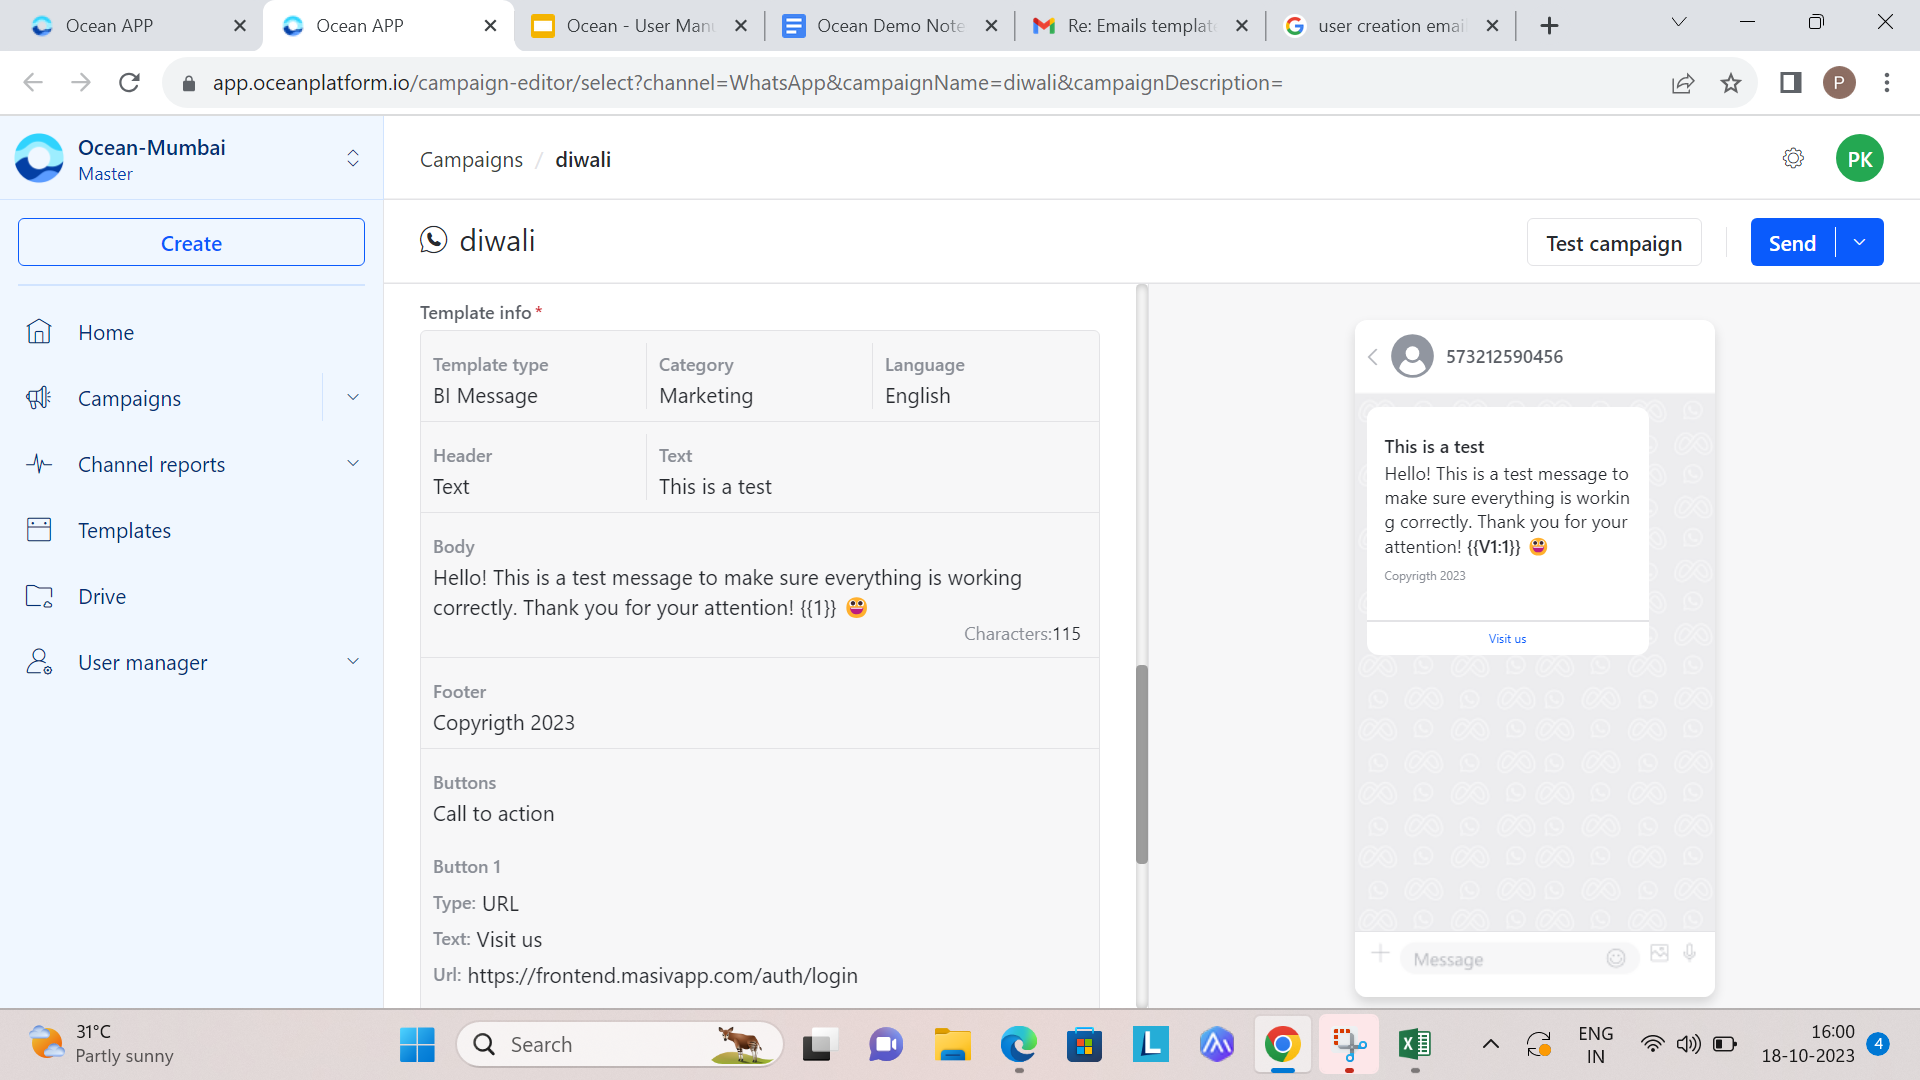
After selecting a template:
- Use Change template if you want to choose a different template.
- Verify the content under Template information.
- Add an image or file under Header Media, if required.
- Match template variables with the fields that contain variable data.
- Click Send in the top-right corner.
- Confirm the message when prompted.
Supported header media formats include .png, image/jpeg, .pdf, .excel, .csv, and .xlsx.
Test a WhatsApp campaign
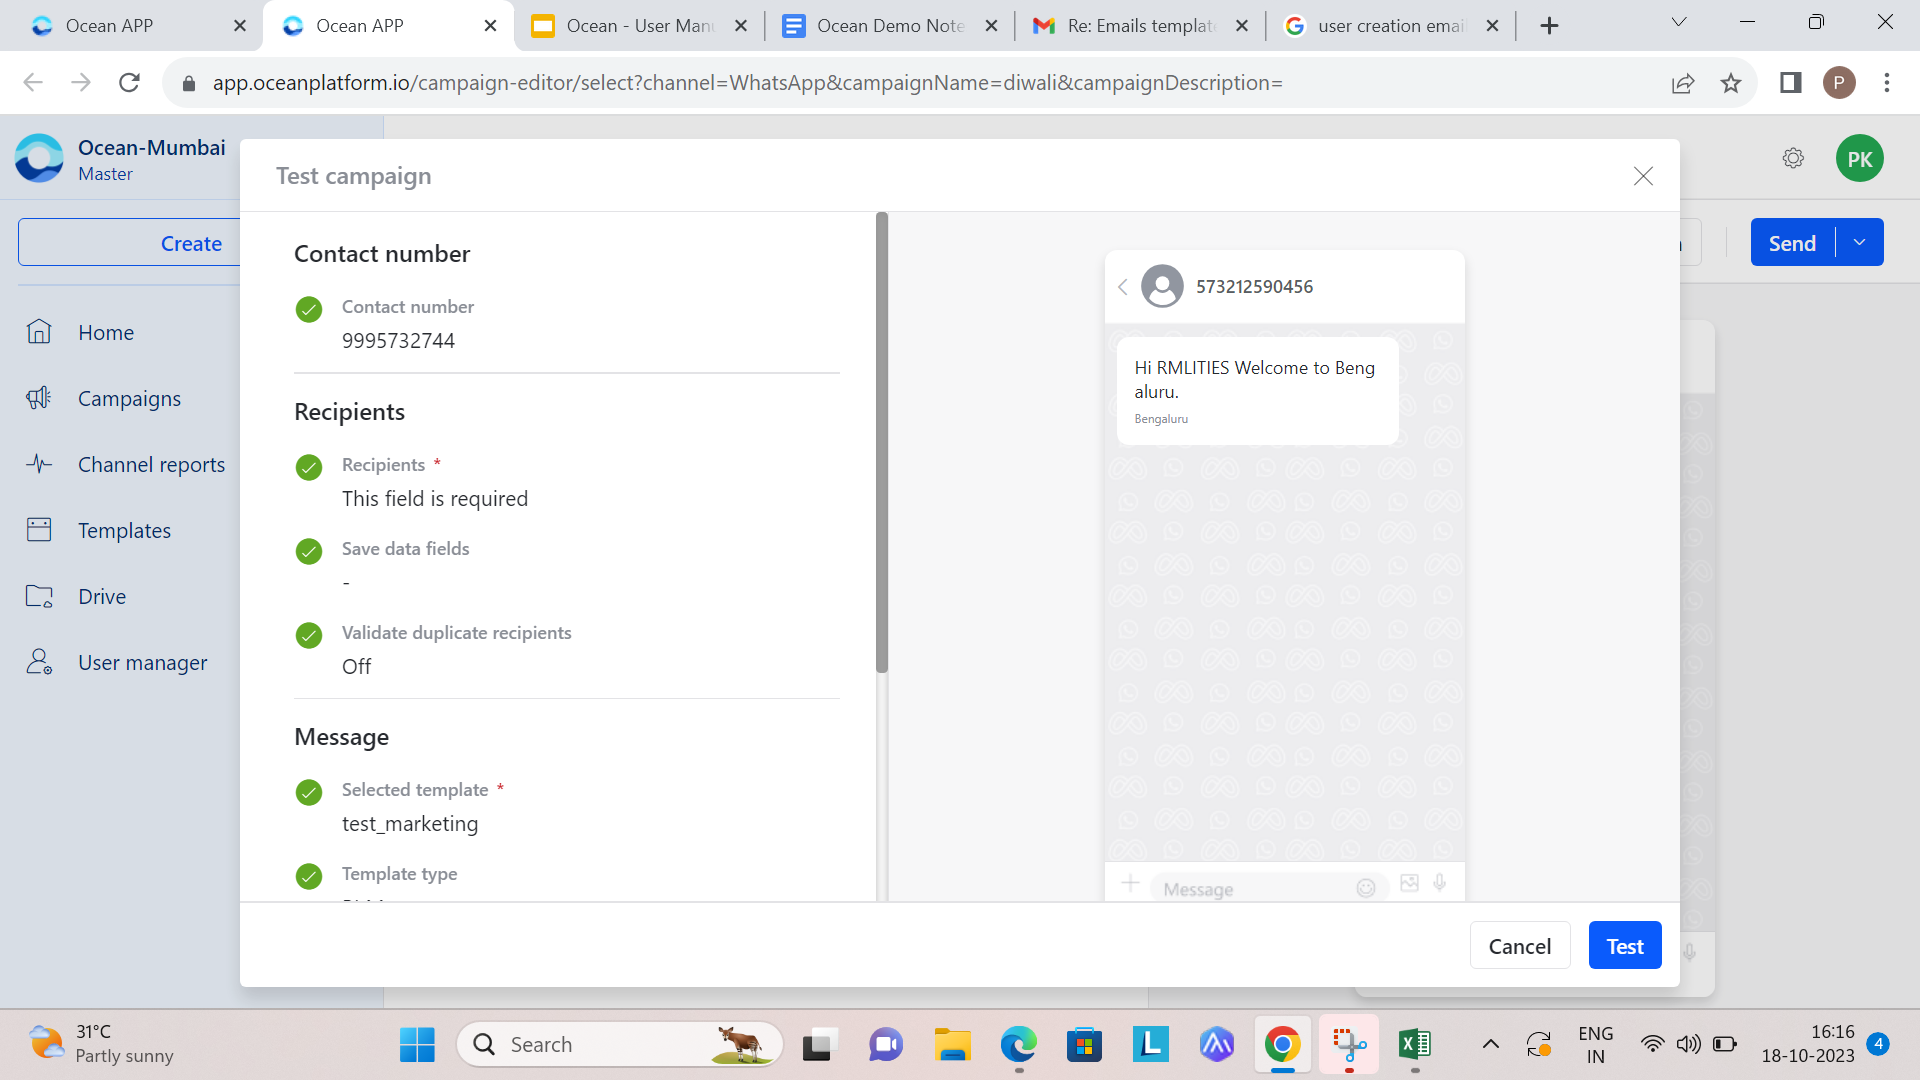
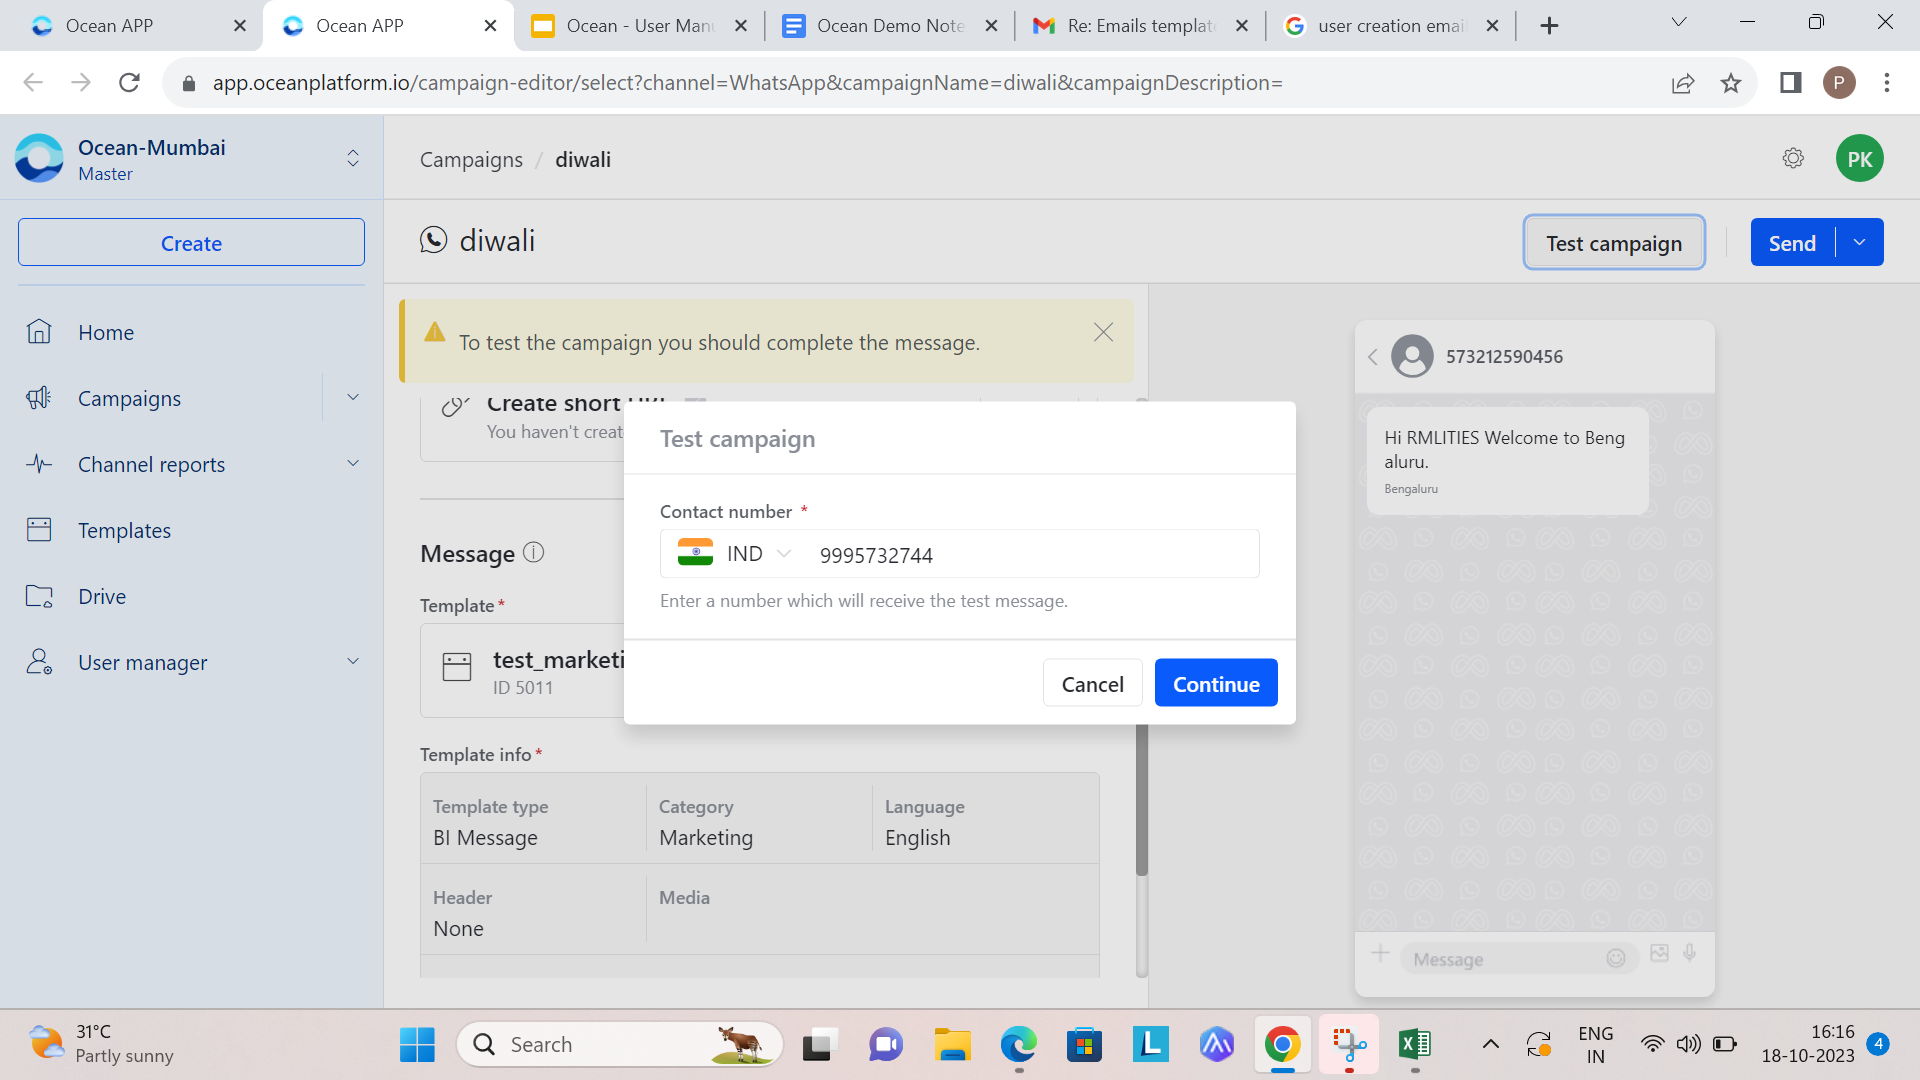
To test a WhatsApp campaign:
- Click Test Campaign on the right side.
- Select the Country from the dropdown list.
- Enter the contact number that should receive the test message.
- Click Continue.
- Verify the information in the dialog box.
- Click Test.
After a successful test, a confirmation message appears and the WhatsApp test message is delivered to the provided mobile number.
Send a WhatsApp campaign
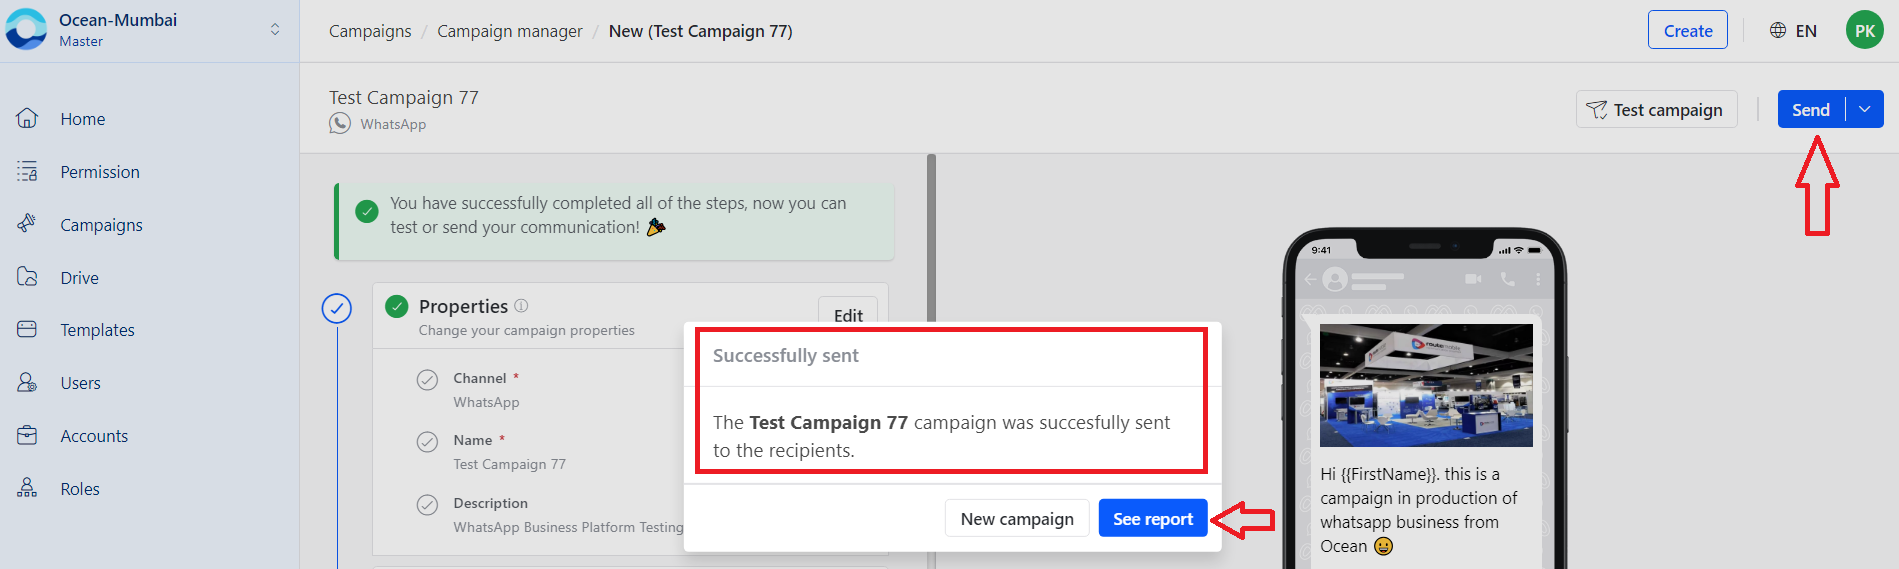
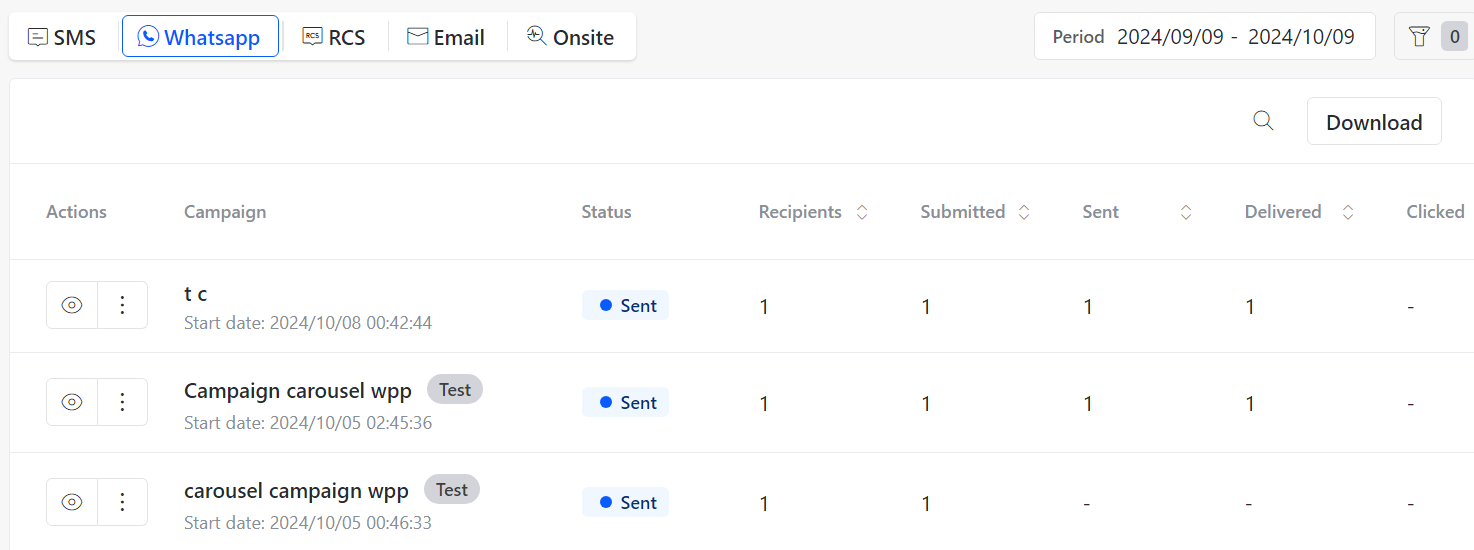
To send a WhatsApp campaign immediately:
- Click Send on the right side.
- Confirm the send action in the popup window.
- Click See report to check campaign status.
The campaign appears in the campaign manager immediately with the status Queued. The status changes to Sent after successful delivery.
Schedule a WhatsApp campaign
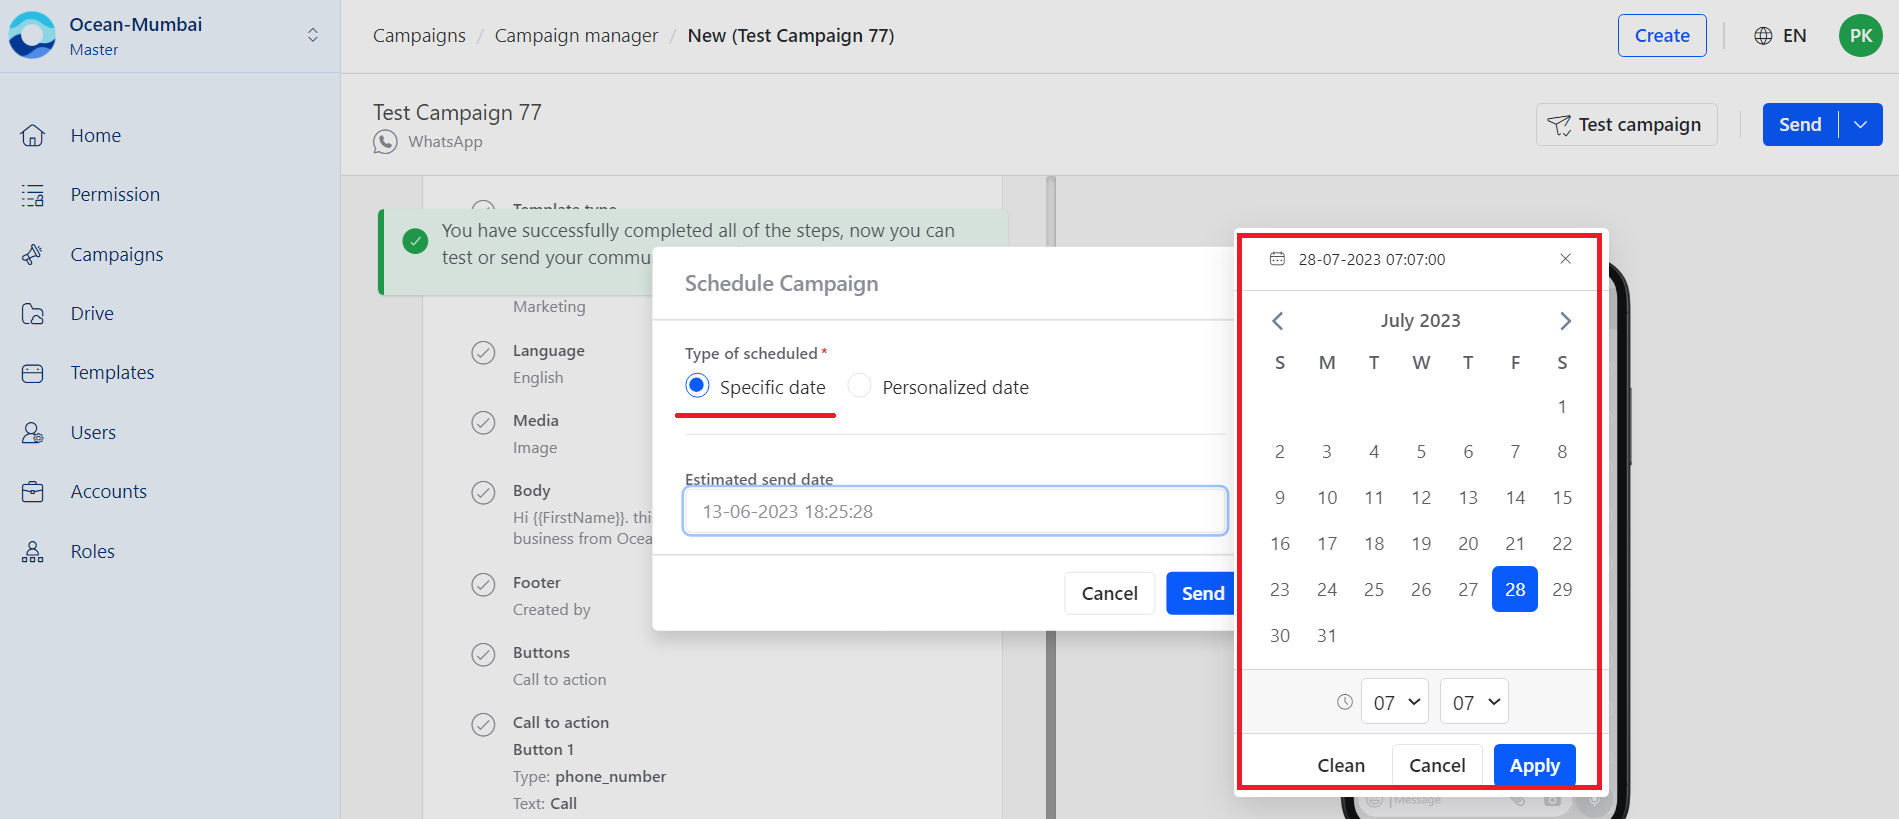
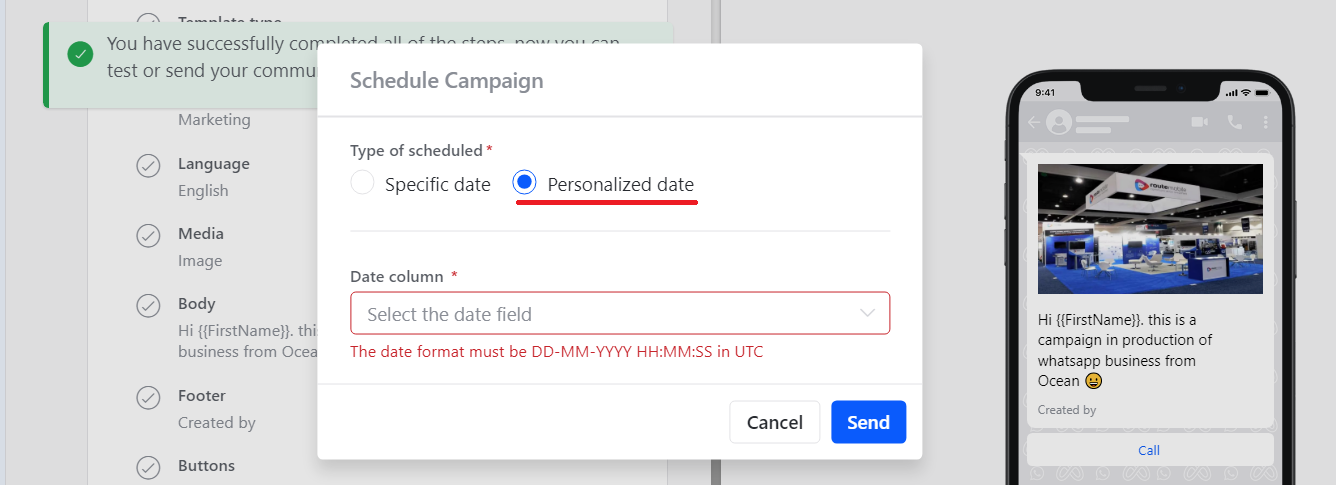
To schedule a WhatsApp campaign:
- Click the dropdown next to Send.
- Select Schedule Campaign.
- Choose one of the schedule options:
- Specific date: Select a date from the calendar.
- Personalized date: Select the date column from the uploaded Excel sheet.
- Click Send.
The campaign appears in the campaign manager with the status Scheduled.

Email campaigns
Use the Email campaign flow to create a campaign, upload email recipients, configure sender details, add content, test the campaign, and send or schedule it.
Create an Email campaign
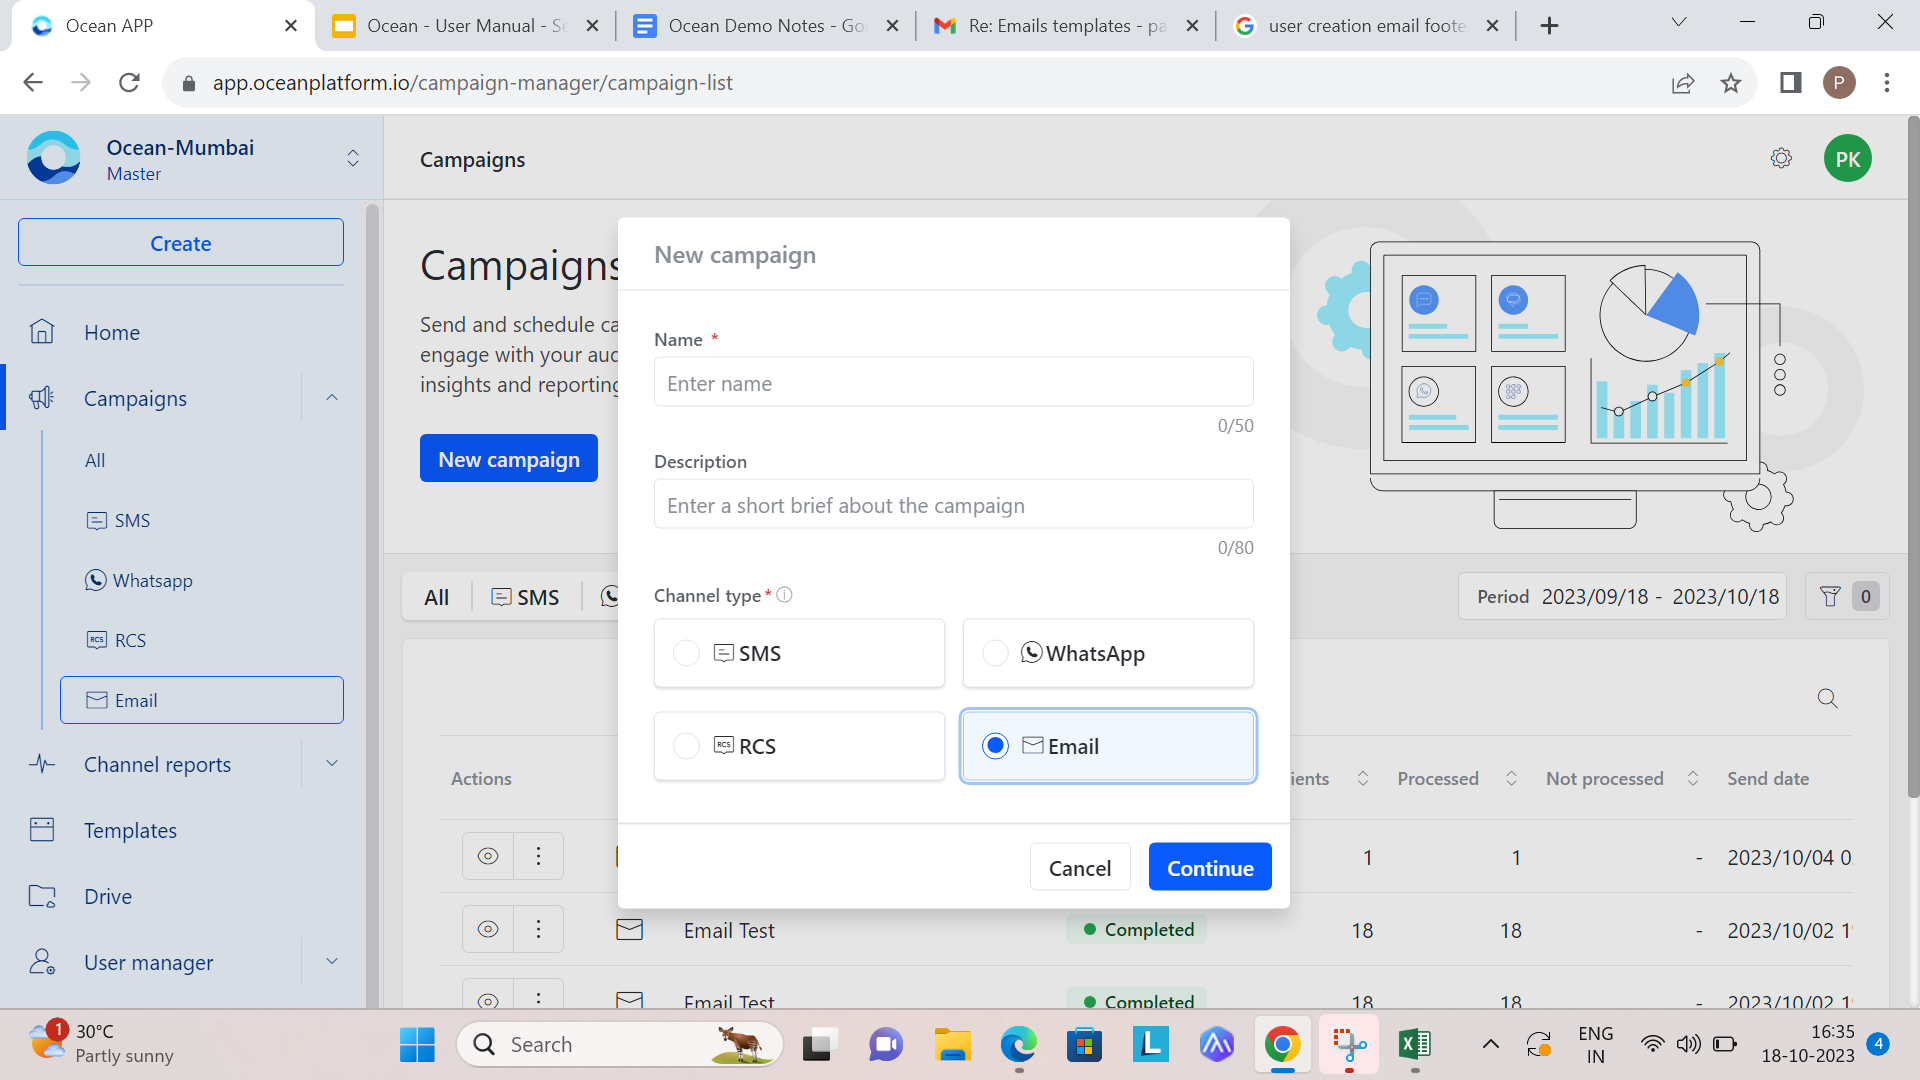
To create an Email campaign:
- Click New Campaign. A popup window opens.
- Enter the campaign Name.
- Optionally, enter a short campaign description.
- Choose Email under Channel type.
- Click Continue. A new browser window opens.
Add Email recipient data
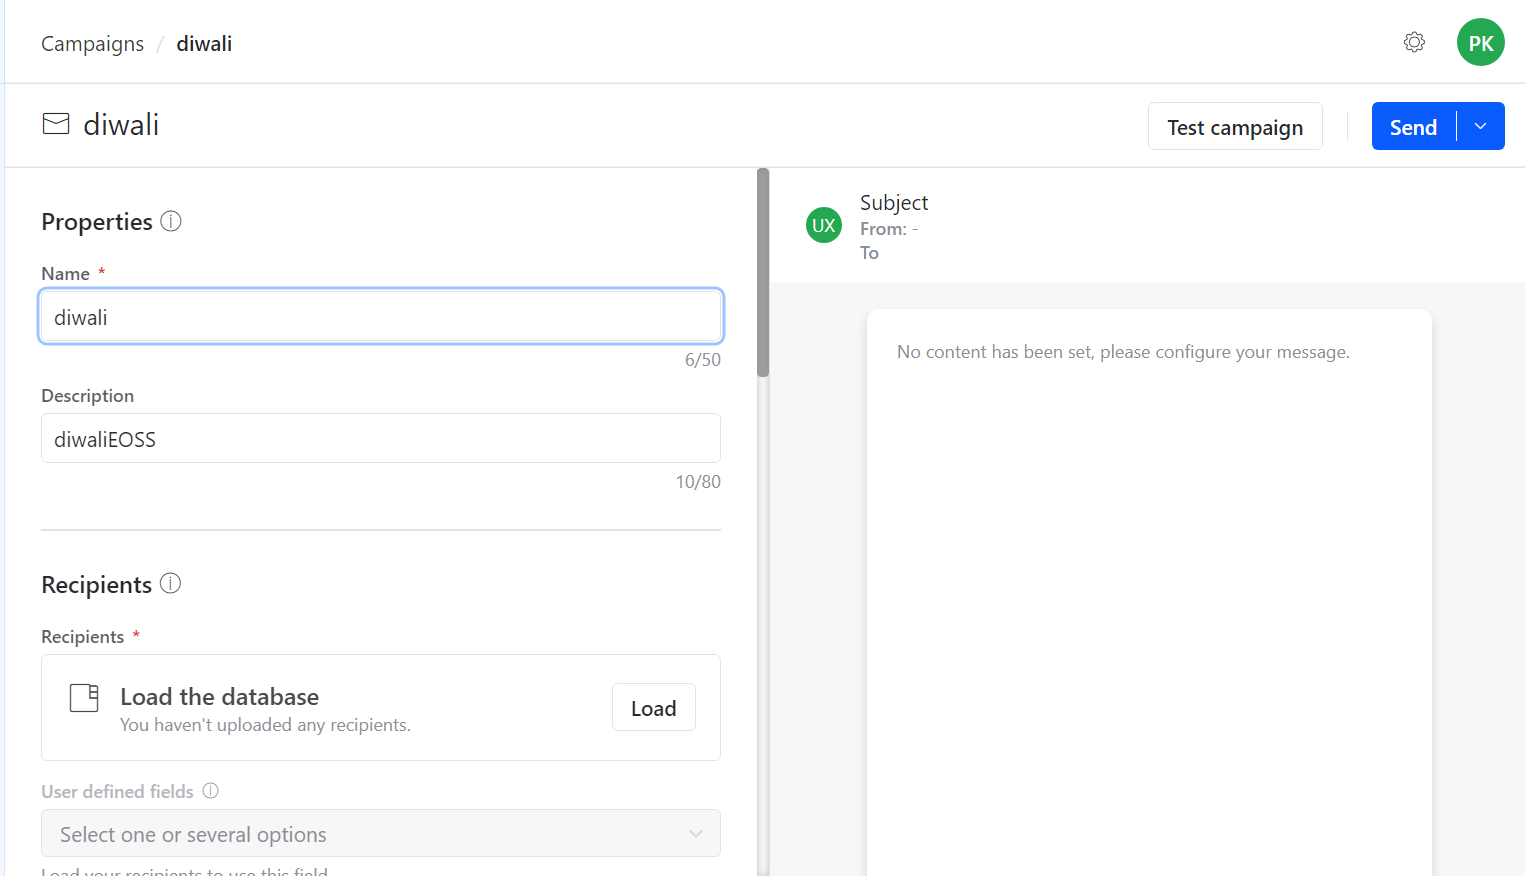
After creating the campaign, verify the details in the Properties section.
To add recipients:
- Confirm that the campaign properties are correct.
- Click Load to add recipients.
- Create an Excel or CSV file with recipients in the required format.
- Upload the file.
Load Email recipient data
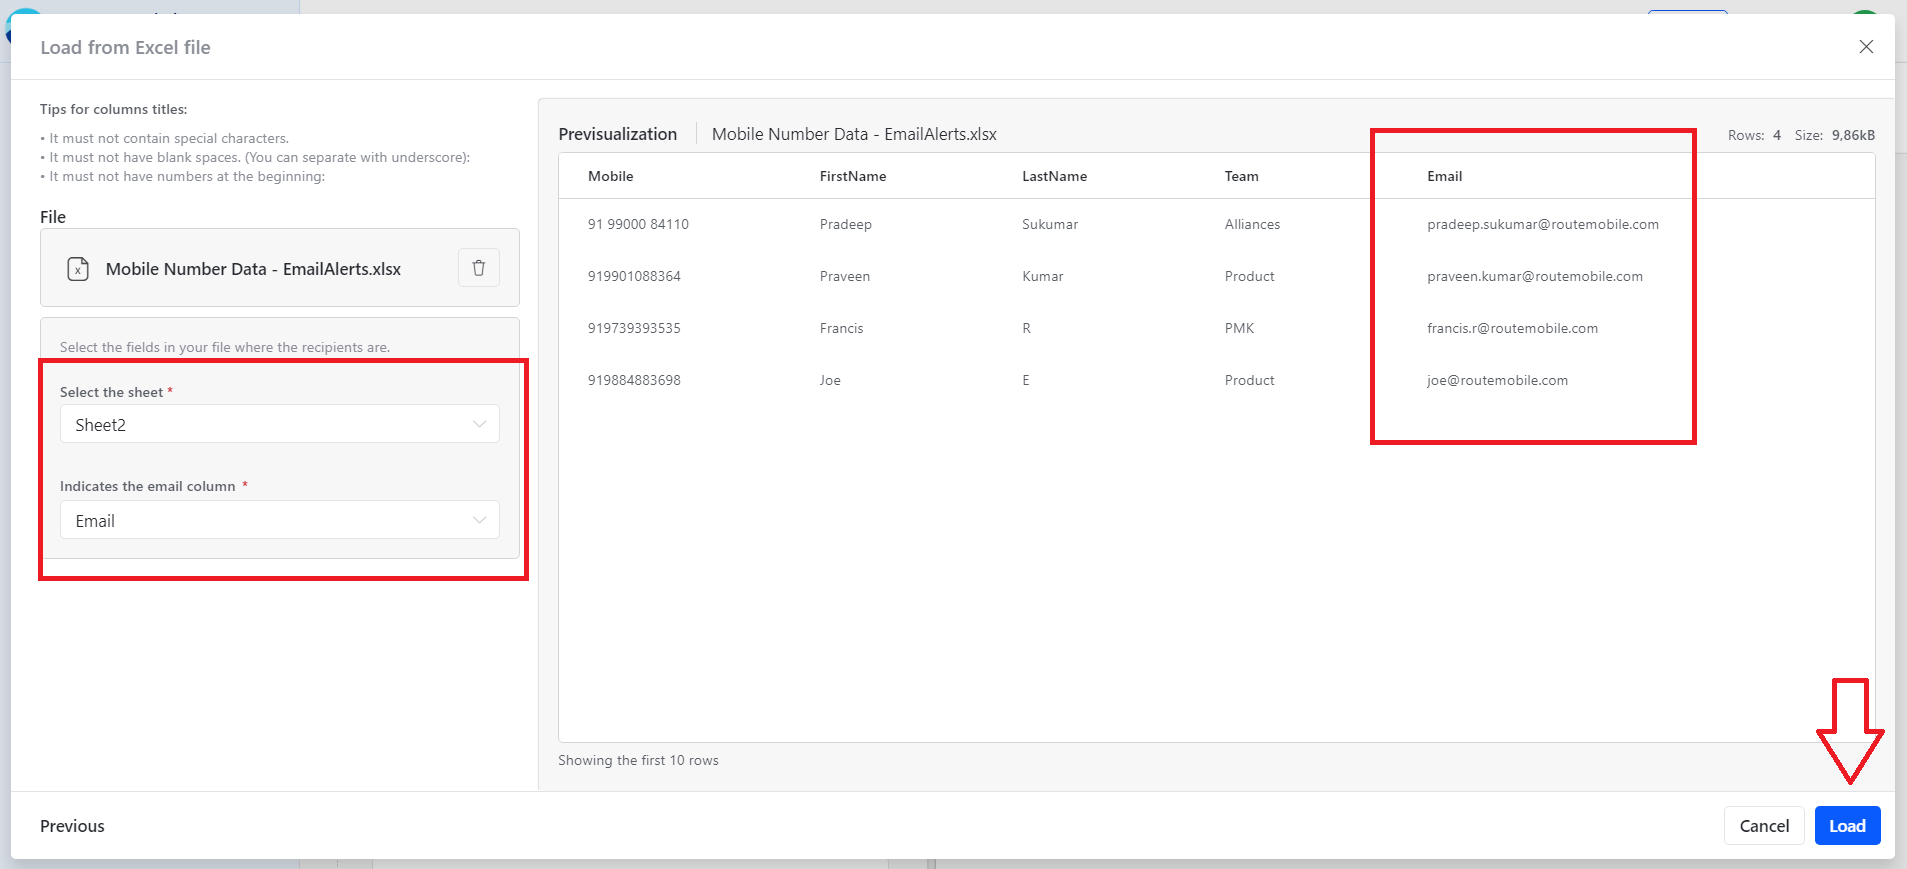
After uploading the Excel sheet:
- Click Pre Visualize to preview the uploaded data.
- Select the sheet that contains your recipient data.
- Select the email address column that contains email IDs.
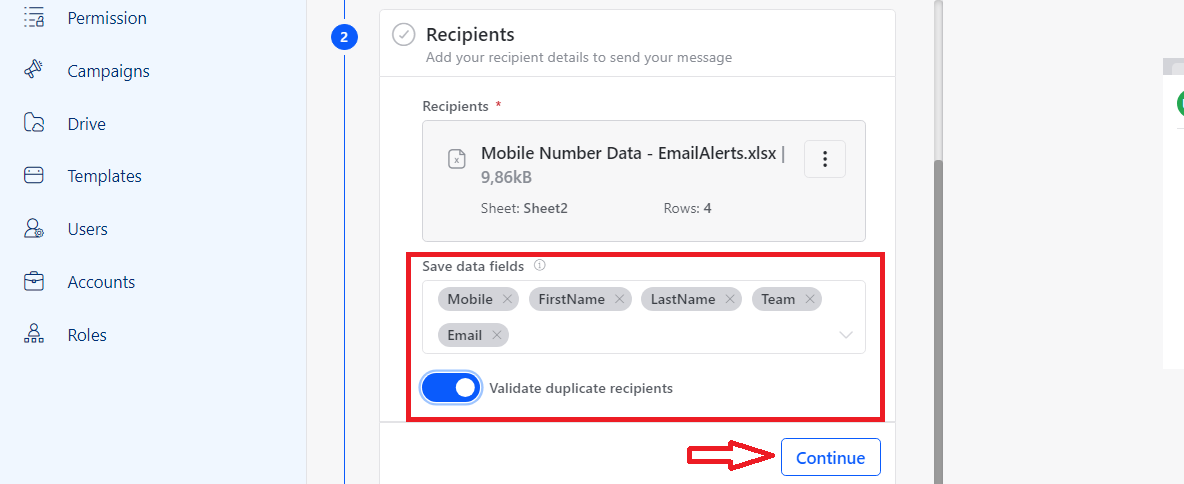
- Select user-defined fields if you want the data to appear in reports.
- Enable Validate duplicate recipients to remove duplicate entries.
Configure Email sender and subject
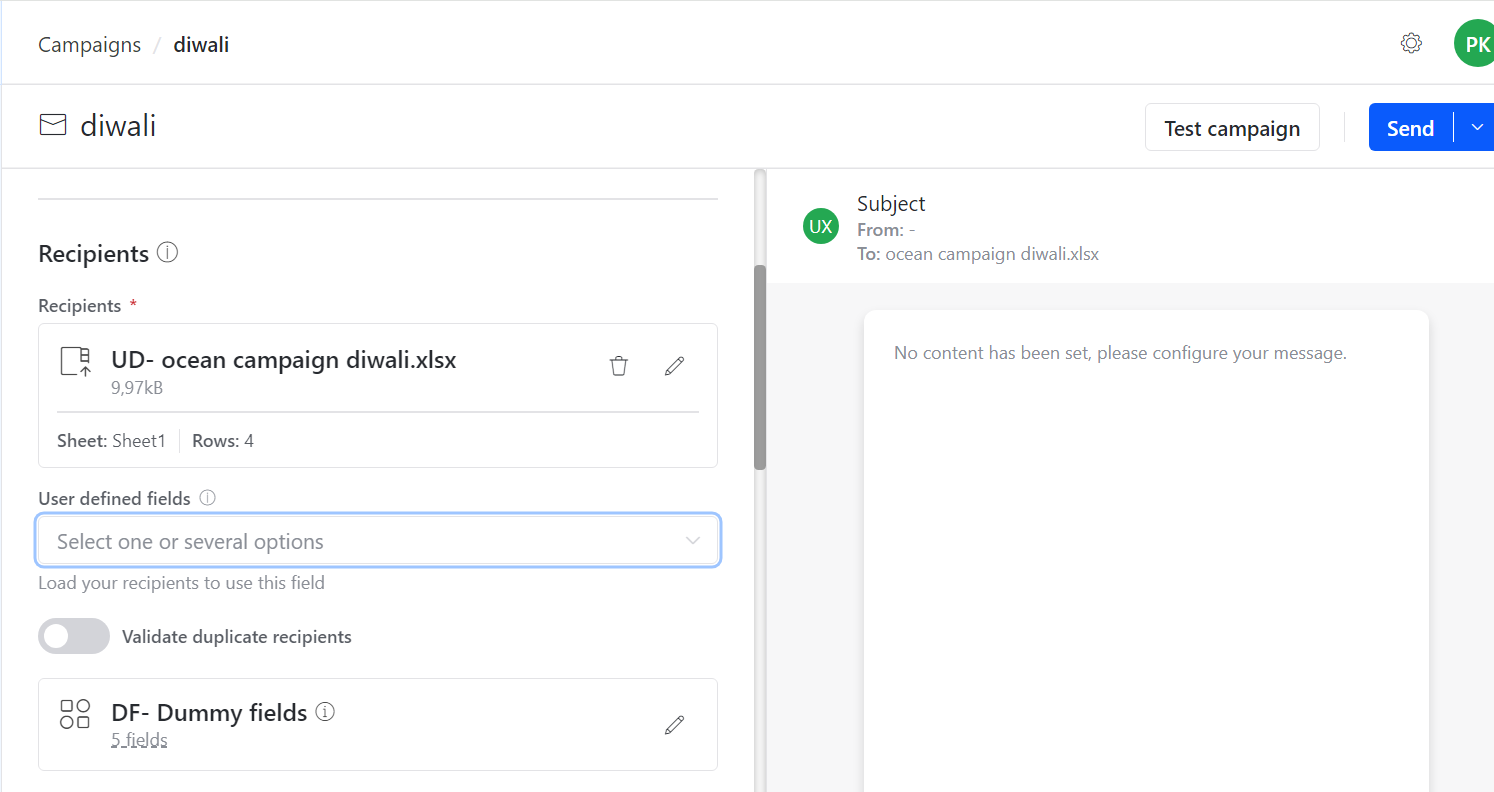
Use DF - Dummy fields to enter predefined information when the database has not been loaded for testing.
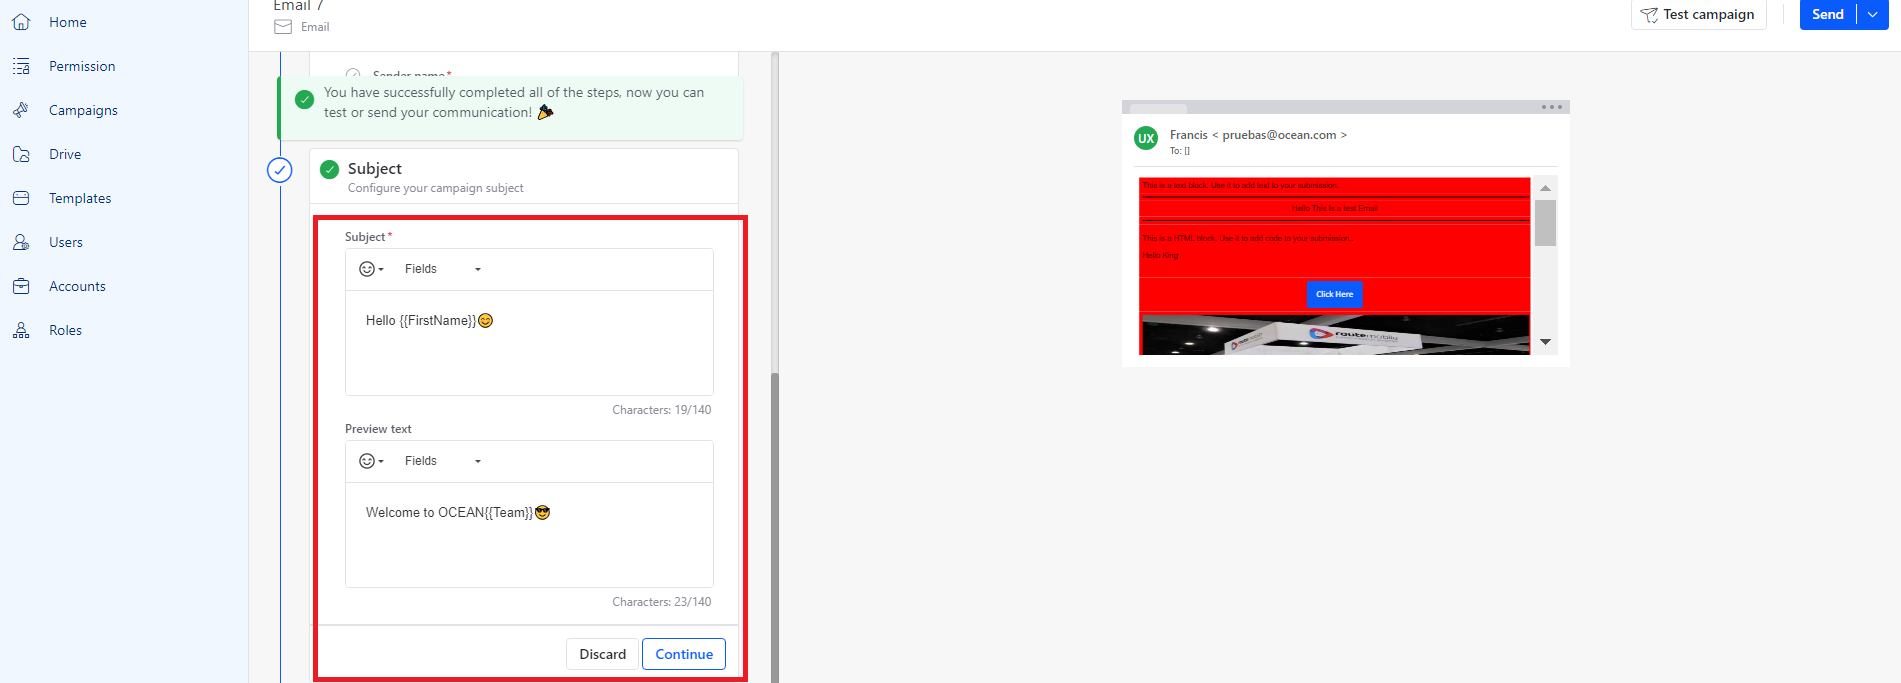
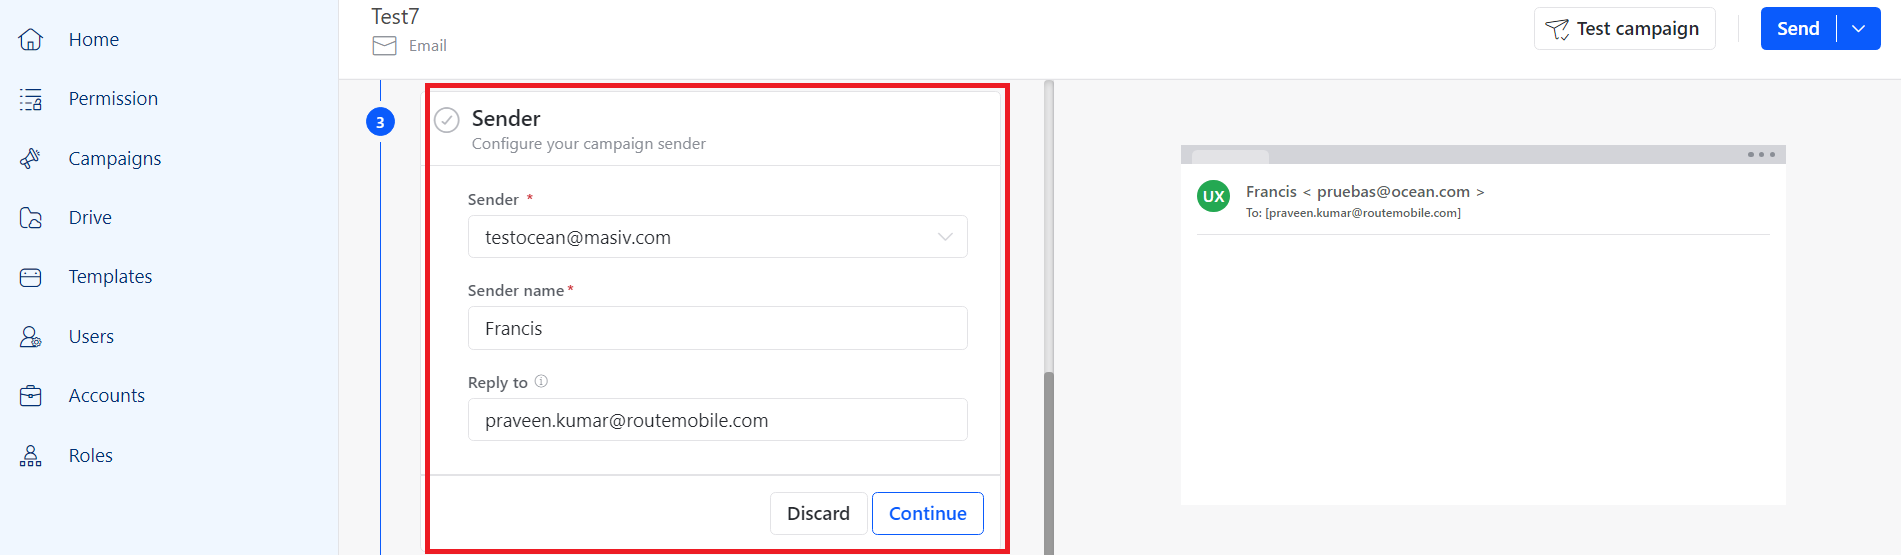
To configure sender and subject details:
- Enter the Sender email address.
- Enter the Sender Name.
- Enter the Reply to email ID where replies should be received.
- Enter the subject line.
- Optionally, add an emoji to the subject.
Configure Email content and choose a template
After configuring the sender and subject, add the email content.
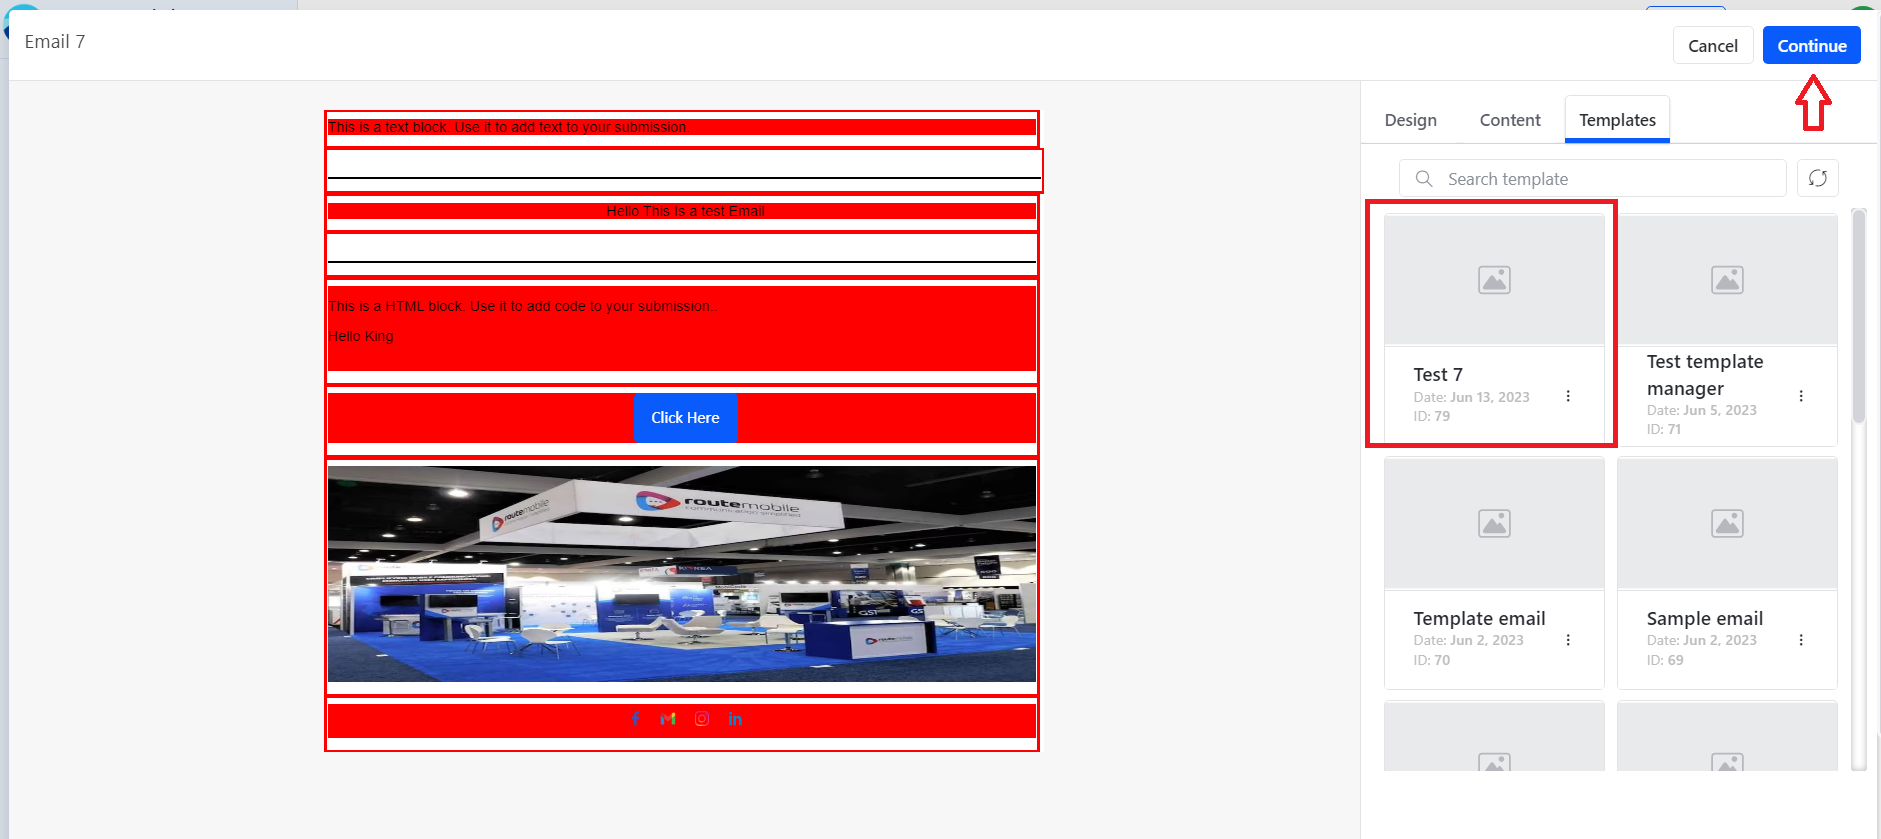
To add content:
- Click Add Content.
- Search for a template by entering the template name in the search bar on the templates tab.
- Drag and choose the template to preview it in the left panel.
- Click Continue.

Add Email attachments
After selecting a template:
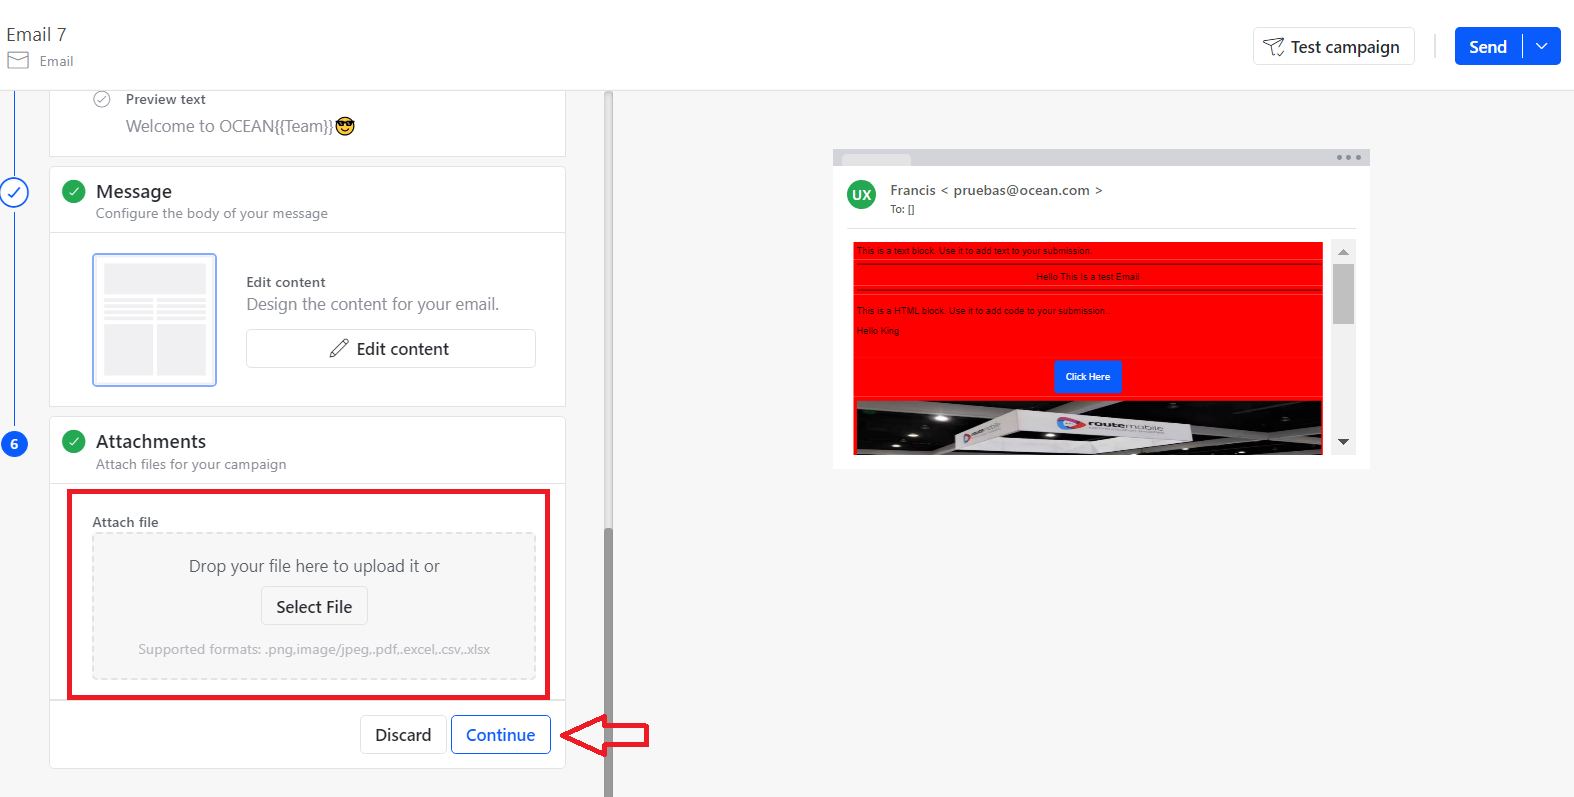
- Click Edit Content if you need to make changes.
- Preview the email on the right-side panel.
- Add an image or file under the attachment options, if needed.
- Click Send to send the email.
- Confirm the message when prompted.
Supported attachment formats include .png, image/jpeg, .pdf, .excel, .csv, and .xlsx.
Test an Email campaign
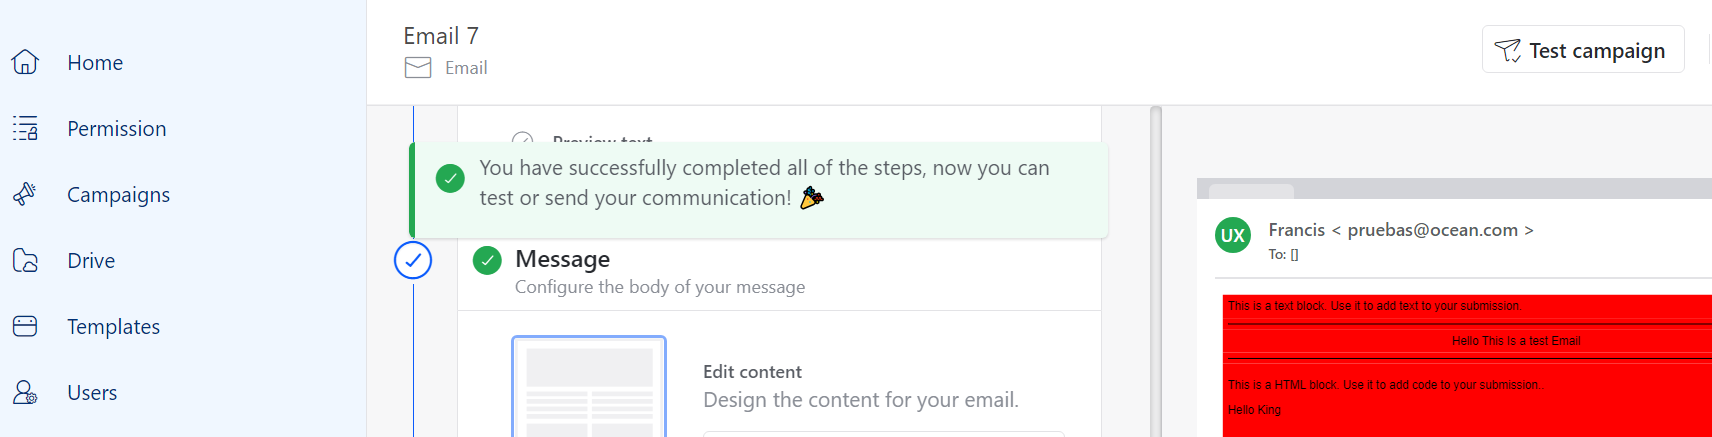
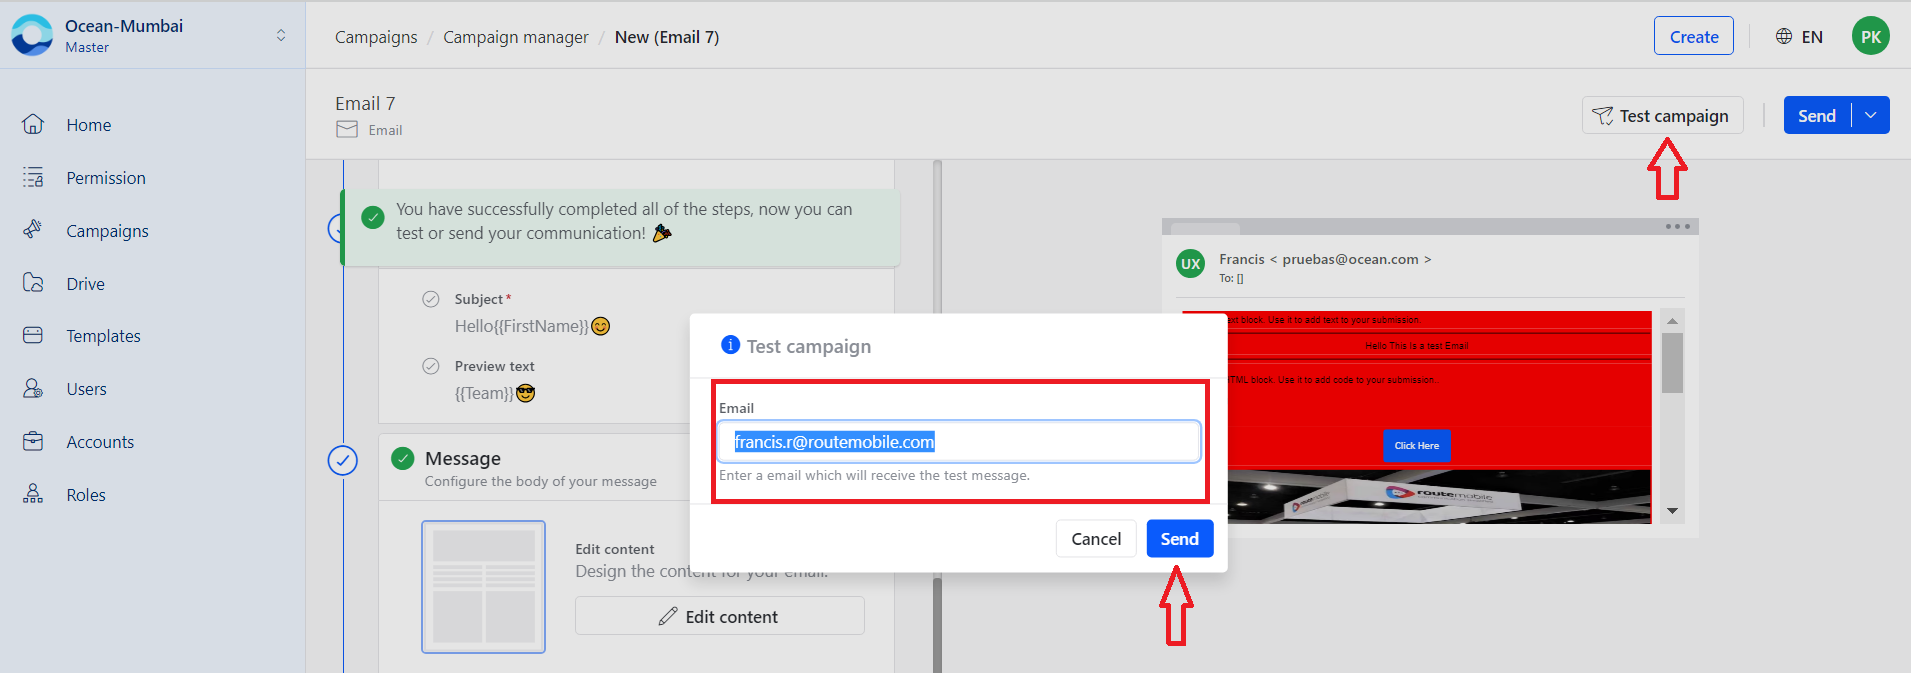
To test an Email campaign:
- Click Test Campaign on the right side.
- Enter the email address that should receive the test message.
- Click Send.
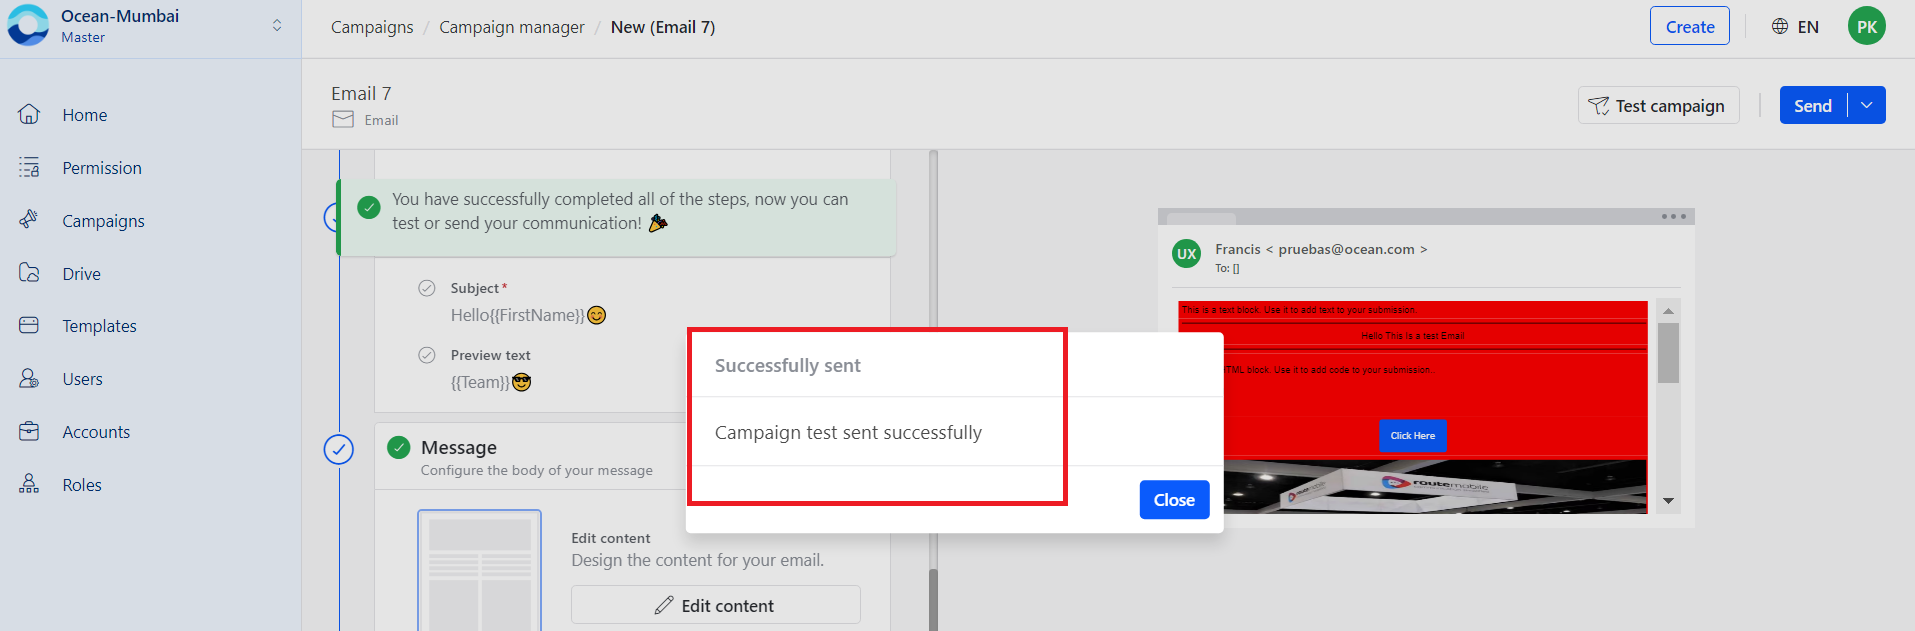
After a successful test, a confirmation message appears and the email is delivered to the provided email ID.
Send an Email campaign
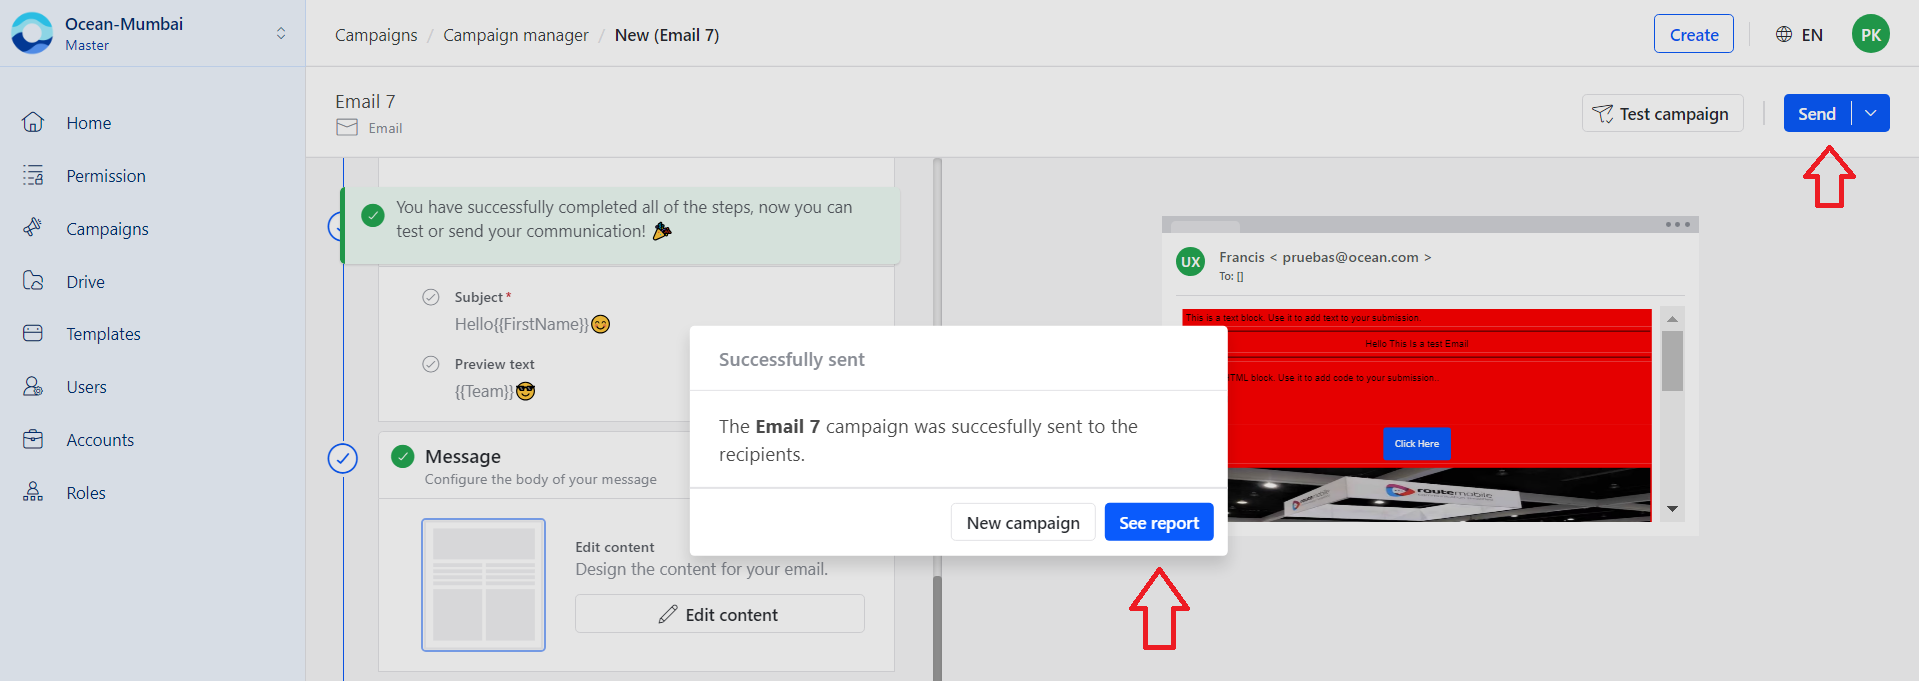
To send an Email campaign immediately:
- Click Send on the right side.
- Confirm the send action in the popup window.
- Click See report to check campaign status.
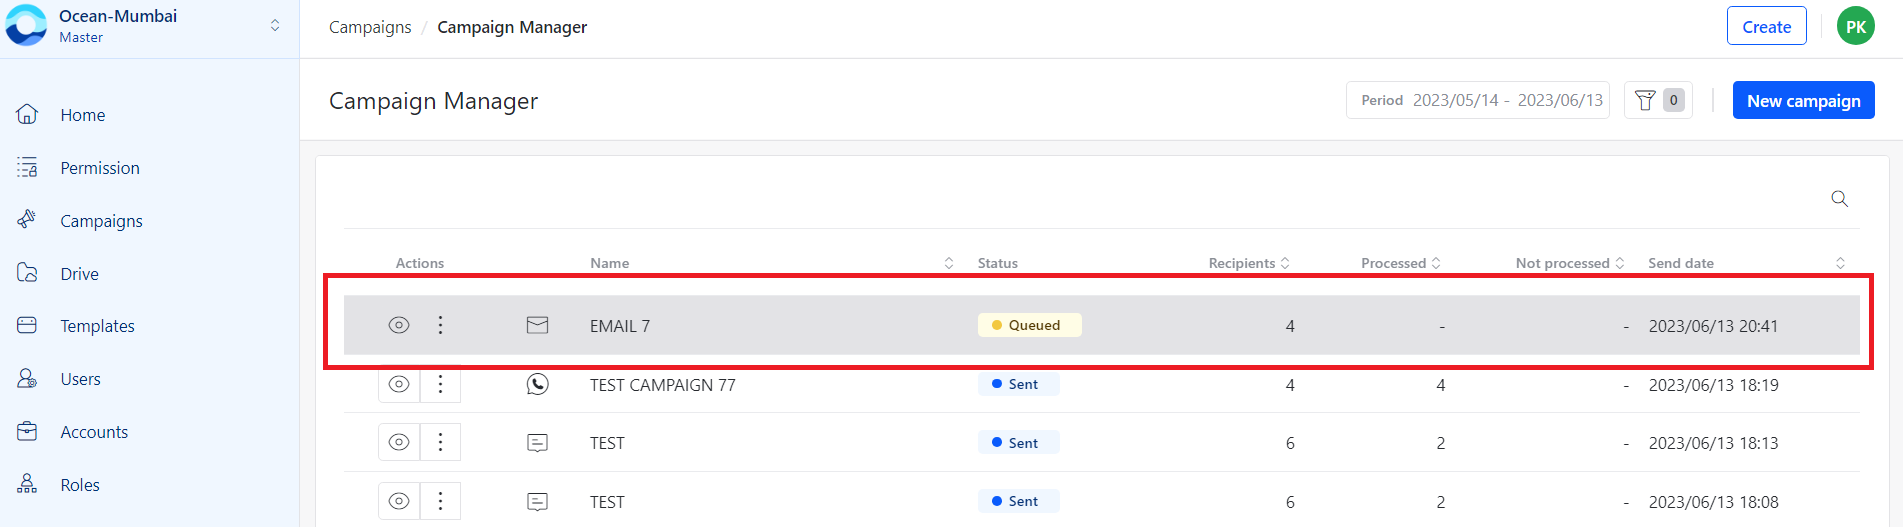
The campaign appears in the campaign manager immediately with the status Queued. The status changes to Sent after successful delivery.
Schedule an Email campaign
To schedule an Email campaign:
- Click the dropdown next to Send.
- Select Schedule Campaign.
- Choose one of the schedule options:
- Specific date: Select a date from the calendar.
- Personalized date: Select the date column from the uploaded Excel sheet.
- Click Send.
The campaign appears in the campaign manager with the status Scheduled.
RCS Business Messaging campaigns
Use the RCS Business Messaging (RBM) campaign flow to create India or international RCS campaigns, upload recipients, select or create message content, test the campaign, and send or schedule it.
Create an RBM campaign for India
To create an RBM campaign for India:
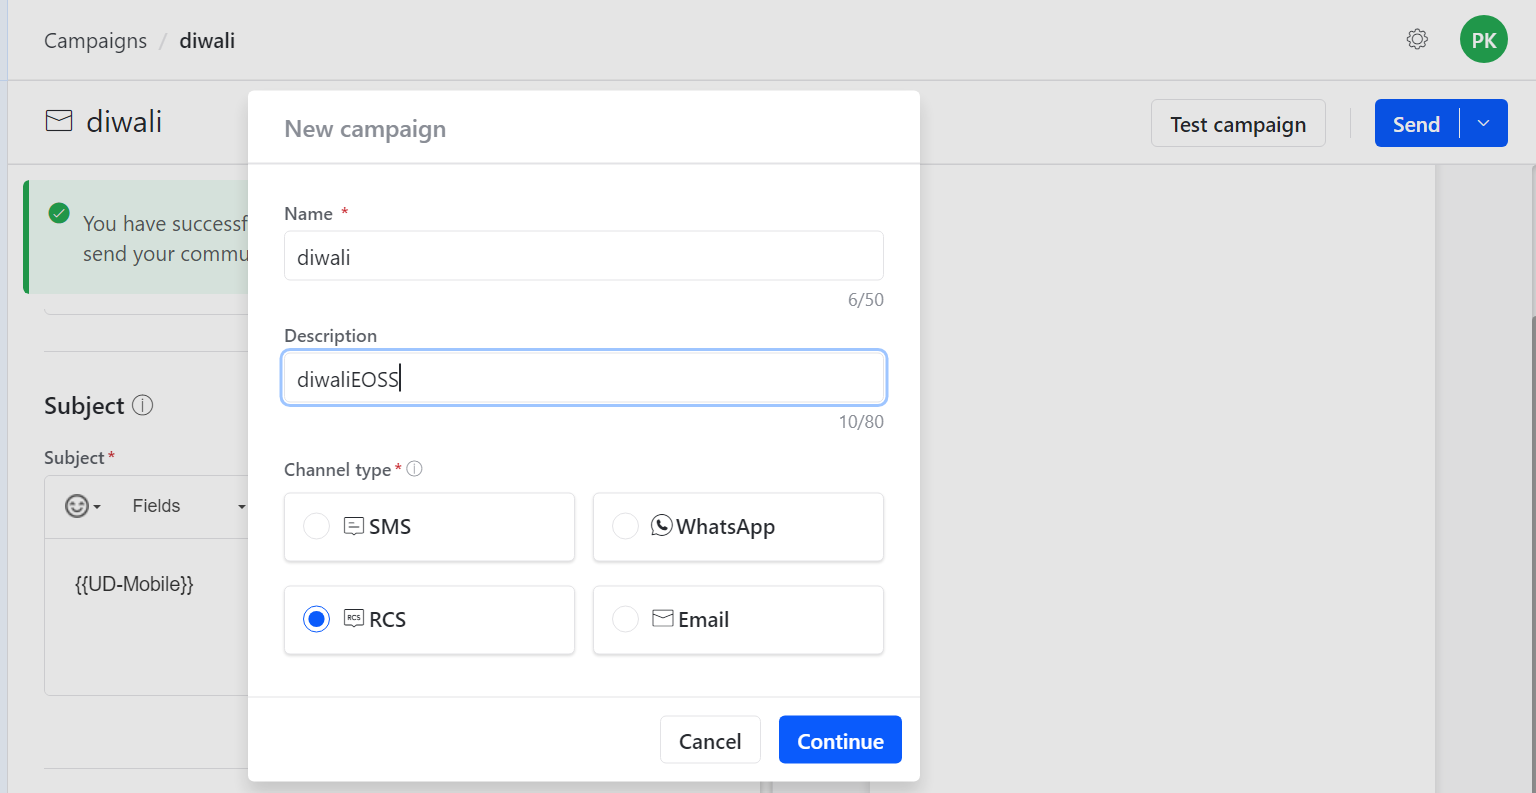
- Click New Campaign. A popup window opens.
- Enter the Campaign name.
- Optionally, enter a campaign description.
- Choose RCS under Channel type.
- Click Continue. A new browser window opens.
Add RBM recipient data
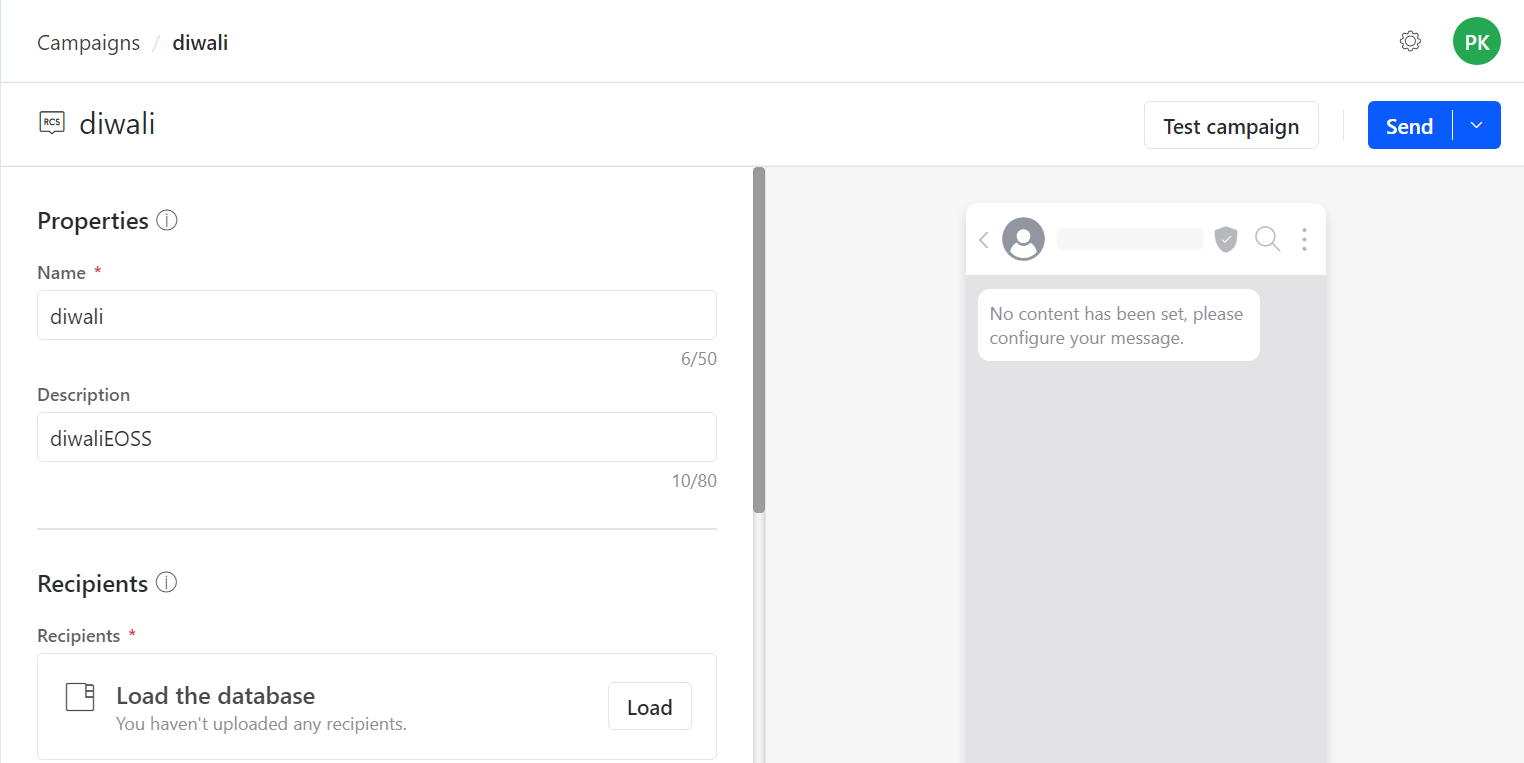
After creating the campaign, verify the details in the Properties section.
To add recipients:
- Confirm that the campaign properties are correct.
- Click Load to add recipients.
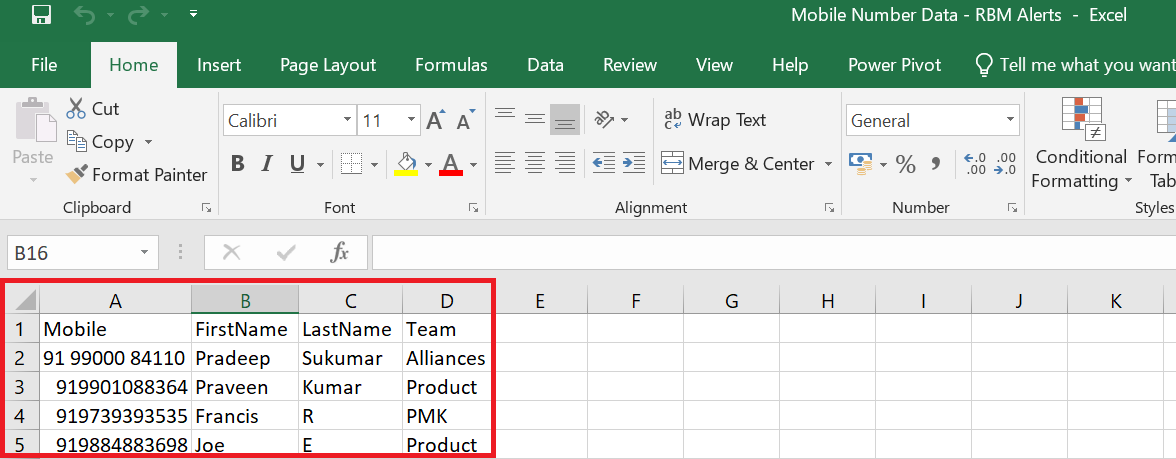
- Create an Excel or CSV file with recipients in the required format.
- Upload the file.
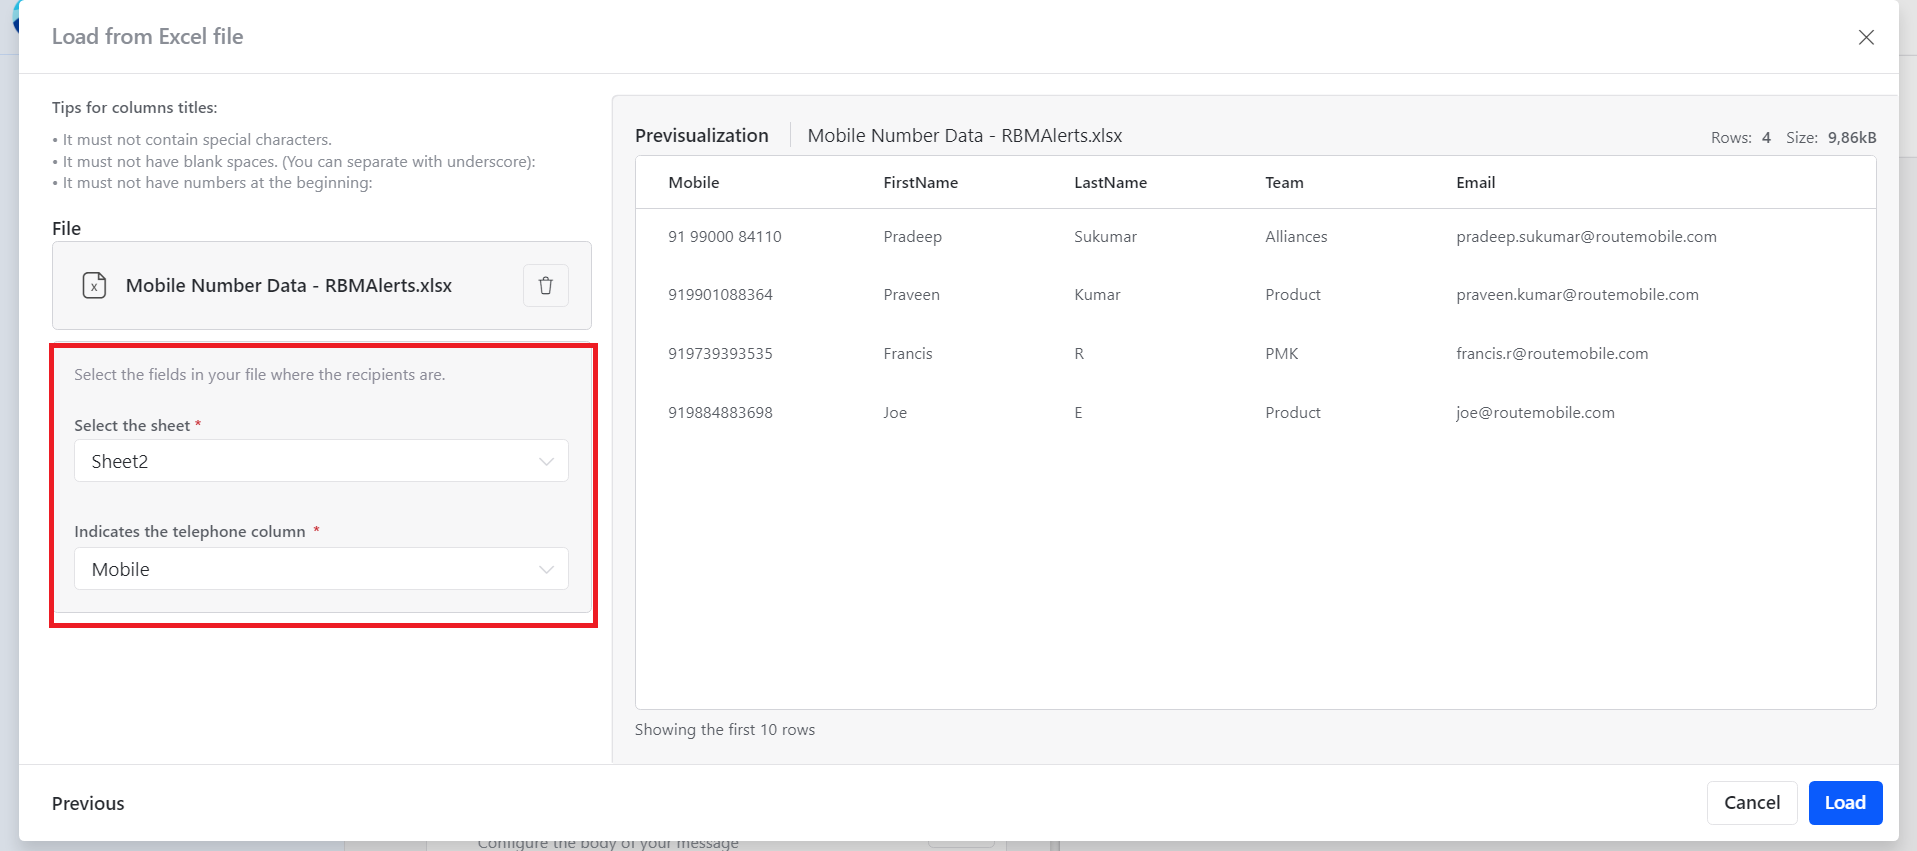
Load RBM recipient data
After uploading the Excel sheet:
- Click Pre Visualize to preview the uploaded data.
- Select the sheet that contains your recipient data.
- Select the telephone number column that contains mobile numbers.
- Select user-defined fields if you want the data to appear in reports.
- Enable Validate duplicate recipients to remove duplicate entries.
Configure RBM campaign options
Use DF - Dummy fields to enter predefined information when the database has not been loaded for testing.
Use Short URL to create a custom short URL for the campaign:
- Click Create.
- Enter the Link name.
- Select the Domain.
- Enter the Long URL.
- Preview the link.
- Click Create.
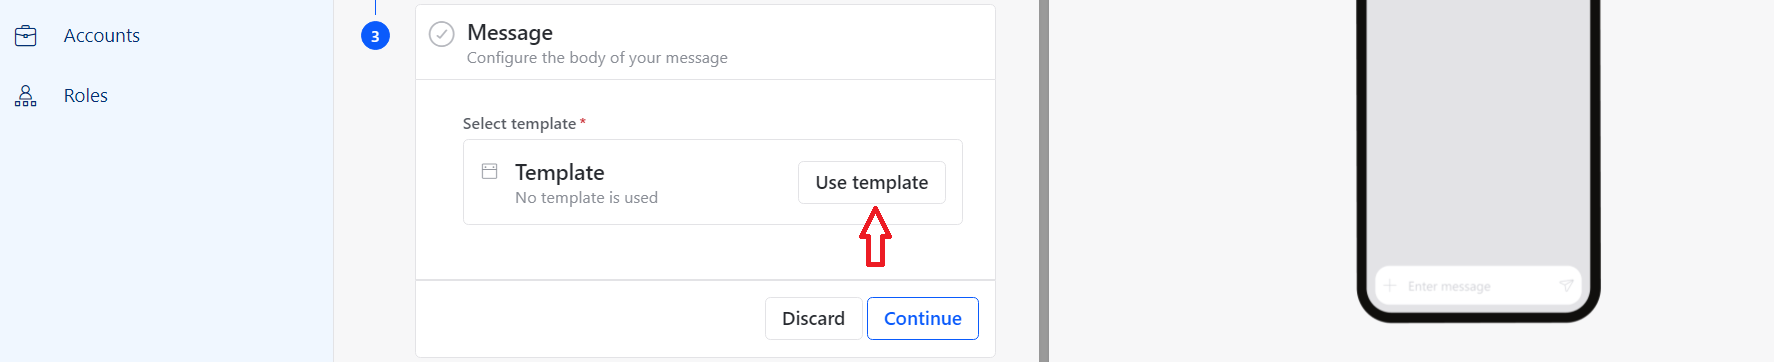
Choose an RBM template for India
After uploading recipient data, choose an approved RBM template.
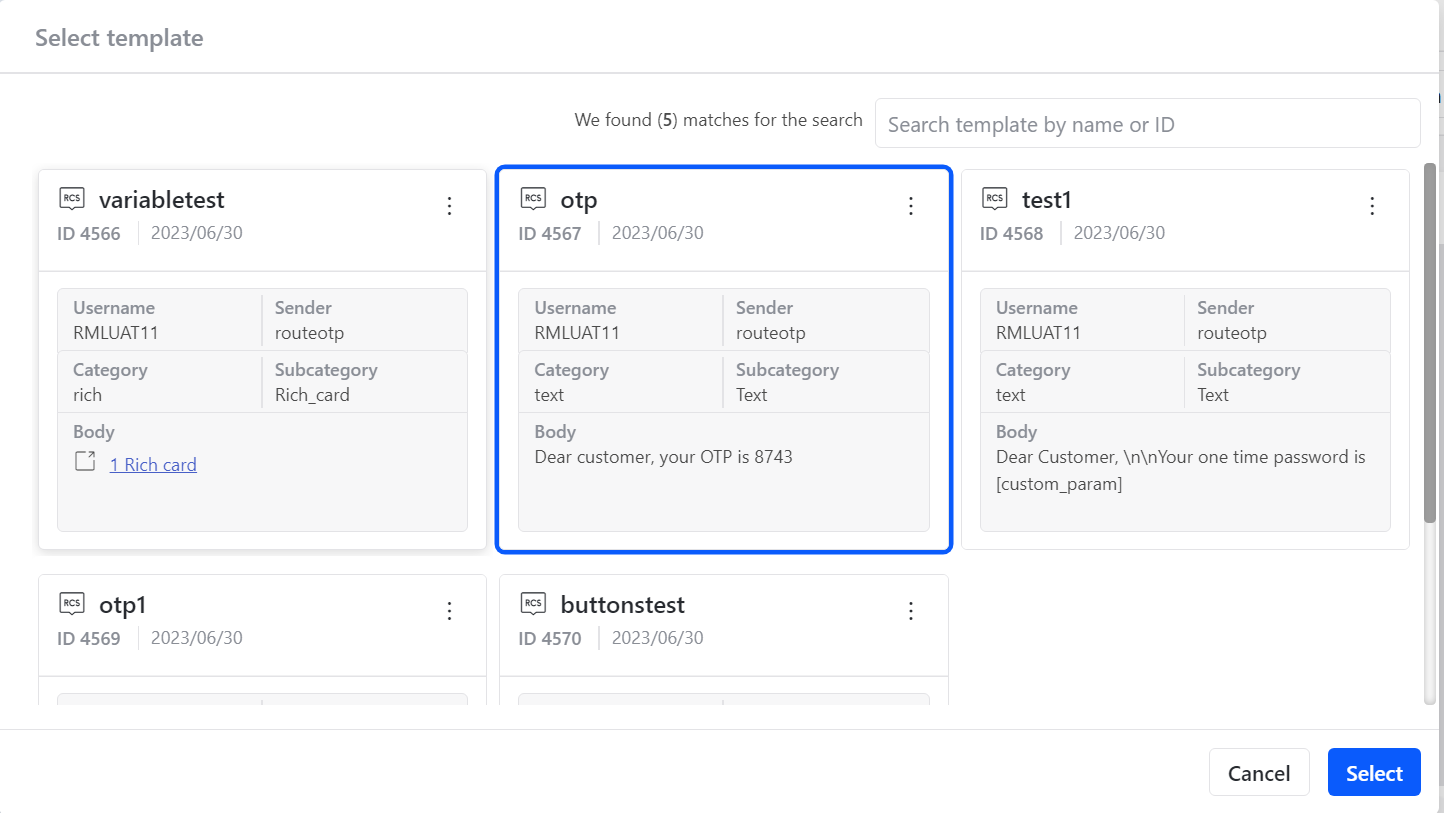
To choose a template:
- Click Select.
- Search for a template by entering the template name in the search bar.
- Choose an approved template from the Template manager window.
- Click Select.

Create or choose an RBM campaign for international recipients
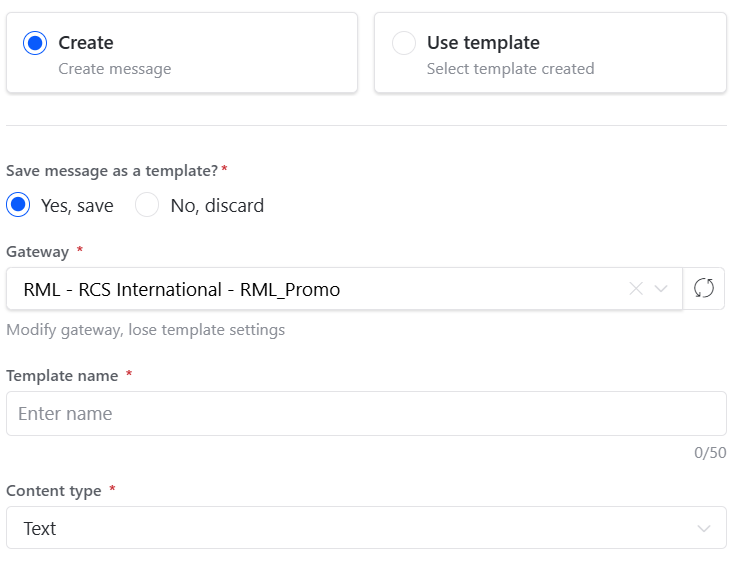
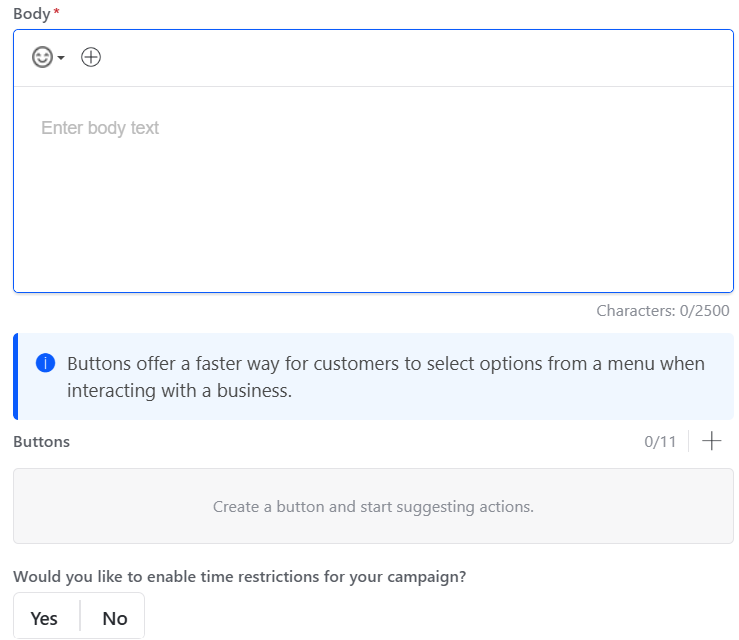
For international RBM campaigns, you can choose a template or create a new message from scratch for instant campaigns.
You can:
- Save newly created message content as a template for future use.
- Select the gateway or sender used for delivery.
- Choose the content type to create and deliver.
- Add message body content with variable fields and emoticons.
- Configure buttons to make the message interactive.
- Configure delivery restrictions based on time.
Finalize RBM template configuration
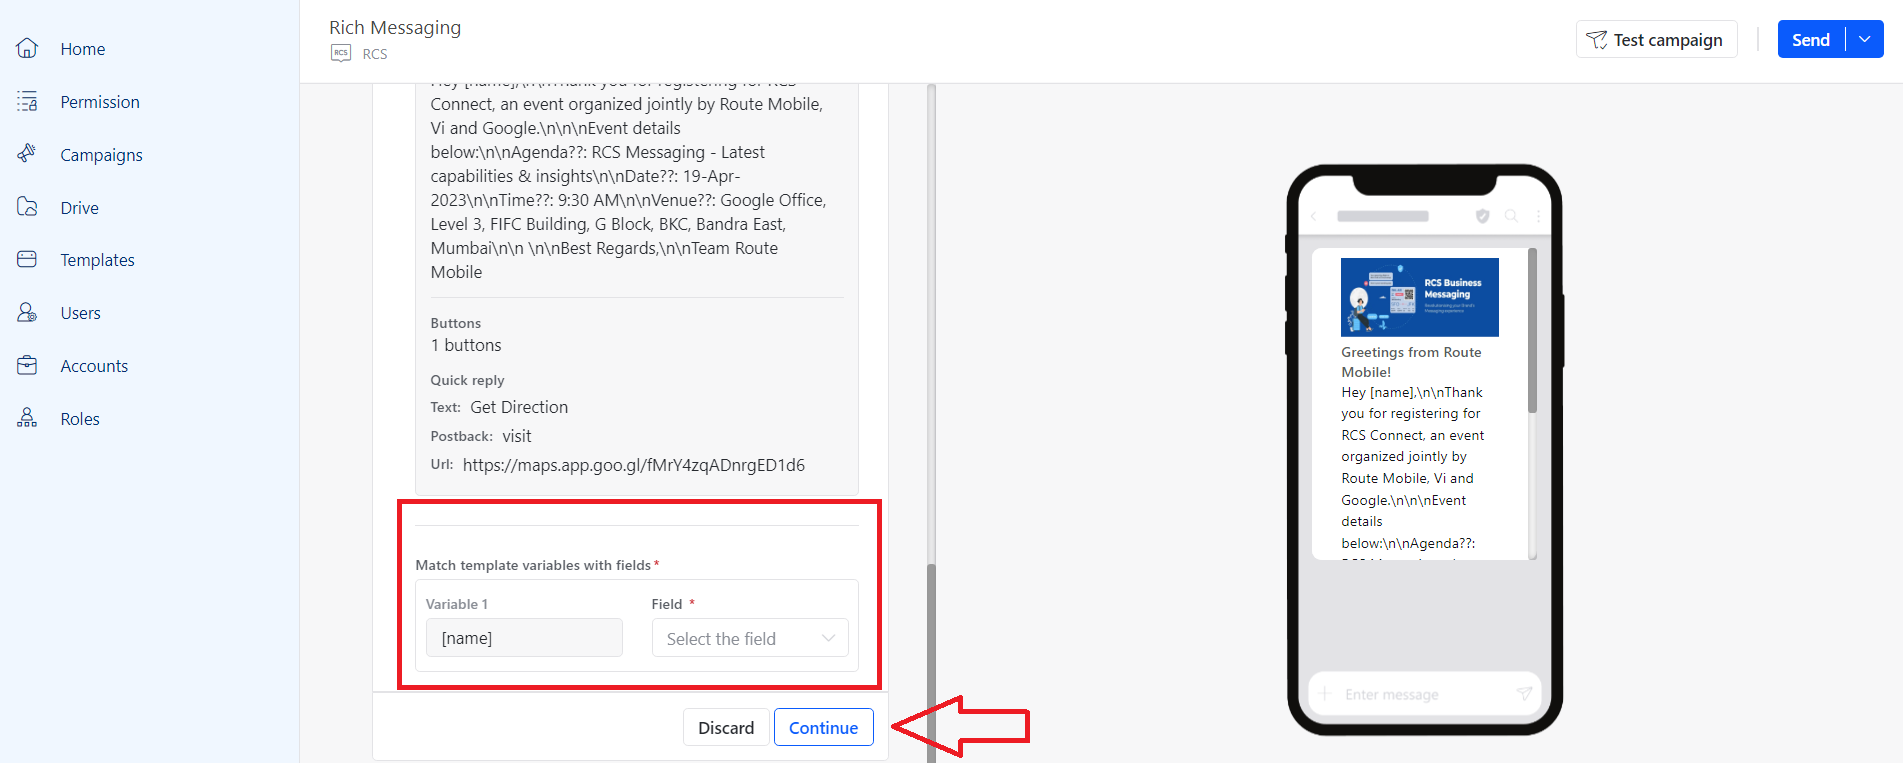
After selecting a template:
- Use Change template if you want to choose a different template.
- Verify the content under Template information.
- Add an image or file under Header Media, if required.
- Match template variables with the fields that contain variable data.
- Confirm the message when prompted.
Supported header media formats include .png, image/jpeg, .pdf, .excel, .csv, and .xlsx.
Test an RBM campaign
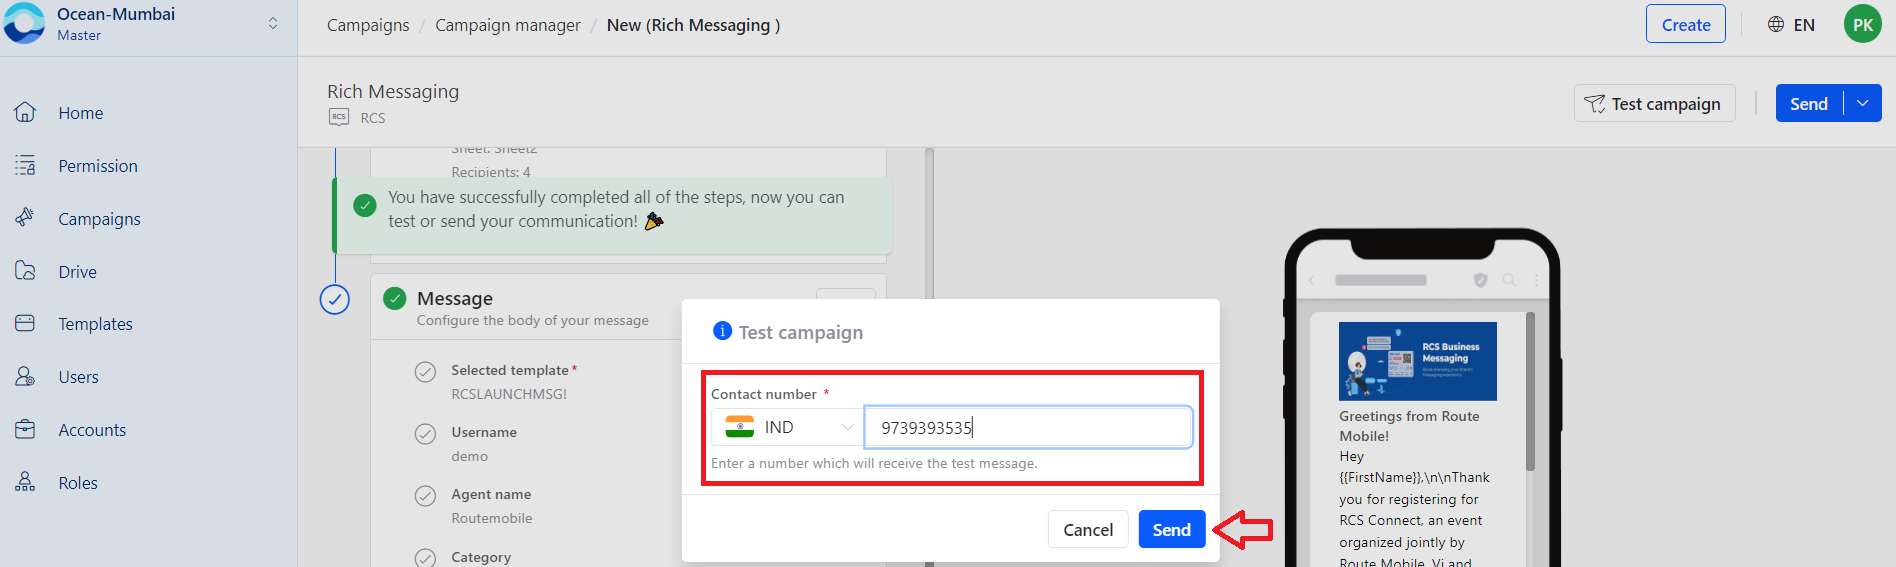
To test an RBM campaign:
- Click Test Campaign on the right side.
- Select the Country from the dropdown list.
- Enter the contact number that should receive the test message.
- Click Send.
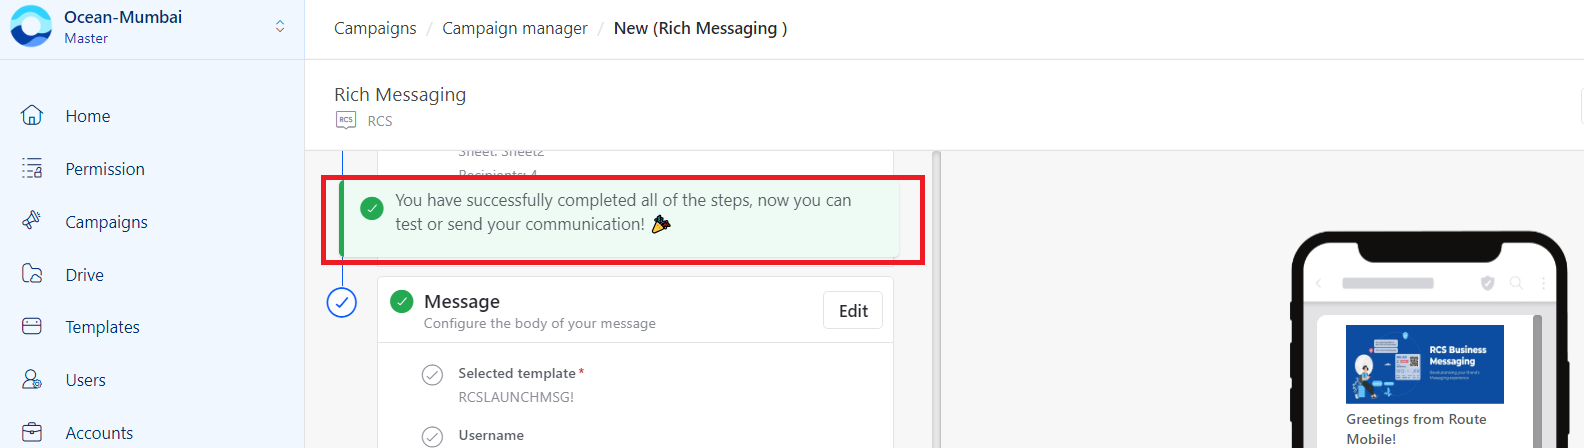
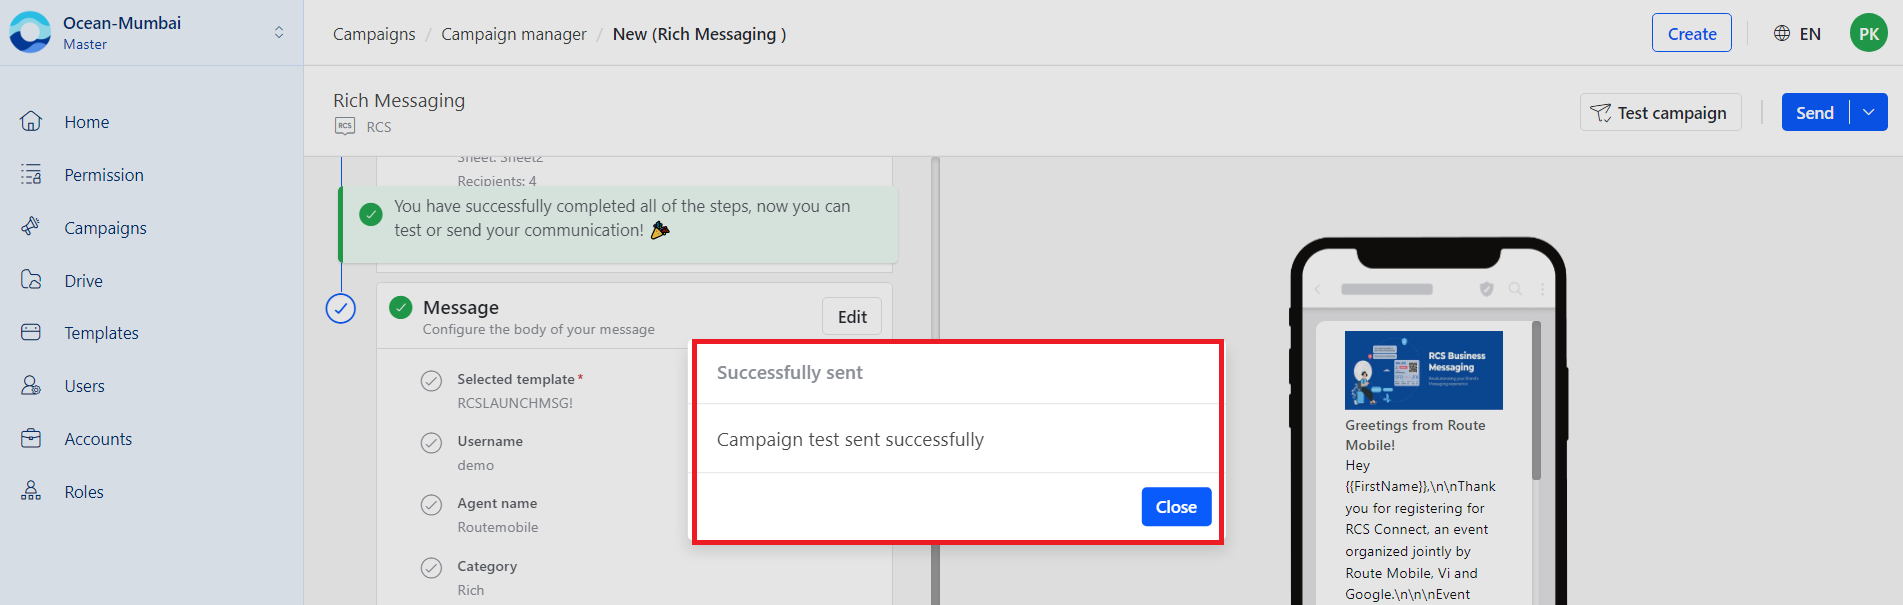
After a successful test, a confirmation message appears and the RBM test message is delivered to the provided mobile number.
Send an RBM campaign
To send an RBM campaign immediately:
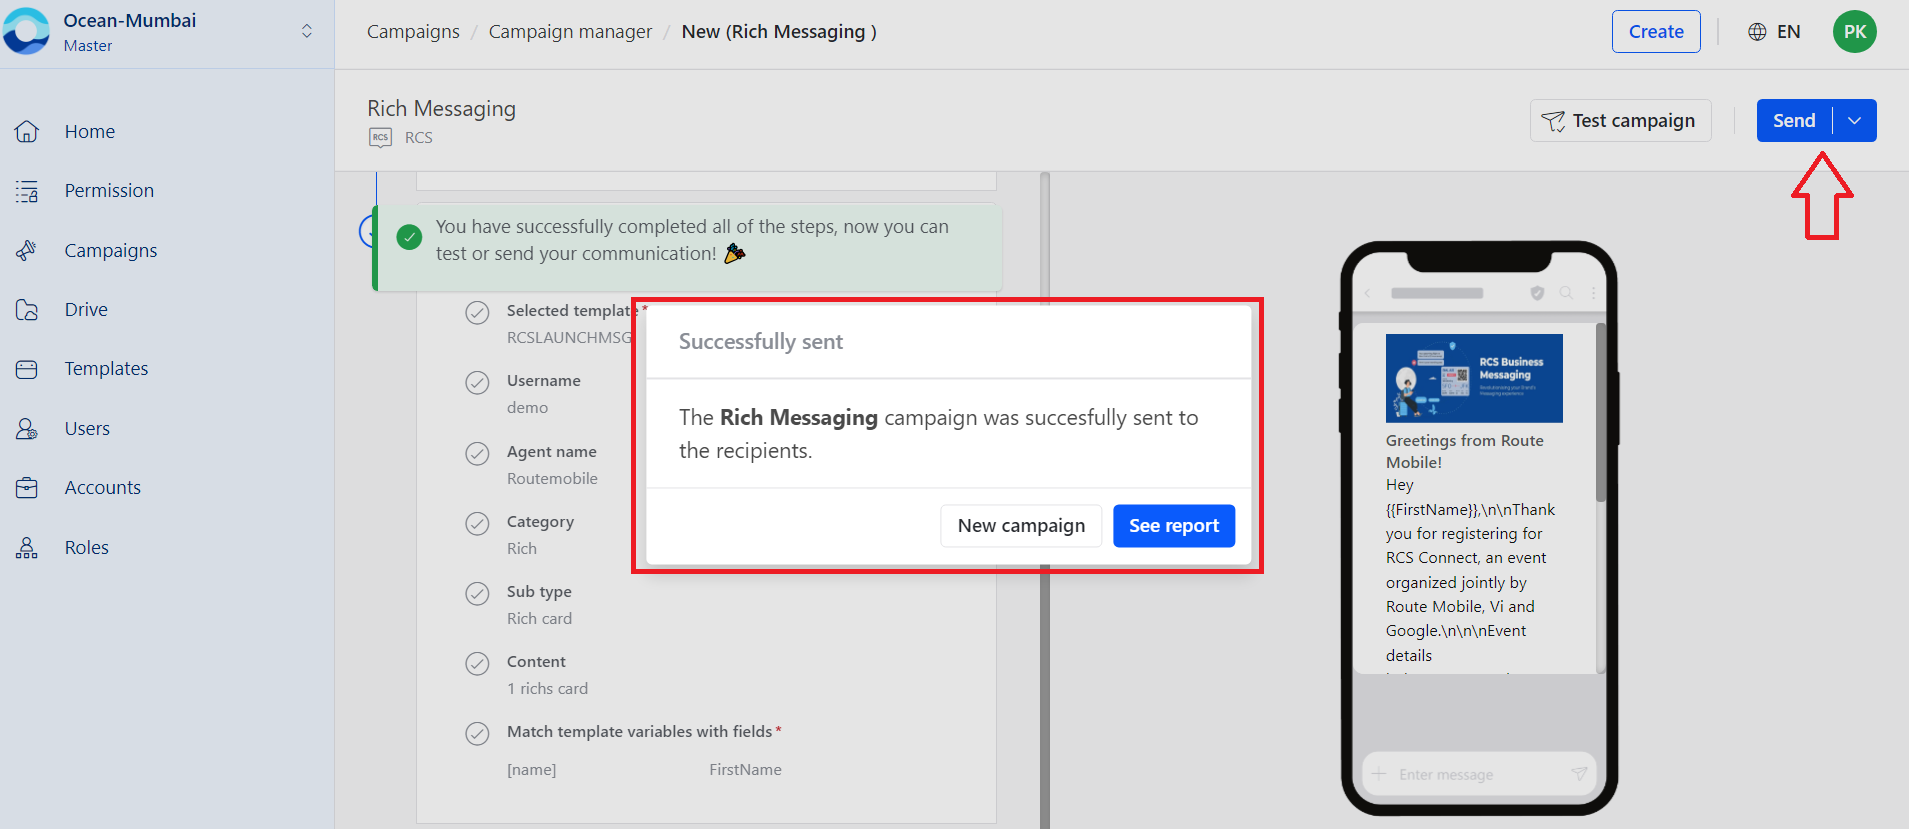
- Click Send on the right side.
- Confirm the send action in the popup window.
- Click See report to check campaign status.
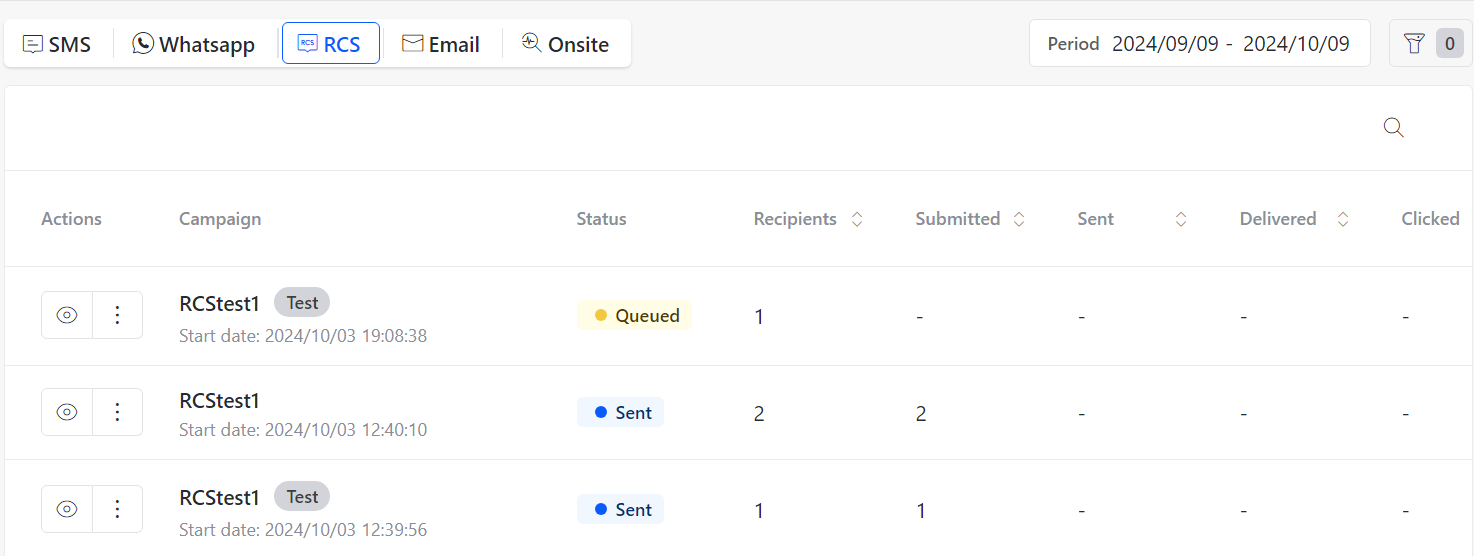
The campaign appears in the campaign manager immediately with the status Queued. The status changes to Sent after successful delivery.
Schedule an RBM campaign
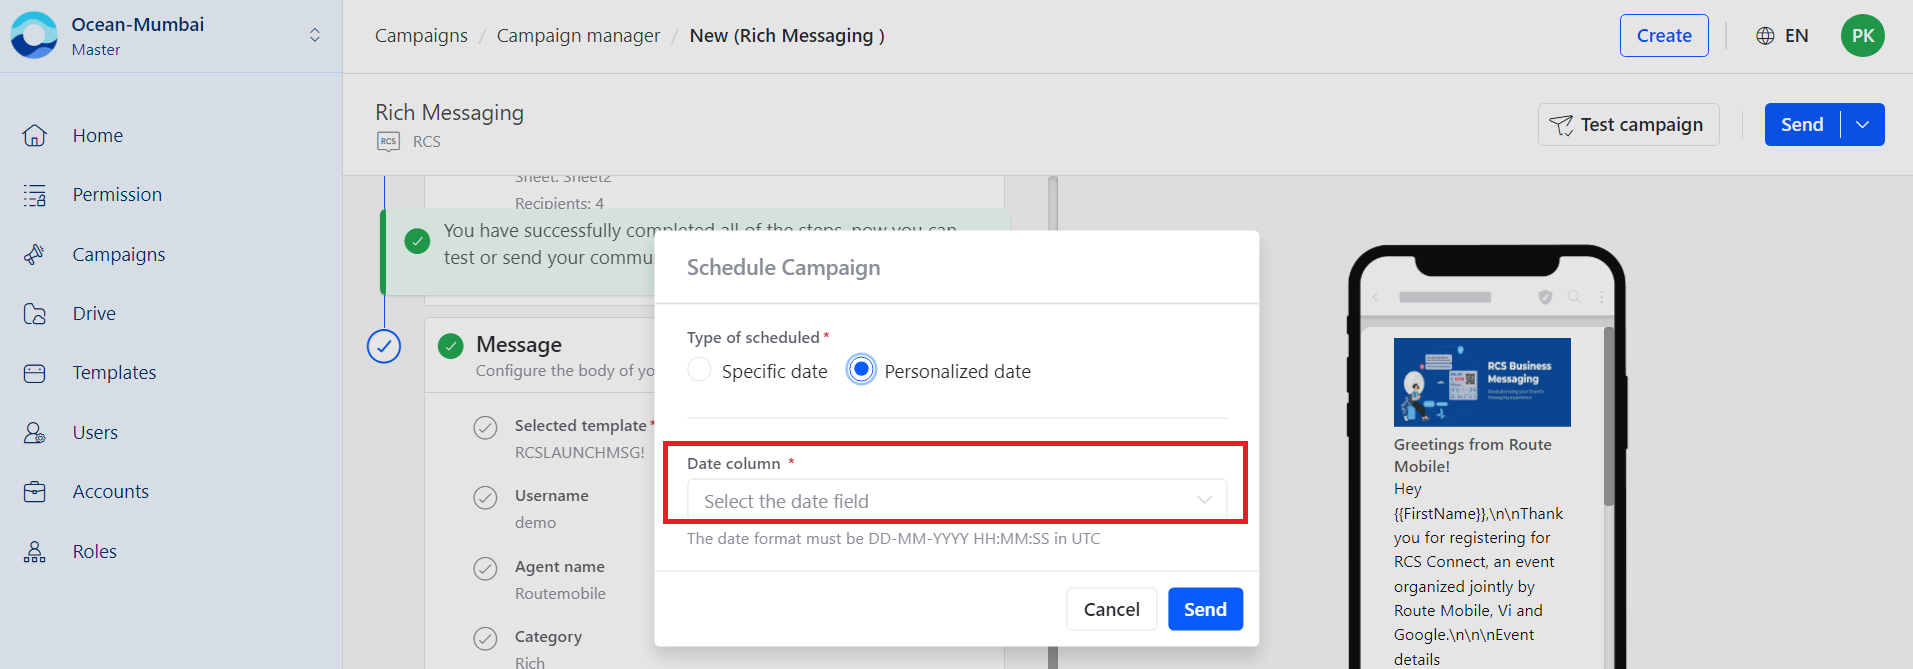
To schedule an RBM campaign:
- Click the dropdown next to Send.
- Select Schedule Campaign.
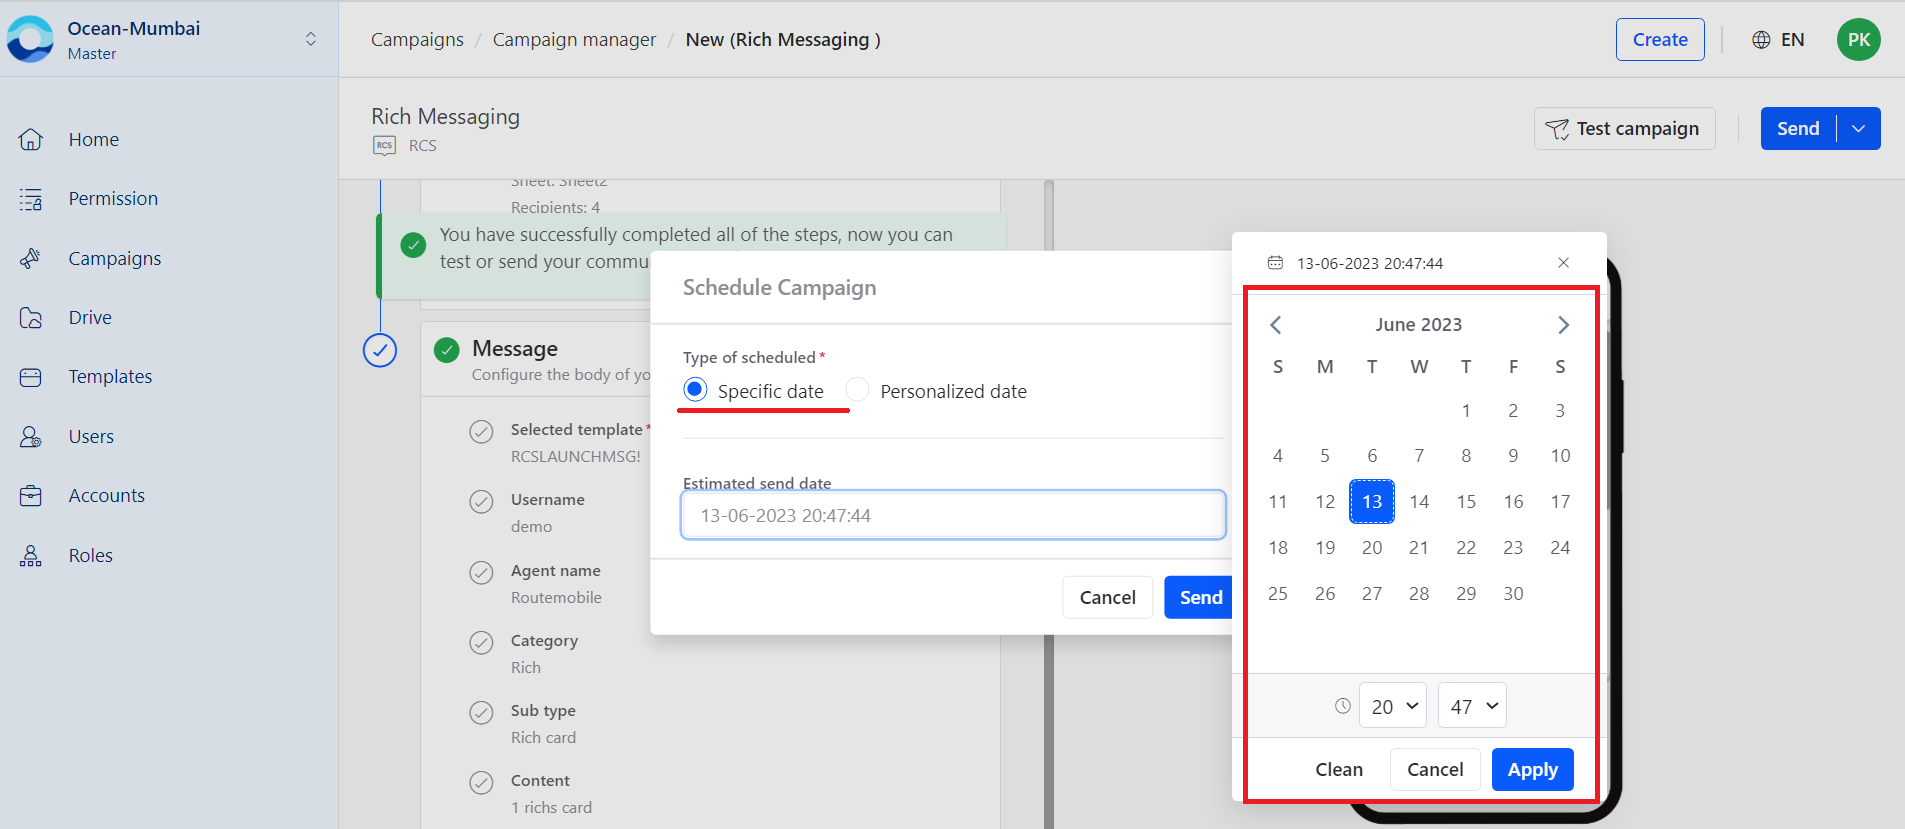
- Choose one of the schedule options:
- Specific date: Select a date from the calendar.
- Personalized date: Select the date column from the uploaded Excel sheet.
- Click Send.
The campaign appears in the campaign manager with the status Scheduled.

Updated 4 days ago