
How to send a RCS Business Message
Use the Send Message flow to send RCS Business Messages to a single contact, multiple contacts, or a personalized contact list.
Select Operation Type
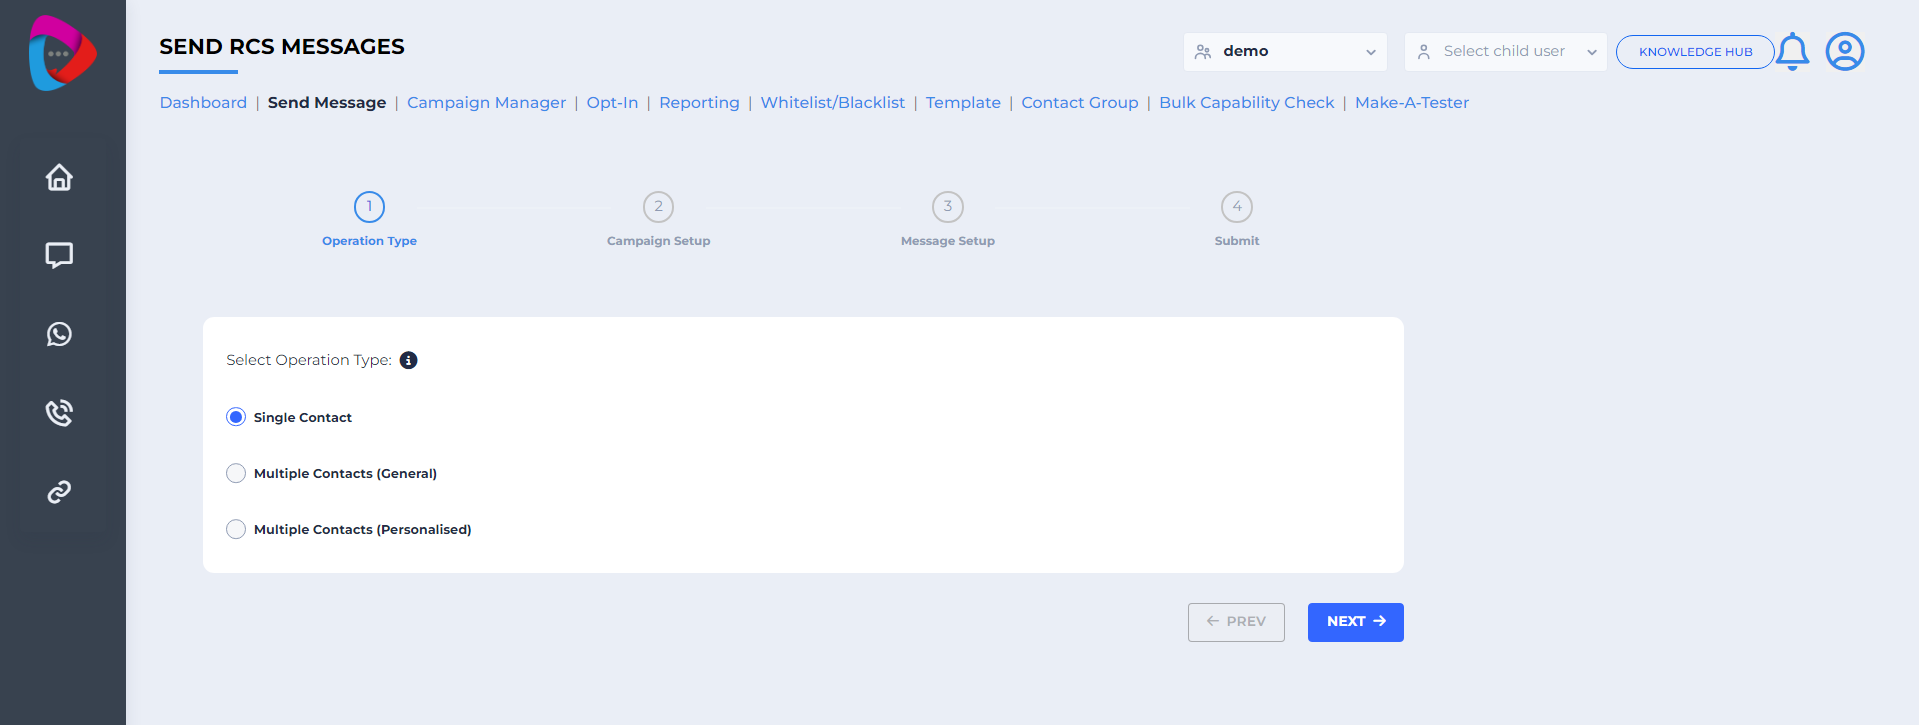
When you click the Send Message tab, a new window appears where you can select the operation type.
Select one of the following operation types:
- Single Contact: Send a message to a single number.
- Multiple Contacts (General): Send RCS messages to more than one number.
- Multiple Contacts (Personalized): Send personalized messages to multiple contacts.
Campaign setup
When you select Single Contact, you move to the next step where you have to select the message type.
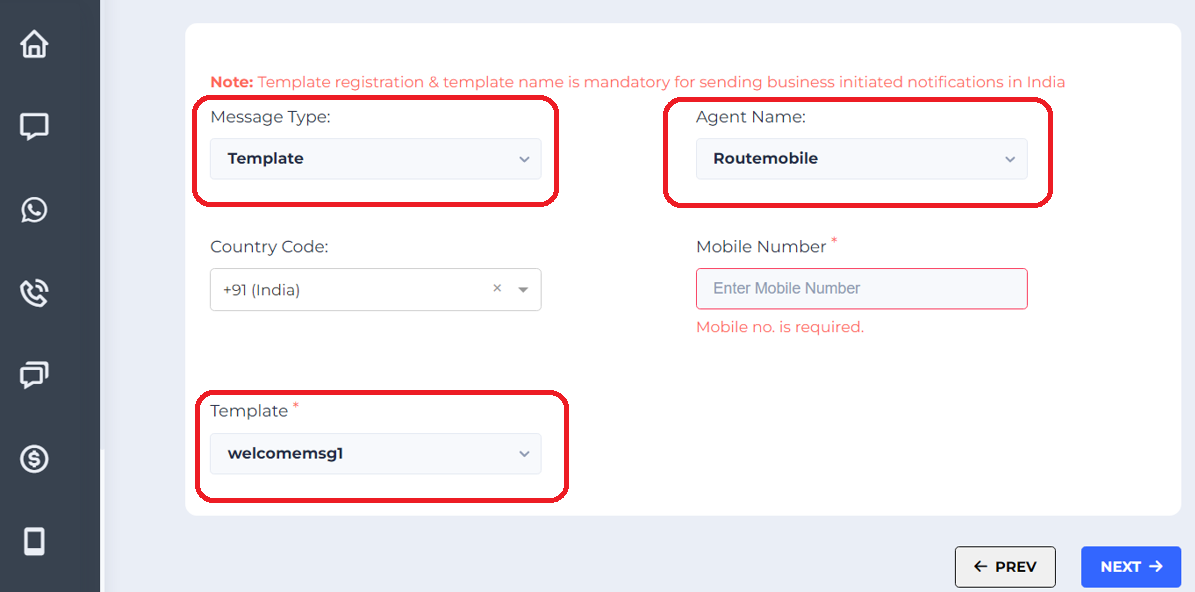
Configure the campaign details:
- Message Type: Select Template if you are sending Business Initiated Notifications. For session messages, you can select any message type you want to send.
- Agent Name: Select the Agent Name according to the category: Promo, Trans, or OTP.
- Country Code: Enter the country code. Example:
+91. - Mobile Number: Type the number to which you want to send the message.
- Template: Select one of the registered templates shown under the template section.
Message Setup
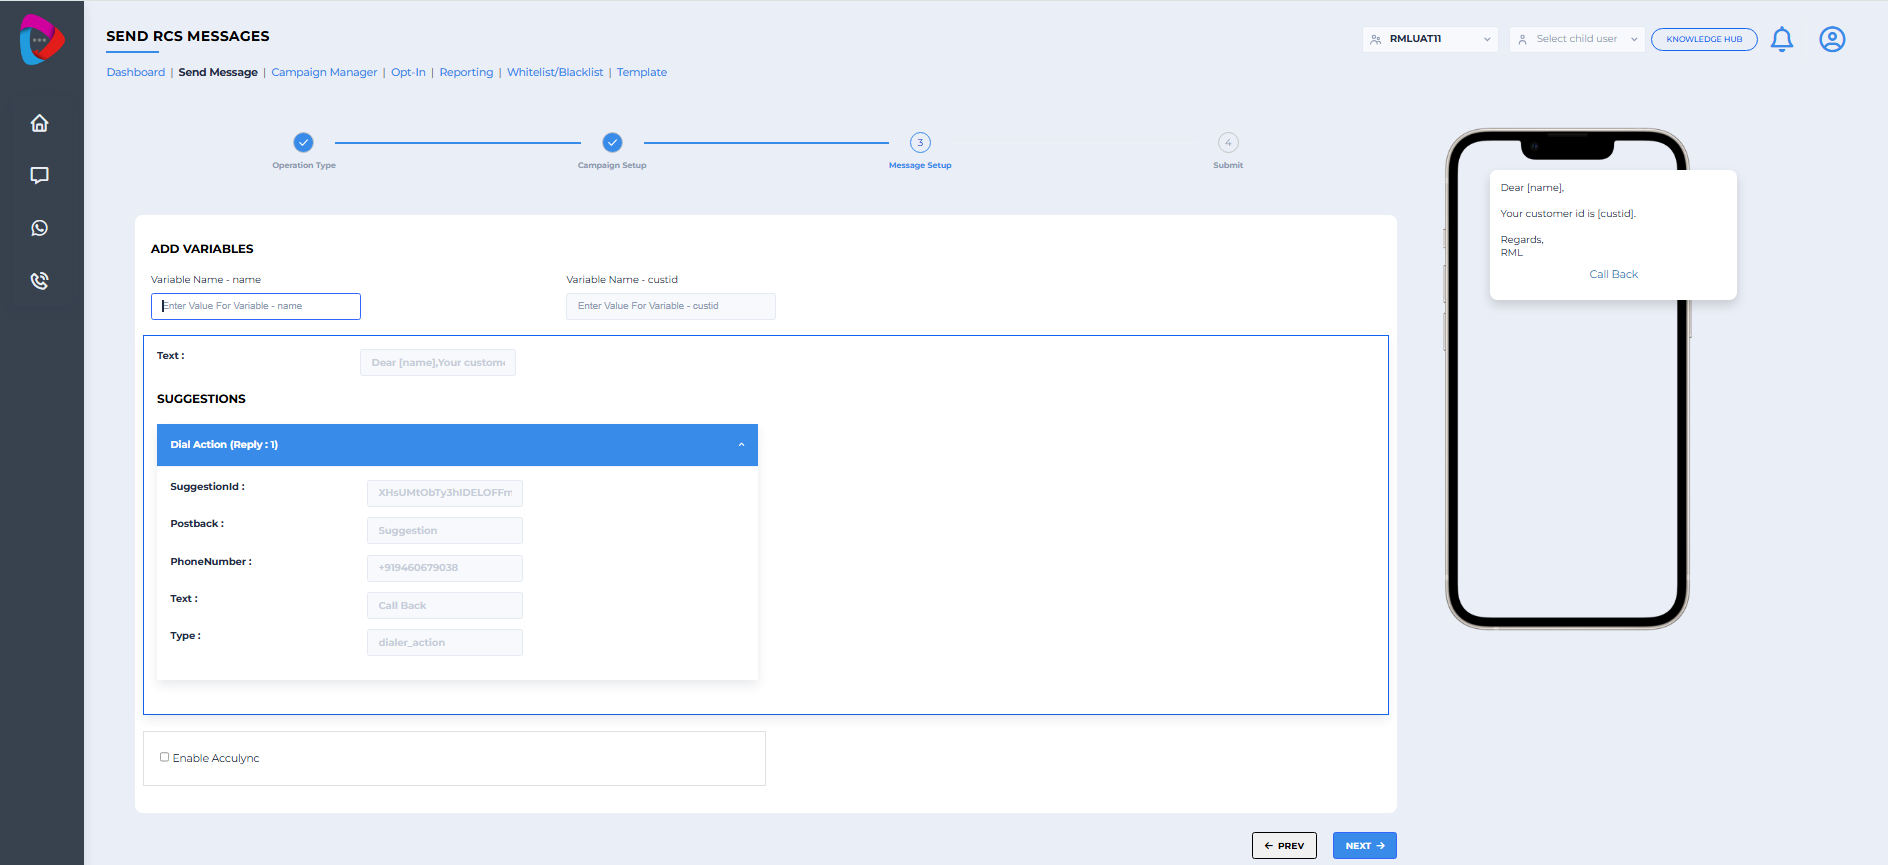
Once you select the template, you can preview the message on the right side of the screen.
- Add Variable: If the selected template contains a variable in the body content, provide the variable parameter without curly braces.
- Enable Acculync : Enable Acculync to shorten long URLs. This service reduces costs and character length by creating unique URLs that you can incorporate into your message campaigns.
Customers can add their custom domain name to the shortened URL if they wish to improve brand recognition. By creating user-focused campaigns, end-user click analytics—such as device kind, location, and web browser used—help lower messaging expenses.
Campaign setup
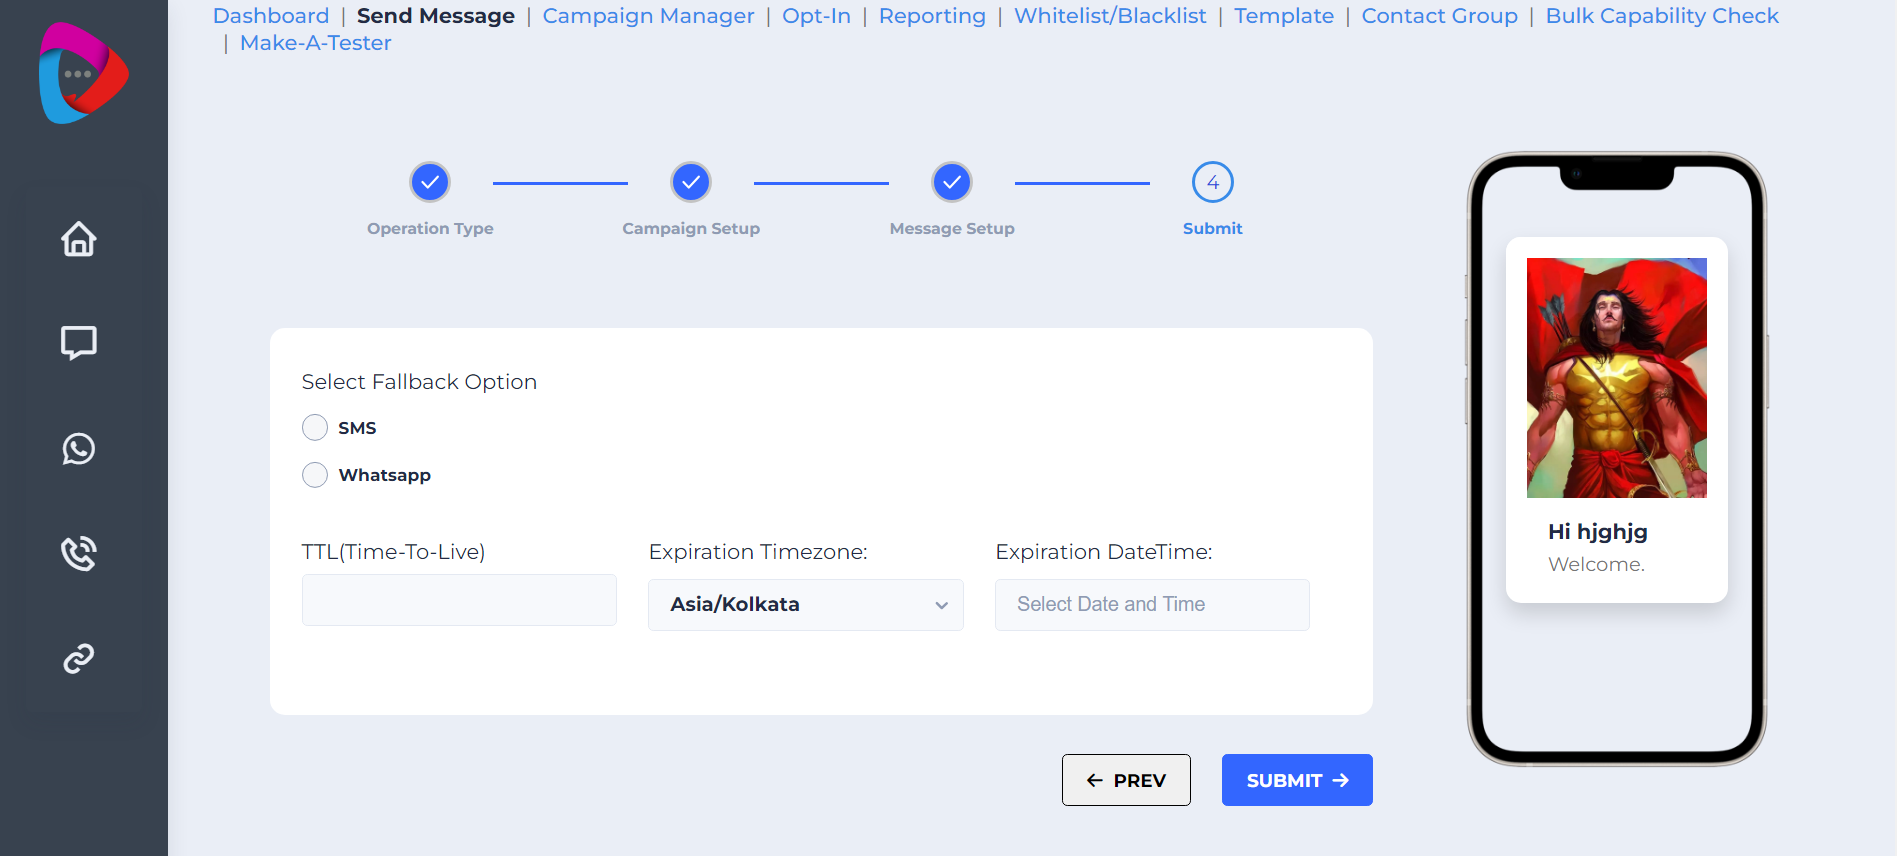
Configure fallback settings if you want to send an alternate message when the RCS message fails.
- Fallback: If your RCS message fails to send, you can automatically send a similar message as either an SMS or a WhatsApp message instead.
- TTL and Expiration Date/Time: TTL is the duration for which a message remains active or valid. It works like a countdown timer set in seconds. Once this time elapses, the message is considered expired and won't be delivered. Expiration Date/Time lets you specify the exact date and time until which a message can be delivered. Expiration Time/Date allows users to specify a specific date and time until which a message can be delivered. If the message isn't delivered by this specified time, it will be considered failed, and any further attempts to send it will be prevented.
Fallback to SMS and WhatsApp
Use SMS fallback if you want to send an SMS when the RCS message cannot be delivered.
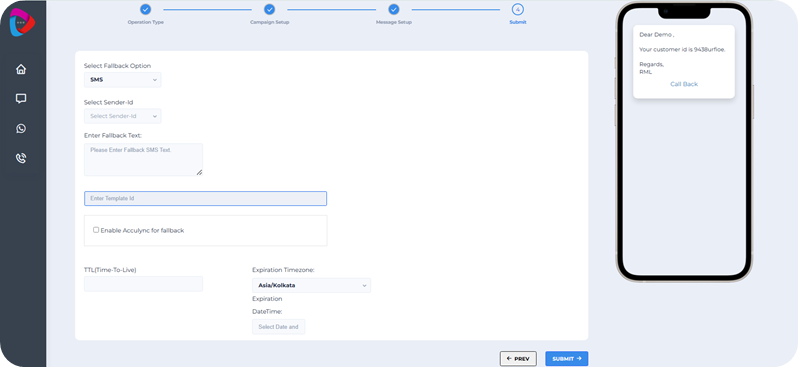
- Fallback to SMS: If you select to send a fallback message via SMS then select SMS as seen in screenshot
- Enter Fallback Text : Where if you wish to send fallback messages for RCS Disabled Number then you can have the SMS message content which is registered on Dlt and click submit.
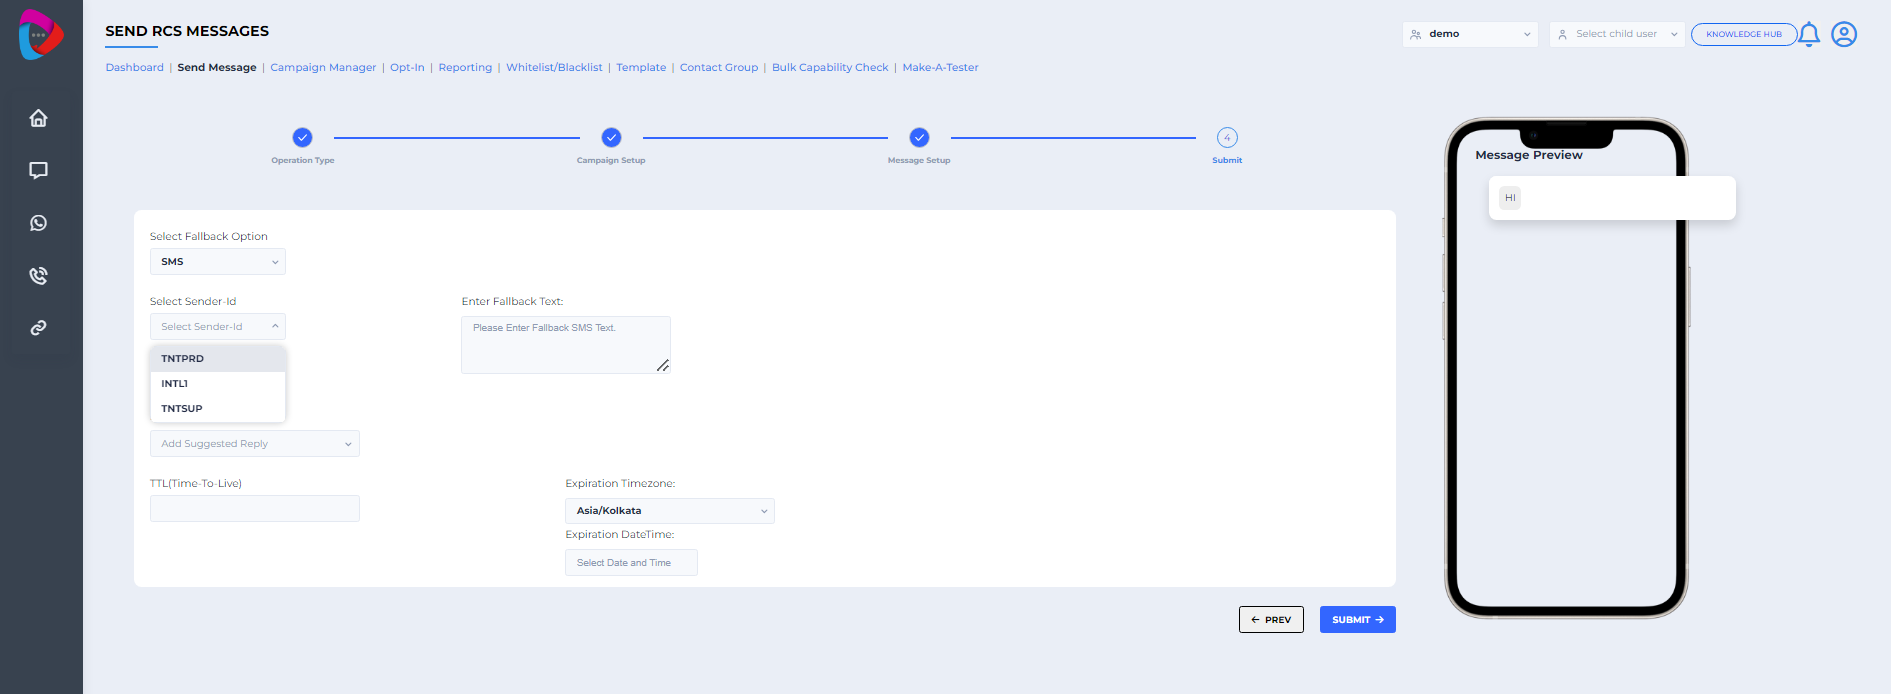
Fallback to SMS and WhatsApp
-
Fallback to SMS: If you select to send a fallback message via SMS then select SMS as seen in screenshot
-
Enter Fallback Text : Where if you wish to send fallback messages for RCS Disabled Number then you can have the SMS message content which is registered on Dlt and click submit.
-
Enter Template Id: Enter the Template ID with respect to message content that has been registered on DLT platform.
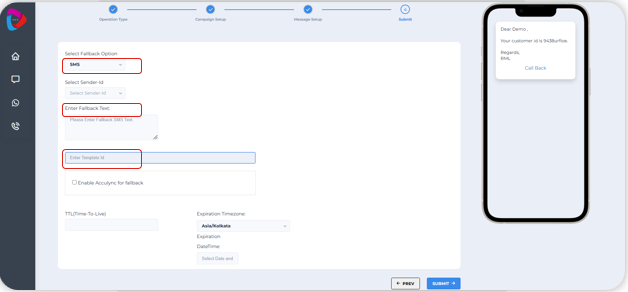
Fallback to SMS and WhatsApp
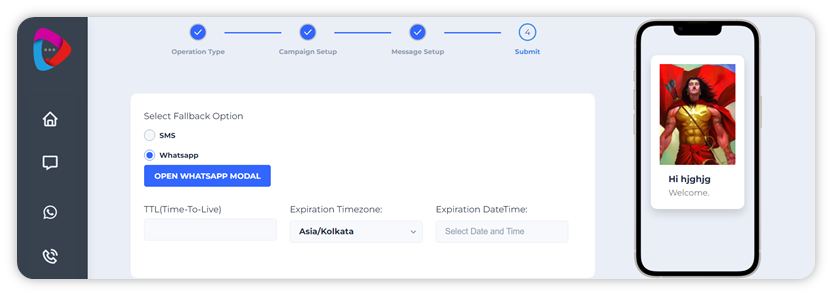
Use WhatsApp fallback if you want to send a WhatsApp message when the RCS message cannot be delivered.
-
Fallback to WhatsApp: If you select fallback to WhatsApp then click on open WhatsApp modal
-
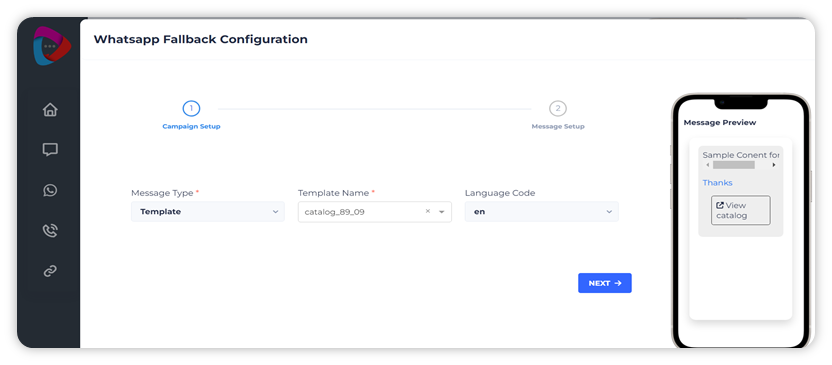
WhatsApp Fallback Configuration: Select your message type, template name and language code from the drop down and click on next for a preview of your WhatsApp message.
Submit
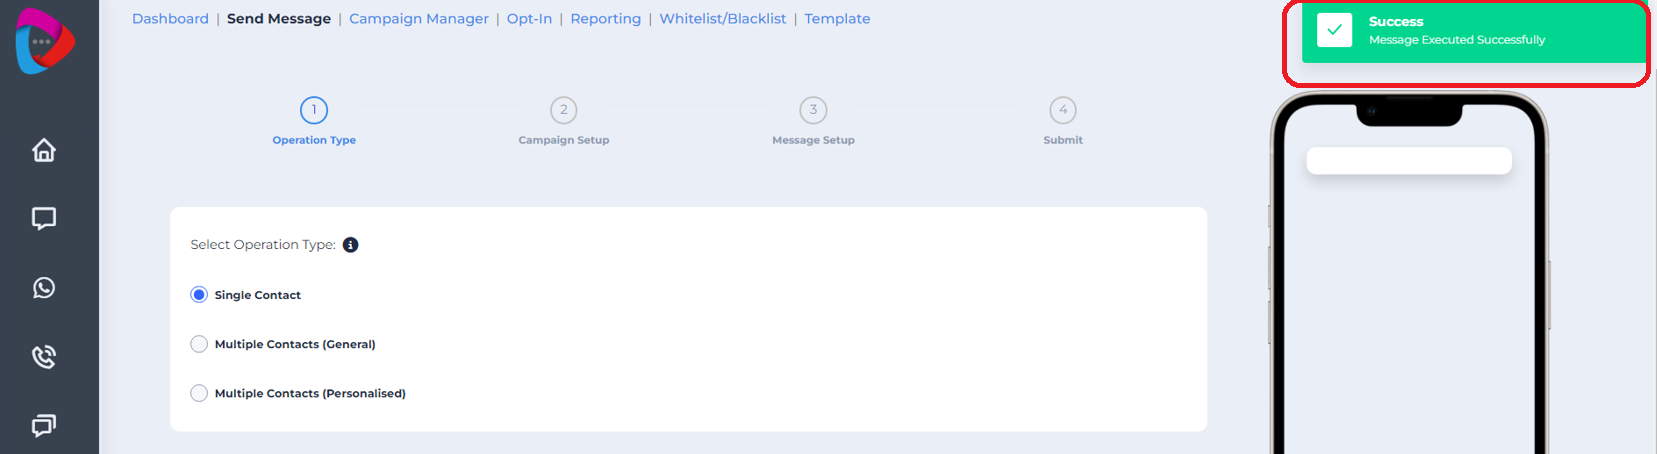
Success : Once the message is submitted you can see that message has been executed successfully.
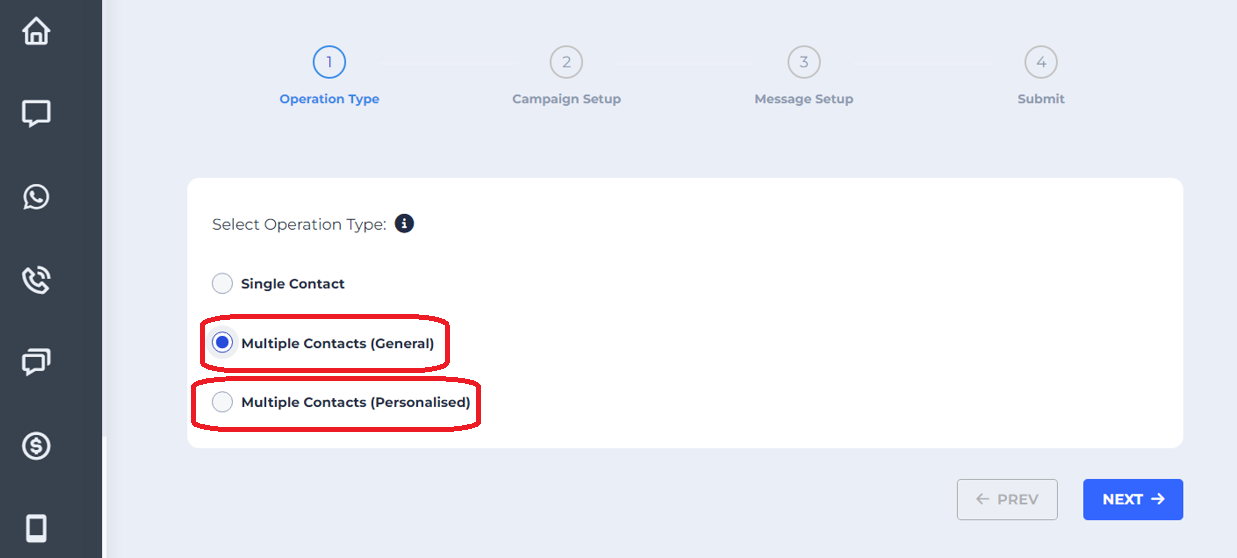
Select Operation Type — Multiple Contacts
Select one of the following multiple-contact operation types:
- Multiple Contacts (General): Send RCS messages to more than one number.
- Multiple Contacts (Personalized): Send personalized messages to multiple contacts.
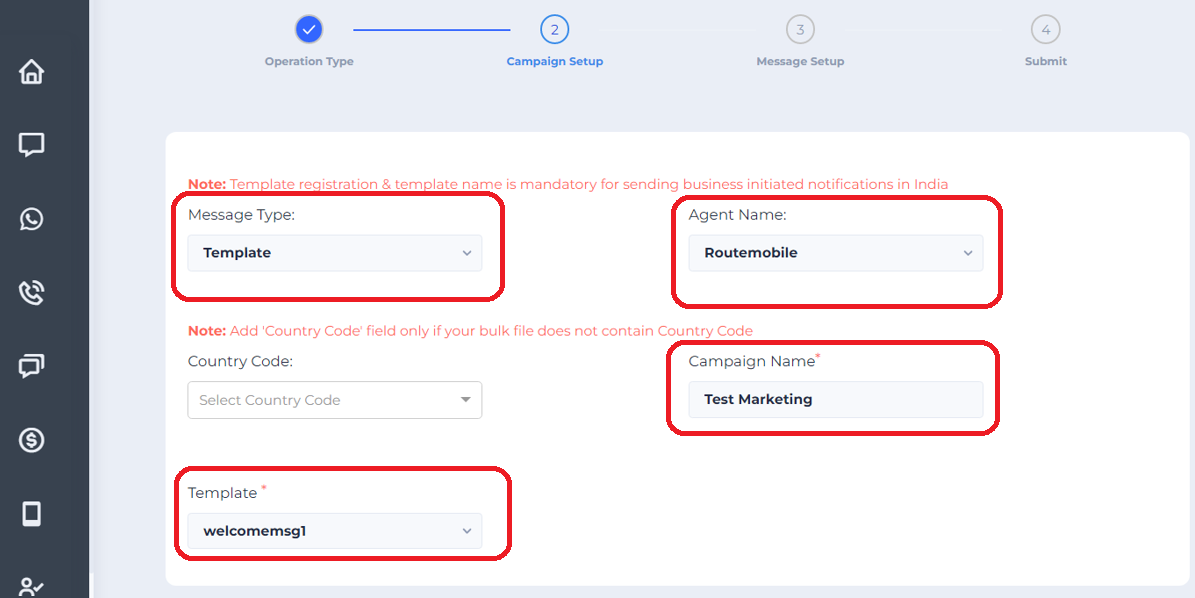
Campaign Setup for multiple contacts
Once you select Multiple Contacts (General) or Multiple Contacts (Personalized), configure the campaign details.
- Message Type: If you are sending a Business Initiated message, select Template type. For session messages, select any available message type :
- Agent Name: Select the sender created for the brand.
- Campaign Name: Enter an alphanumeric campaign name within 25 characters. Do not use special characters.
- Template: Select the template registered under the selected agent.
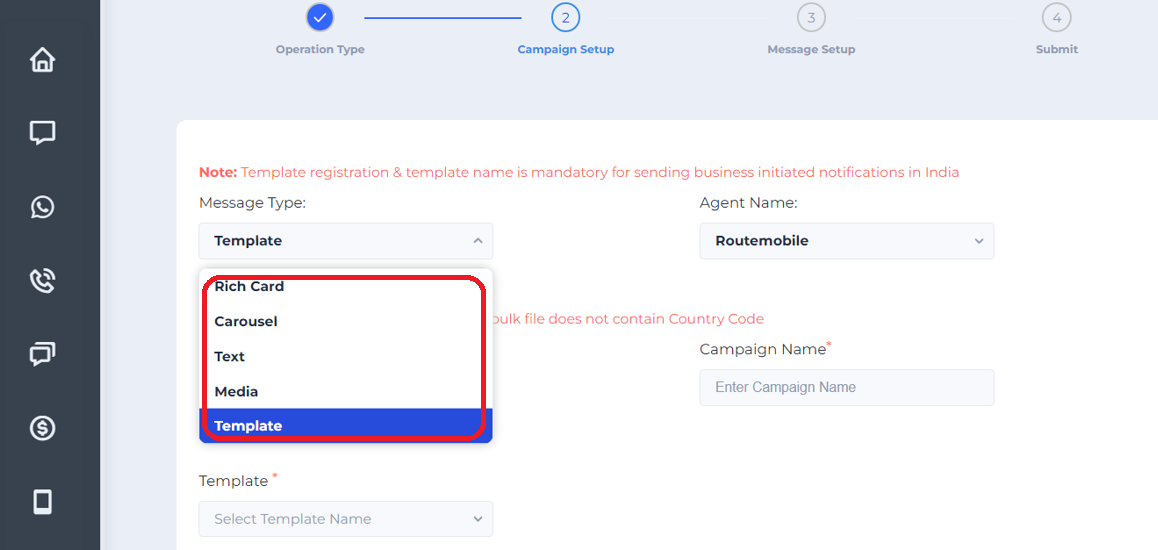
Message Setup for multiple contacts
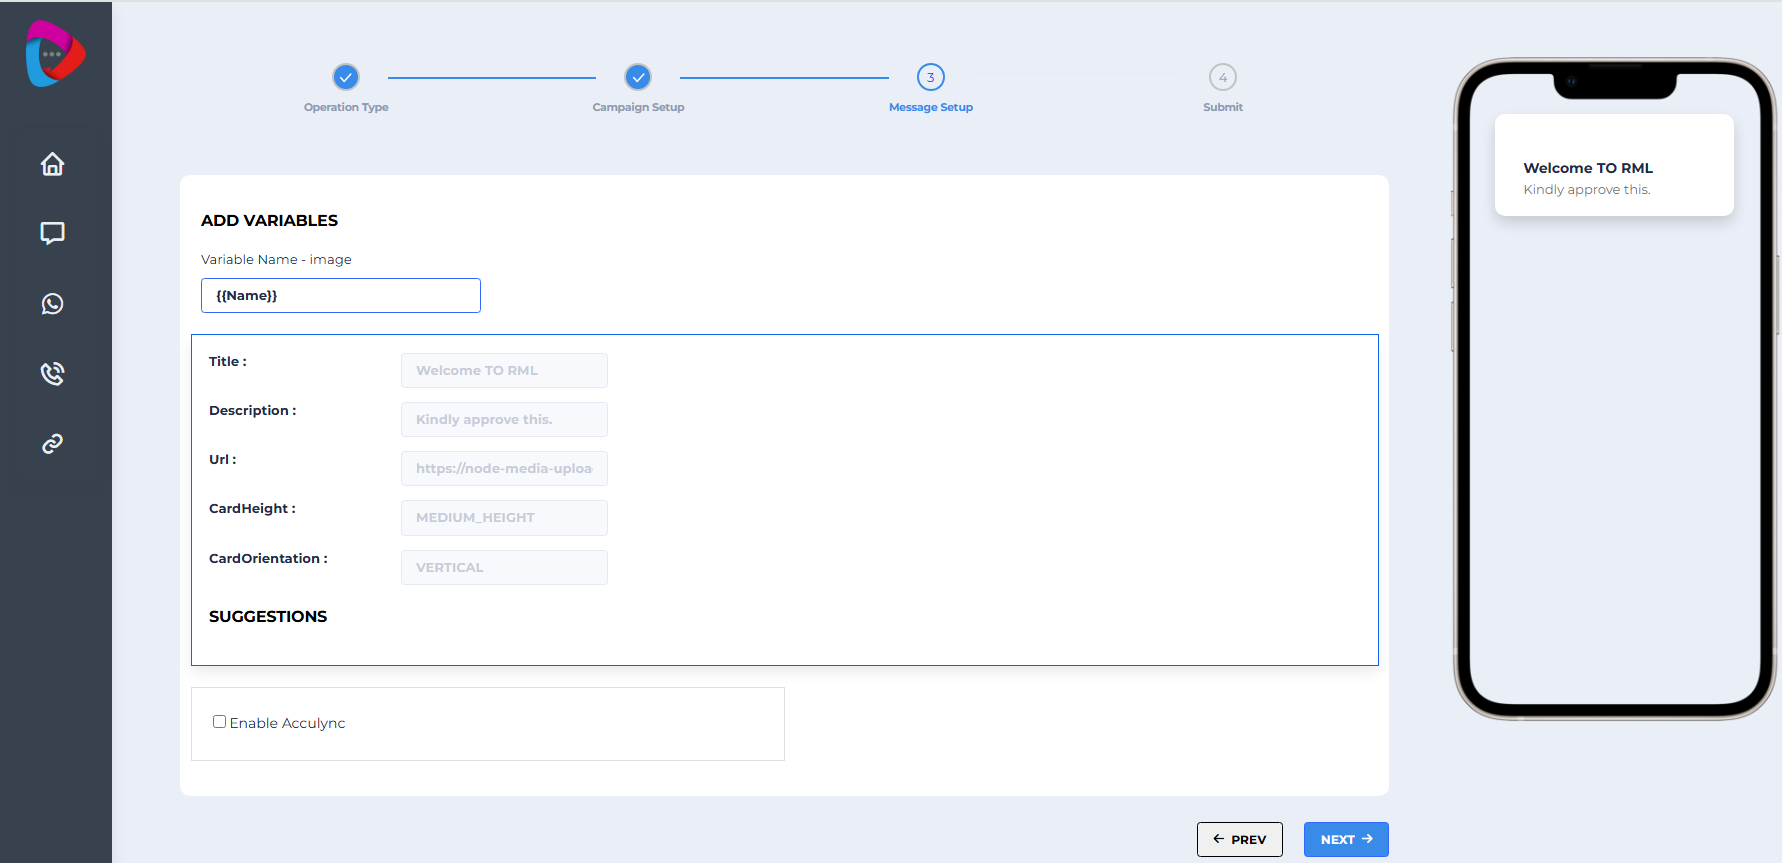
Once you select the template, you can view the template details in the message setup.
- Add Variable : If that particular template contains any variables in it for personalized type of campaign, then add the variable content with two curly braces along with the variable parameter.
- Once the template has been approved, you cannot edit the template, but you can add variable content.
NoteFor Generalized and Single messages, you do not need to add the variable parameter within braces.
Campaign Setup
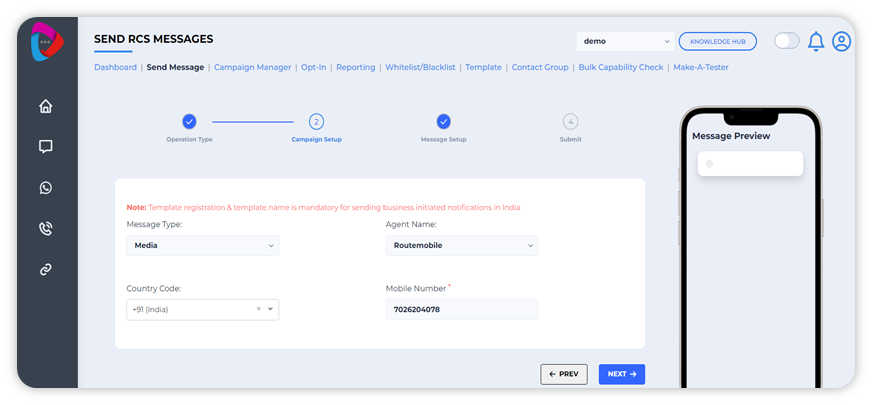
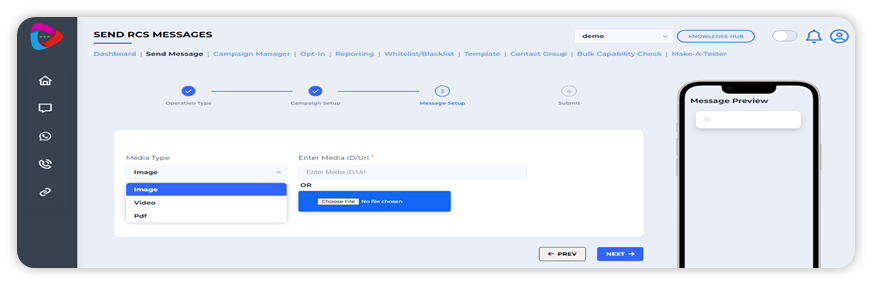
Once you select Multiple contacts for generalized or personalized.
- Message Type: If you are sending a Business Initiated message, select Template type. For session messages, select any available message type :
- Agent Name: Select the sender created for the brand.
- Campaign Name: Enter an alphanumeric campaign name within 25 characters. Do not use special characters.
- Template: Select the template registered under the selected agent.
Upload file and submit
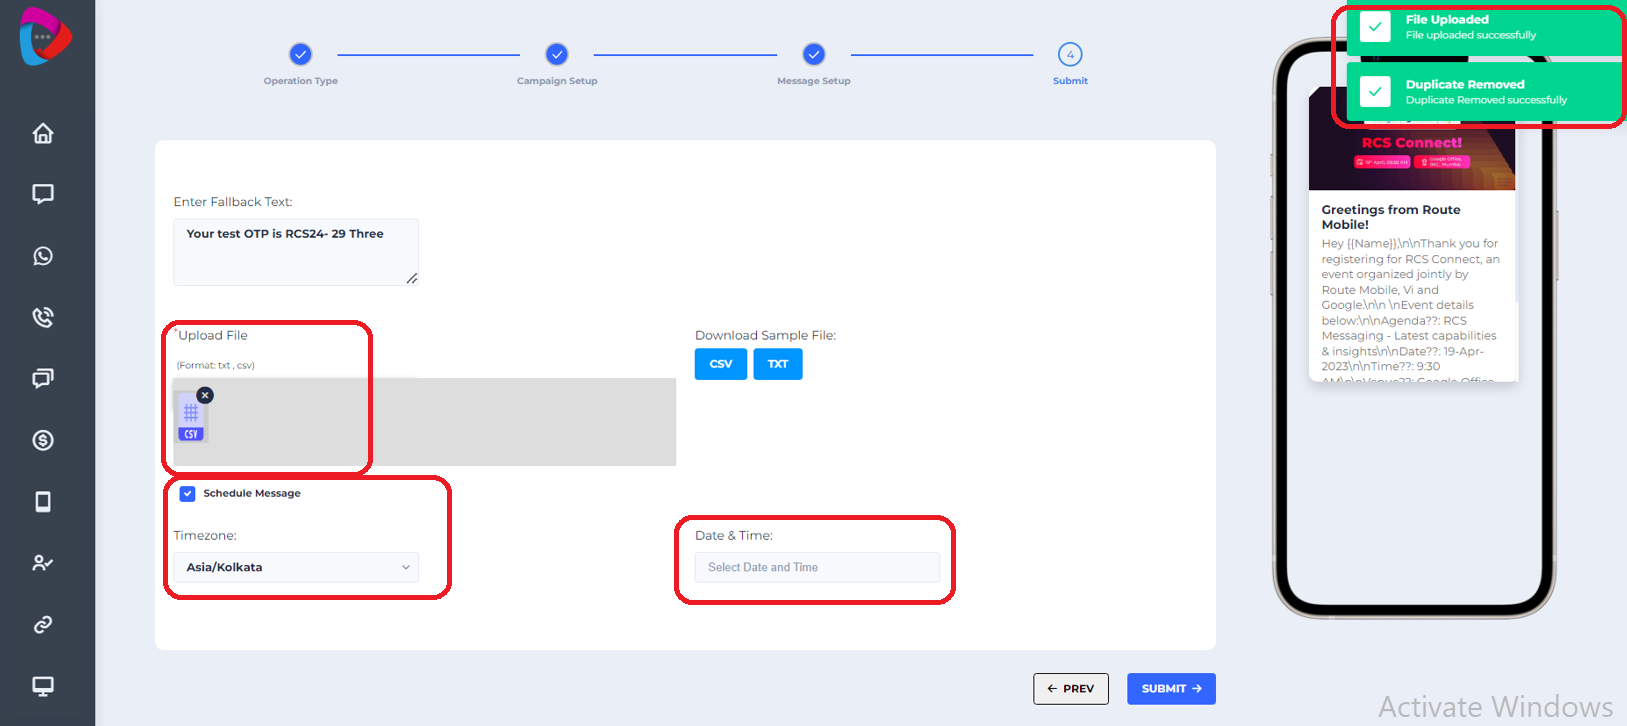
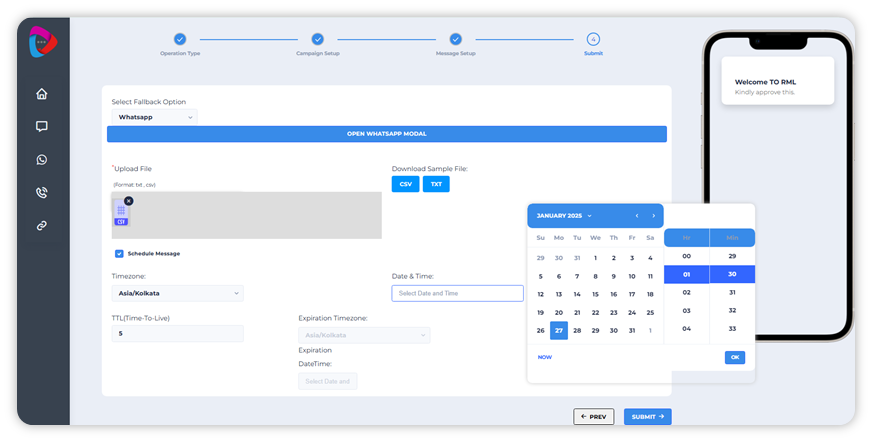
Upload the contact file and schedule the message if required.
- Upload File: For a bulk campaign, upload a
.txtor.csvfile with the headerphone. If the message contains variables, add the same variable header in the second column. - Schedule Message: Select the checkbox if you want to schedule the campaign for later today or tomorrow.
- Timezone: Select the timezone according to the region.
- Date & Time: Select the date and time when you want to send the message.
Once you have uploaded the file and duplicates have been removed you can see the success message at right end corner.
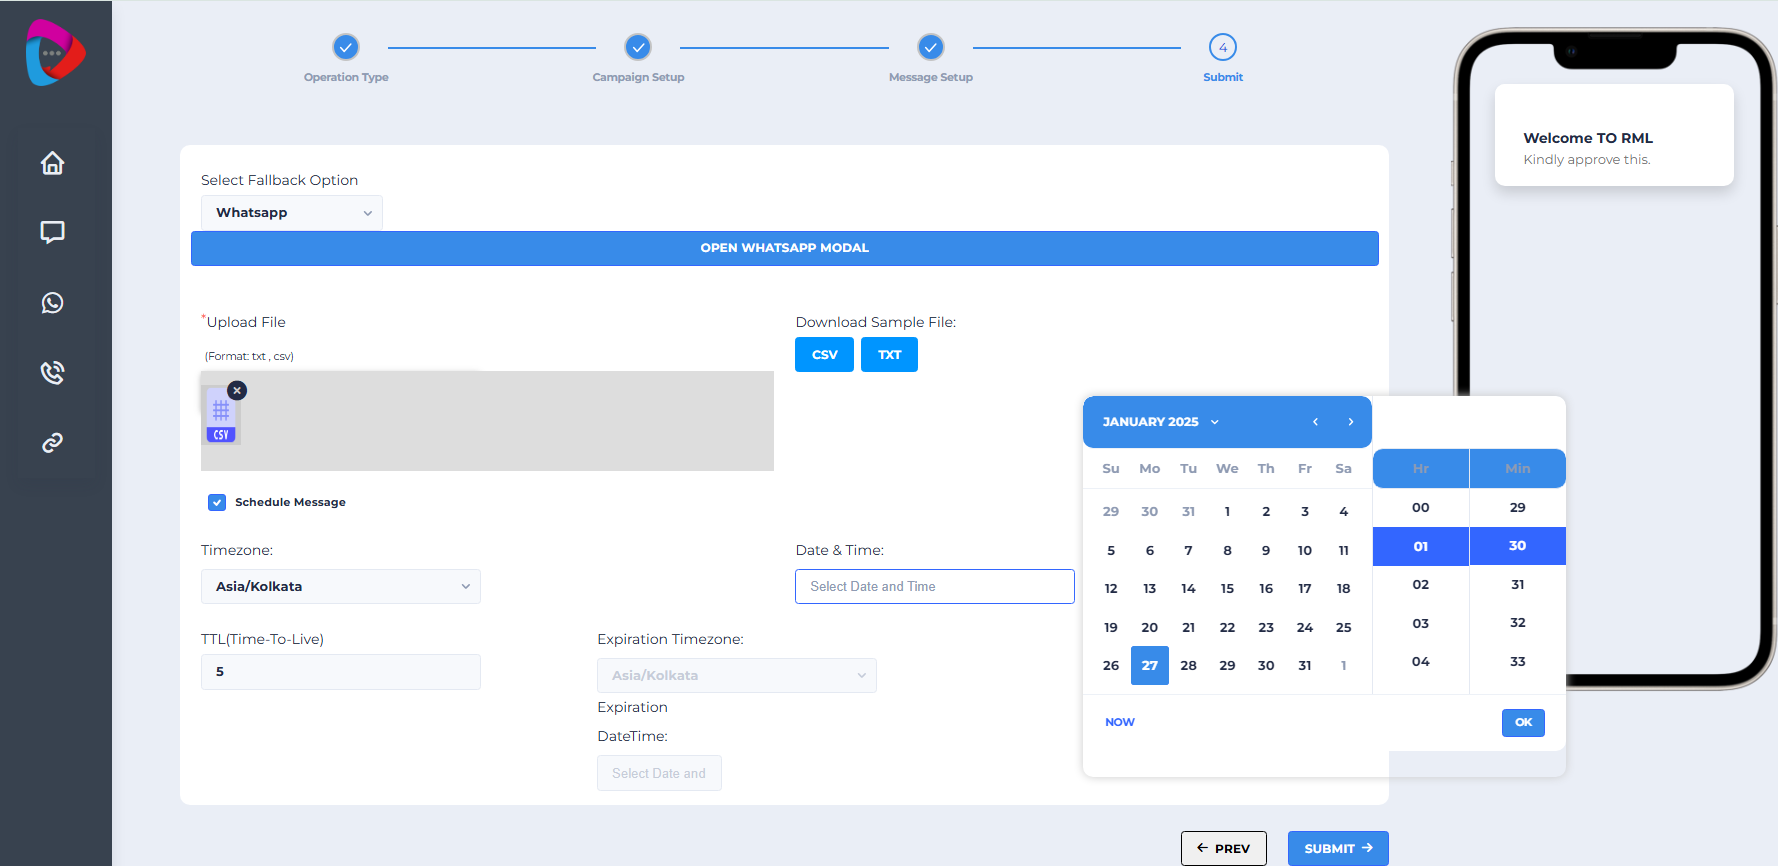
Upload file and submit
Upload the contact file and schedule the message if required.
-
Upload File: For a bulk campaign, upload a
.txtor.csvfile with the headerphone. If the message contains variables, add the same variable header in the second column. -
Schedule Message: Select the checkbox if you want to schedule the campaign for later today or tomorrow.
-
Timezone: Select the timezone according to the region.
-
Date & Time: Select the date and time when you want to send the message.
TTL (Time to Live) : Specify the duration (in secs) for which a message remains valid. If the message cannot be delivered within the TTL period, it will expire and not be sent.
Once you have uploaded the file and duplicates have been removed you can see the success message at right end corner.
Non-Template Message
Once the user responds back to Business messages, the brand can trigger messages to the user without template approval.
Types of non-template messages:
- Rich Card
- Carousel
- Media
- Text
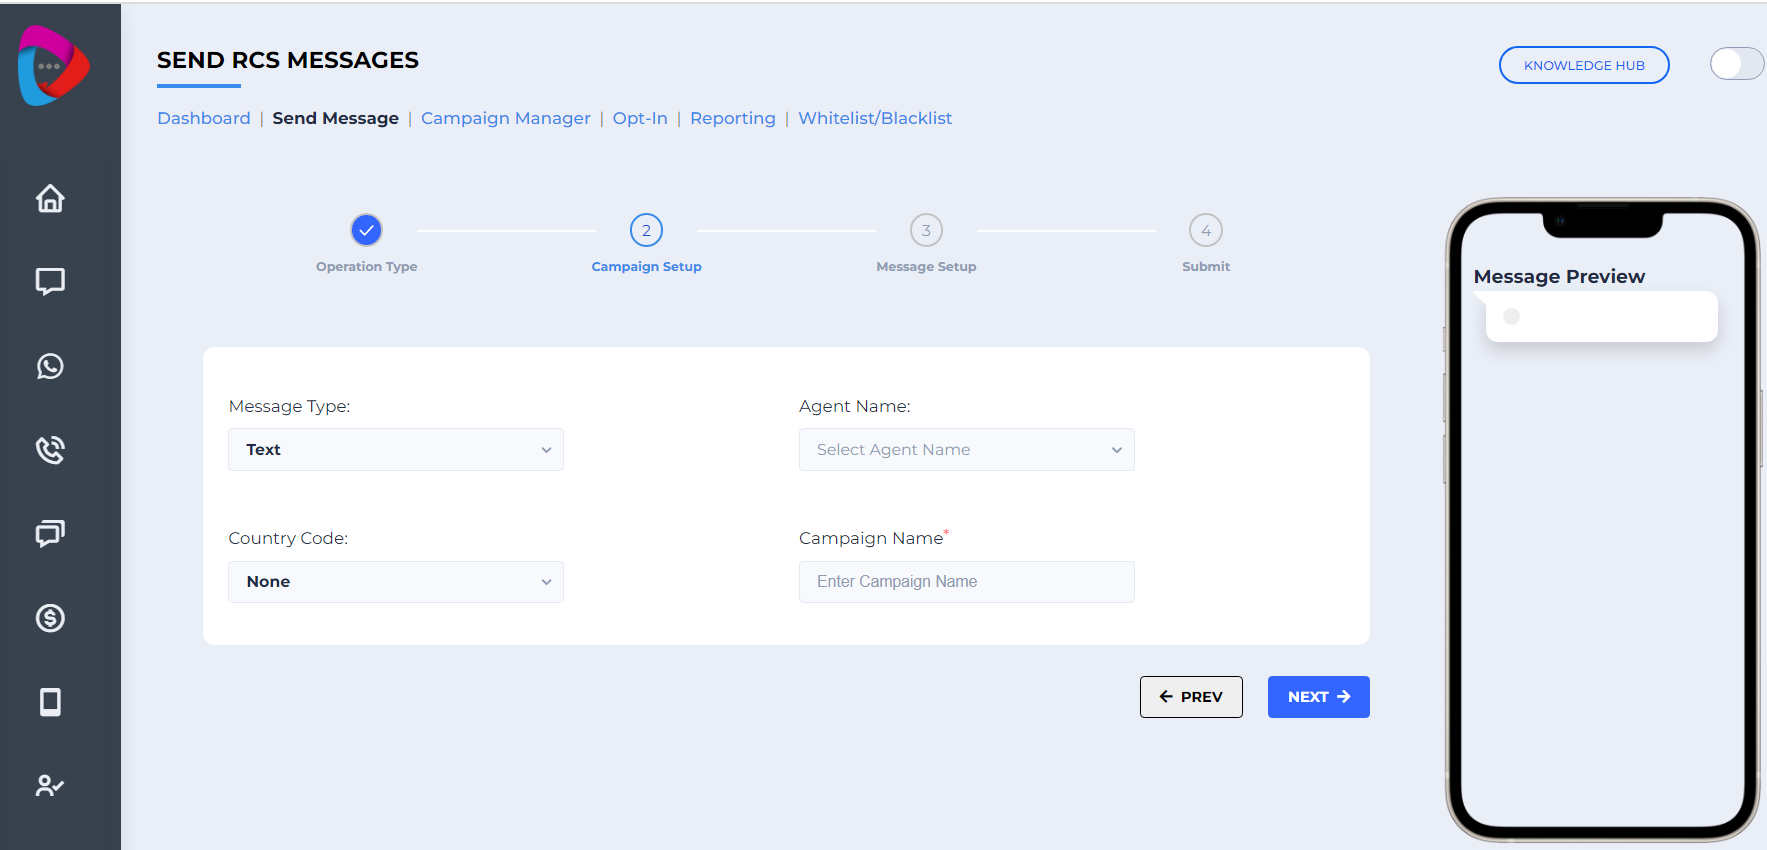
Campaign Setup for Non-Template Message
Points to note while setting up the Campaign for Multiple Numbers
- Campaign Name: Your campaign name must be within 25 characters and must be alphanumeric without special characters.
- Message type: Choose from Media, Text, Rich, or Carousel.
- Agent Name: Select the agent of the brand.
- Country Code: Choose your country code.
- Contact List: Upload either a
.txtor.csvfile. Mobile numbers do not need a country code if it was already provided under the country code section. Example:9875765860. File name for RBM bulk file uploads can be alphabetical, numeric, alphanumeric. File names cannot contain any special characters. File size should not exceed 100 mb. For uploads of file size greater than 100 mb, please write to [email protected] - Duplicates: Duplicate numbers are removed from uploaded files.
- Schedule (Time Zone & Date/Time): Schedule the campaign for a specific date and time when the message needs to be sent to the user.
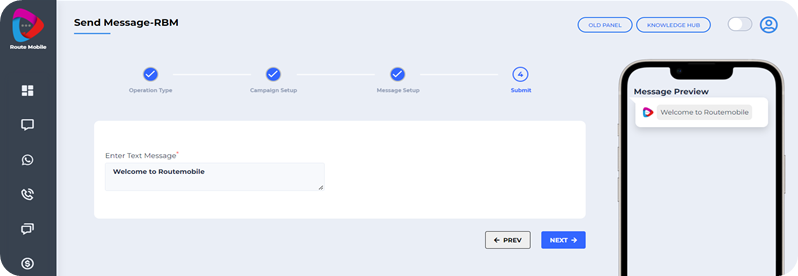
Campaign Setup for Non-Template Message
(Compose your Message & Fallback Text)
(Compose your Message & Fallback Text)
Compose the message content and fallback text.
- Enter Text Message: Type the message which you want to send. If the customer selects other option like Rich, media or carousel then the relevant information as per this message type must be provided.
- Enter Fallback Text: Type the message which you want to add as a fallback SMS.
NoteFor India, only whitelisted DLT templates can be used. Clients should also use the RML SMS service to leverage fallback.
Campaign Setup for Non-Template Message — Suggested Replies/Actions
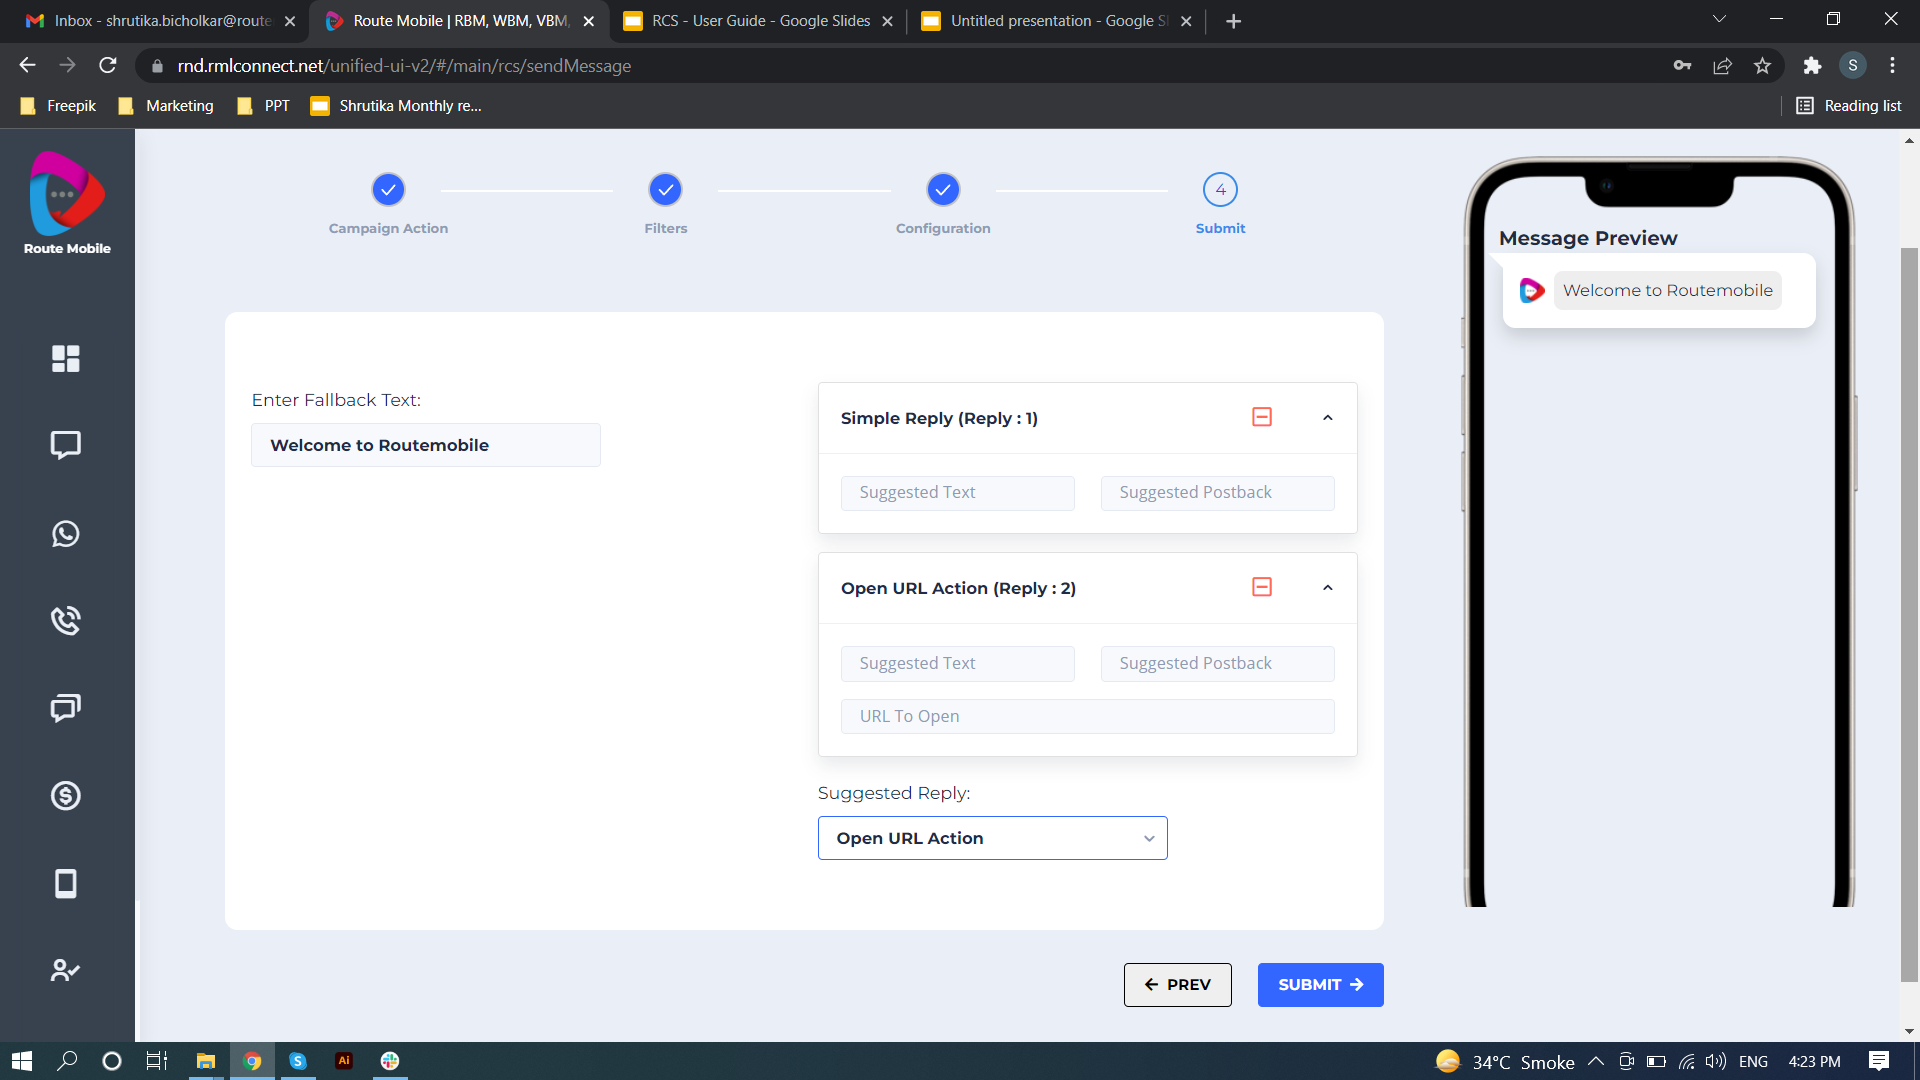
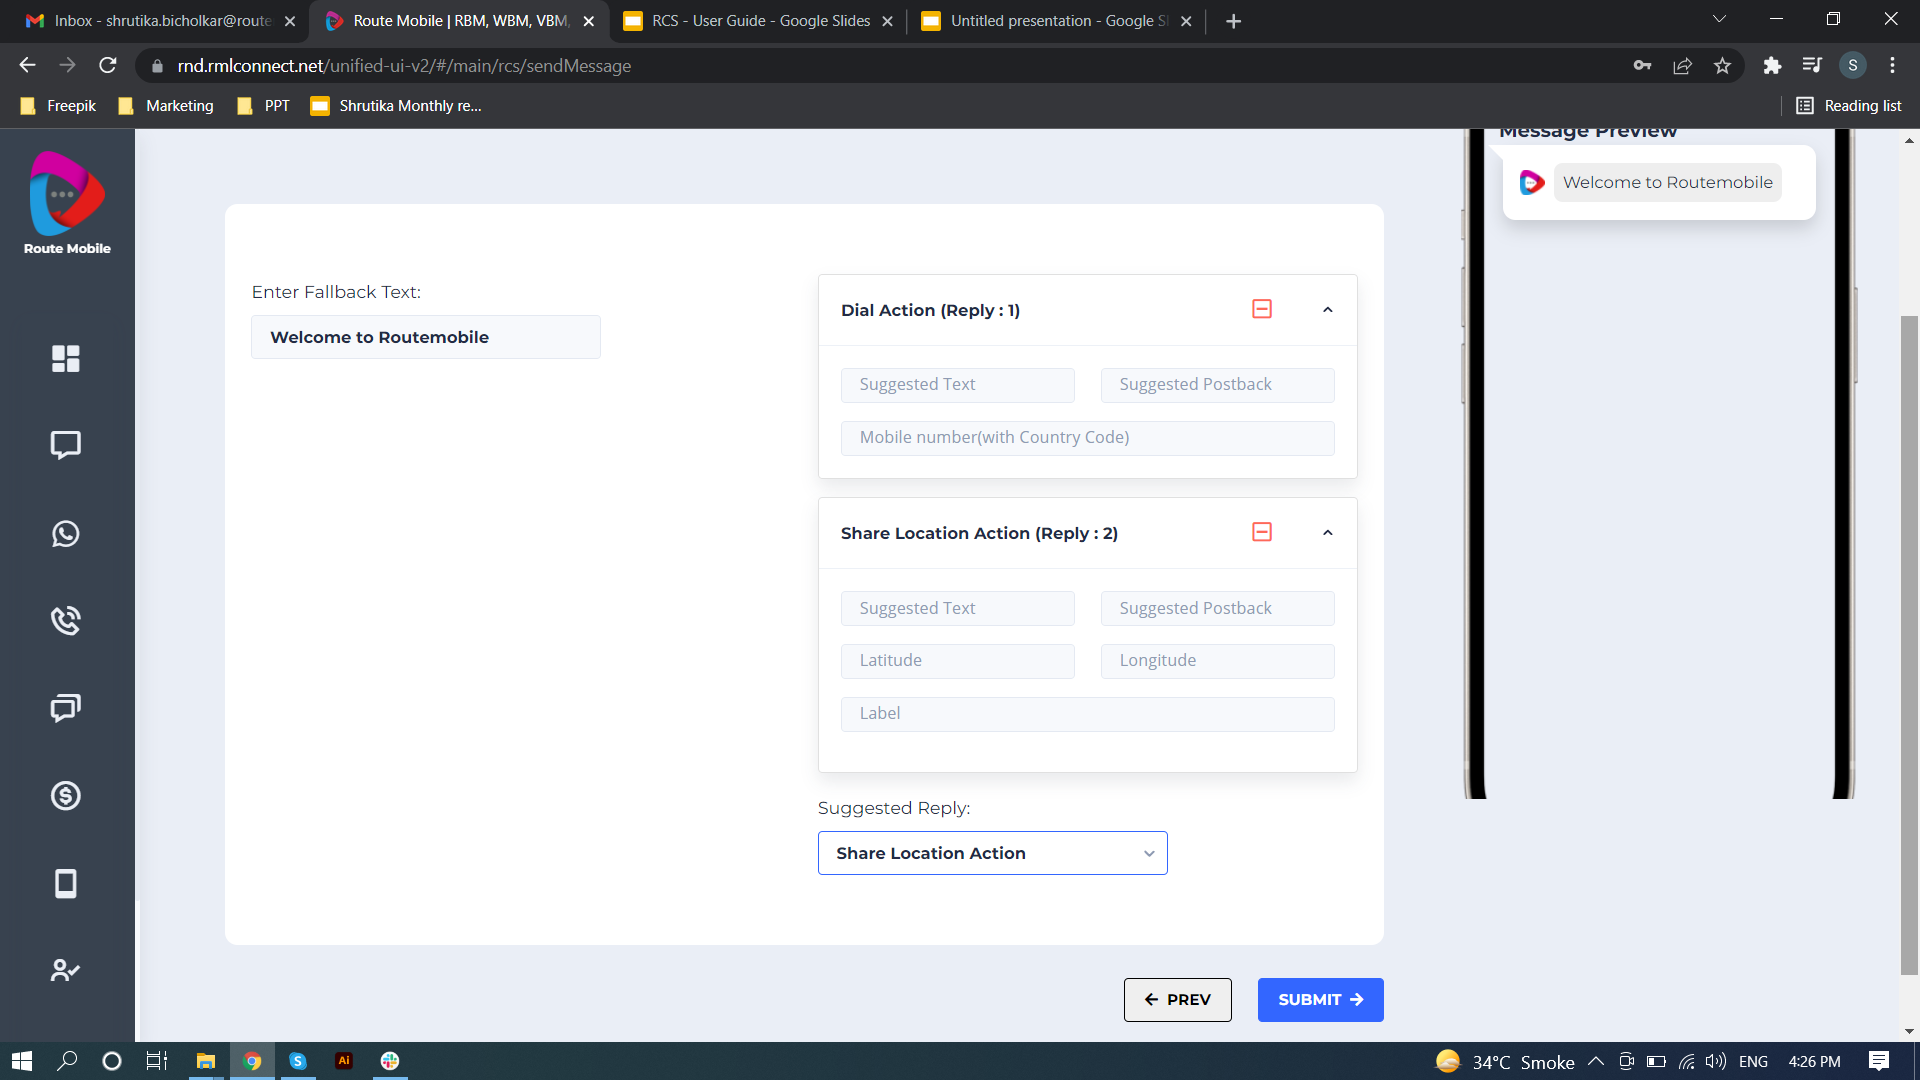
Add Suggested Actions/Replies (Call to Action buttons) : You can add CTA buttons for users to click and capture their responses.
-
These actions can be part of a Rich Card or Carousel and can be used outside as a separate set of buttons.
-
Brands can add up to 11 buttons as part of the text message
-
Character limit is 20 for Suggested Text and Suggested Postback
-
Suggested Text and Suggested Postback should be different texts, so that the responses are captured in the reports for clicks.
-
Suggested Action: Simple texts like Yes/No, STOP, or Unsubscribe that needs to be captured as a response from the user.
-
Open URL Action: Redirect user to website/landing page etc. Needs to be a valid url (starting with http or https).
-
Dial Action: On click, the user would be redirected to the handset's native phone app to dial telephone number entered by brand. Enter number with country code.
-
Share Location Action: On click, users would be redirected to the maps section to the locations coordinates entered by the brand. Need to enter Longitude and Latitude for the desired location.
-
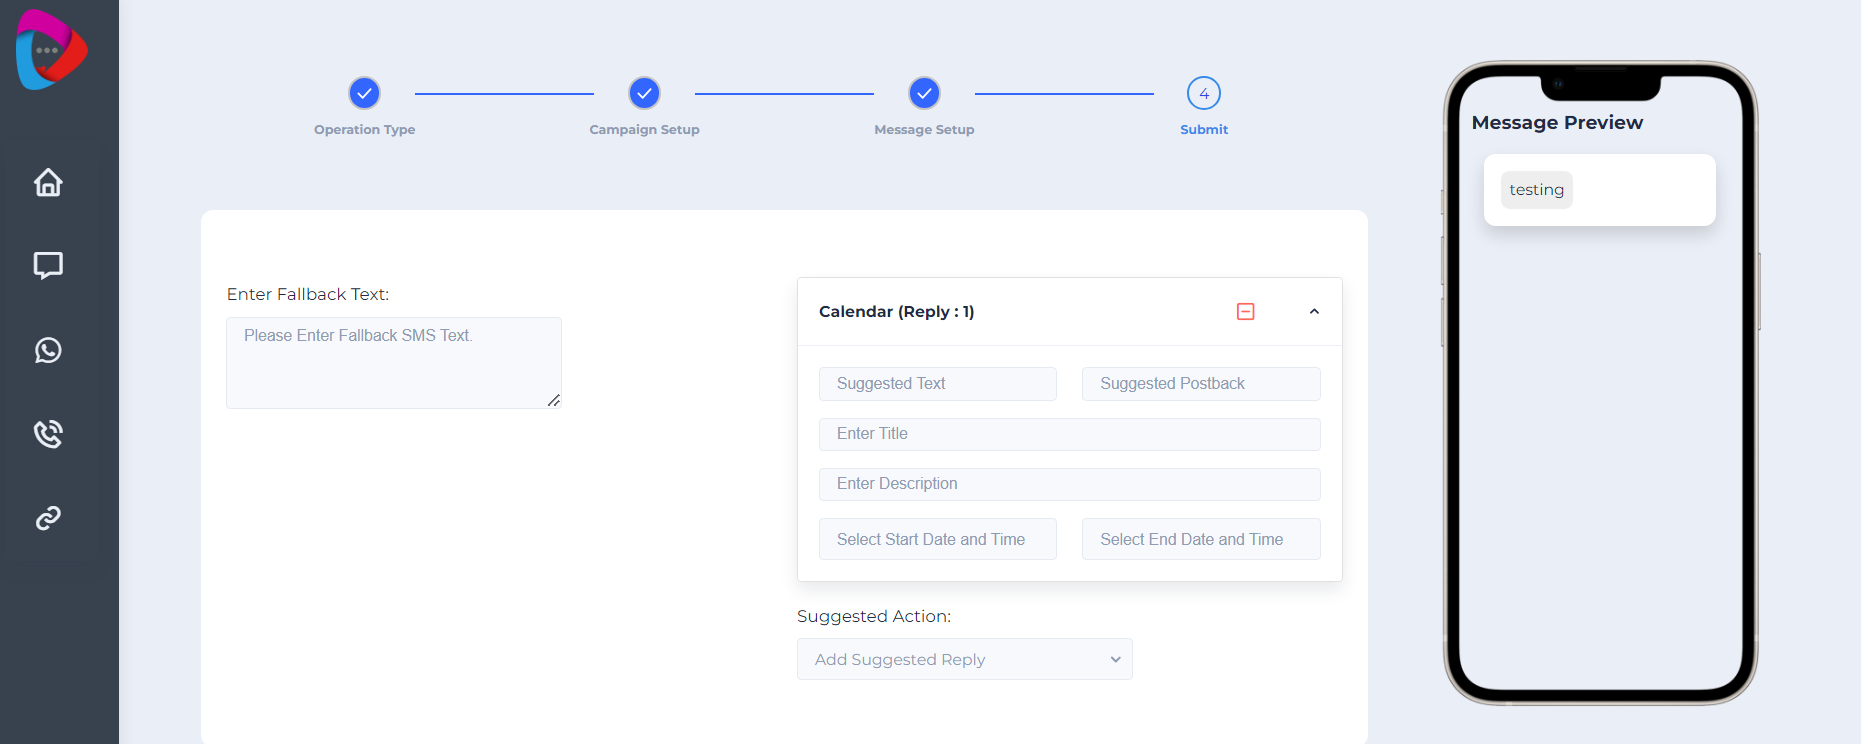
Add Suggested Actions/Replies (Call to Action buttons) : You can add CTA buttons for users to click and capture their responses.
-
Share Calendar Invite : On click, brands gain the capability to dispatch personalized calendar invitations to customers. This feature empowers brands to meticulously set the event's date and time, along with furnishing essential details such as the event name and description.
Updated about 2 months ago