
Manage Campaigns
Create, upload, and update campaigns in SmsPlus SGN Client.
Create, upload, and update campaigns in SmsPlus SGN Client to send messages to destination phone numbers on a defined schedule.
What is a campaign?
A campaign is a planned messaging effort used to enhance engagement, traffic, conversions, or revenue through one or more communication channels.
In SmsPlus SGN Client, a campaign lets you send messages at a frequency that you define. After creating the campaign, you upload the phone numbers that should receive the campaign messages.
Add a Campaign
Create a campaign from the Campaign menu and define how often the campaign should run.
- From the Campaign menu, click Add Campaign.
- On the Campaign page, define the campaign frequency.
- Select the required message type.
- Configure the campaign schedule and send quantity.
- Click Add Campaign to save the campaign details.
You can select Text, Flash, Arabic, and Autodetect message types for campaigns.
Campaign frequency and send quantity
The campaign runs after every span of minutes you specify in the Occurs every list.
The system sends messages to the number of phone numbers you specify in the Send Quantity box, on the date and hour you define. It continues sending messages in the specified span of minutes until the uploaded numbers are exhausted, which terminates the campaign.
If you do not select an end date, the campaign runs and terminates after all numbers are exhausted.
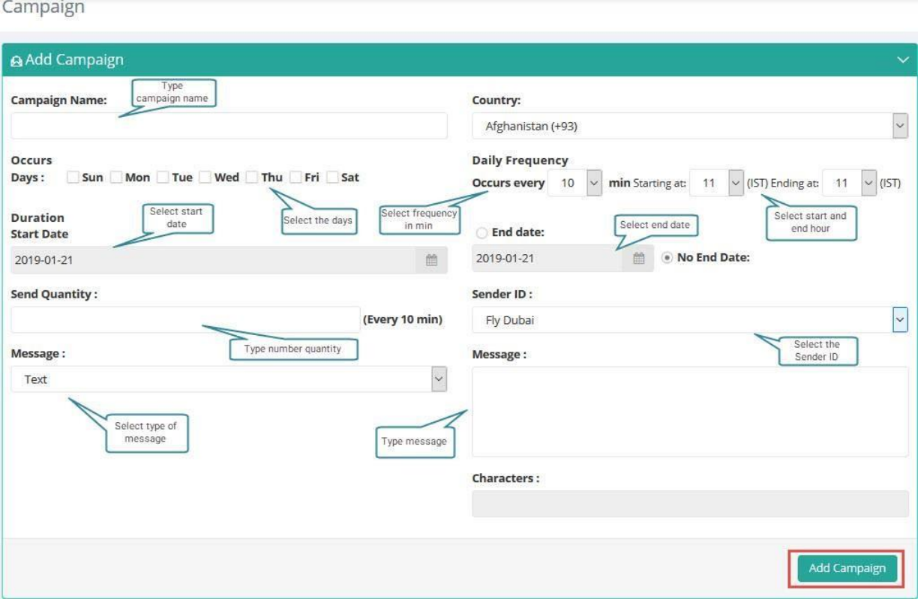
Create a Campaign
Upload Campaign Phone Numbers
After creating your campaign, add the destination phone numbers that should receive the campaign messages.
- From the Campaign menu, click Upload Phone Numbers.
- From the Campaign Name list, select the name of your campaign.
- Upload a file containing the destination phone numbers.
- Click Send to run the campaign.
- If you receive a message stating that the message was successfully sent, click OK.
Supported upload file formats
Upload phone numbers in line-separated format using one of the following file types:
- Text file
- Comma-separated values file
- MS Excel workbook
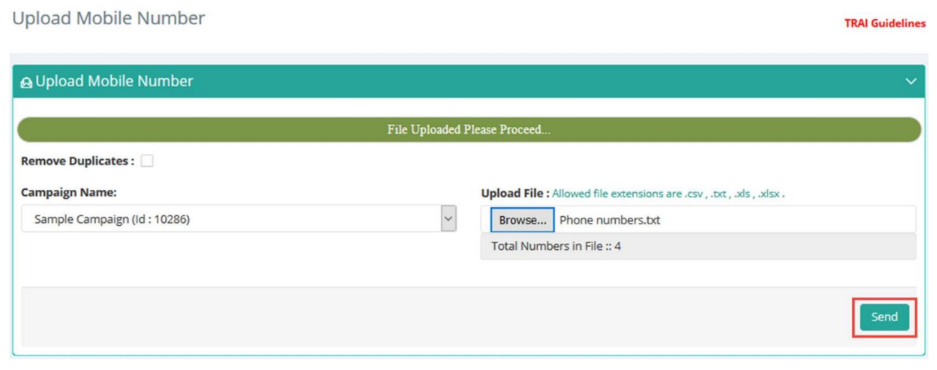
Upload Numbers for a Campaign
Update a Campaign
Use the campaign list to view created campaigns, check statuses, upload additional phone numbers, view sub-jobs, and review campaign changes.
Open the Campaign List page
- From the Campaign menu, click Campaign List.
- Review the campaigns shown on the Campaign List page.
- Use the Status column to check the overall campaign status.
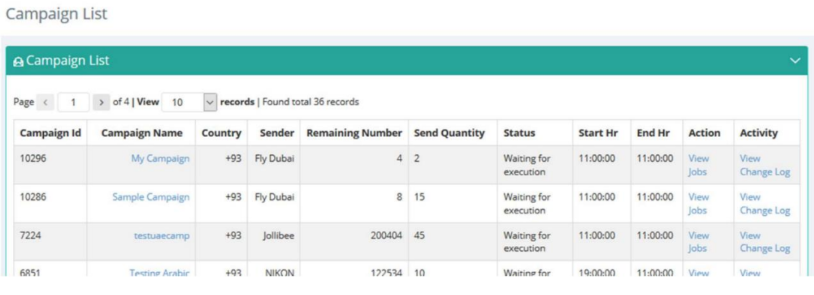
Campaign List Page
View campaign sub-jobs
You can update a campaign by uploading more or new phone numbers using the Upload Phone Numbers option.
To view the status of campaign sub-jobs:
- Go to the Campaign List page.
- Find the campaign you want to review.
- Under the Action column, click View Jobs.
- Review the status, total numbers, and uploaded time for the campaign sub-jobs.
Other than viewing the status, total numbers, and uploaded time, you cannot perform any action on campaign sub-jobs. To see all job statuses, see Job Actions in Chapter 5, Manage Jobs.
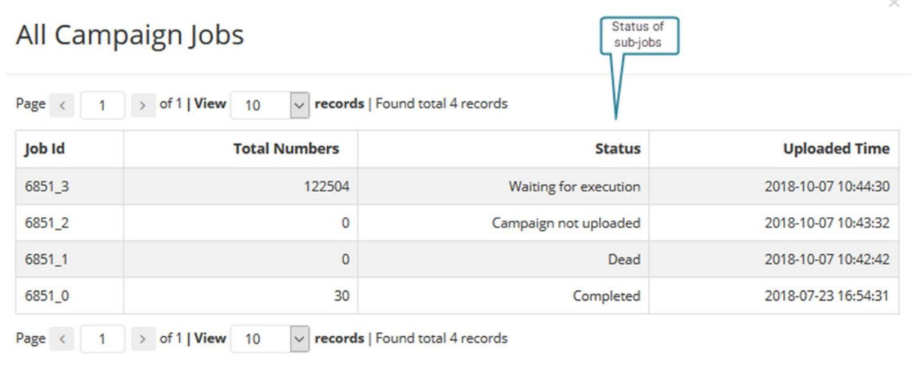
Sub-Jobs of a Campaign
View the campaign change log
Use the campaign change log to review edits made to a campaign.
- Go to the Campaign List section.
- Under the Activity column header, click View Change Log.
- Review the changes in the Campaign Change Log window.
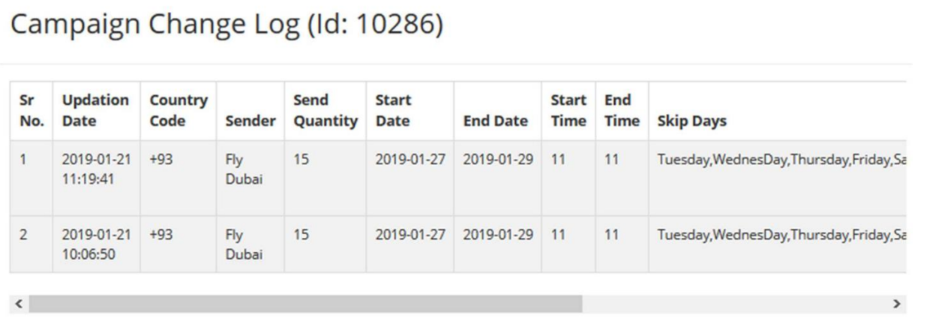
Campaign Change Log Window
Update campaign details
Change a campaign’s core parameters from the Campaign List section.
- Go to the Campaign List section.
- Under the Campaign Name column header, click the link for your campaign name.
- On the Update Campaign page, change the campaign parameters as required.
- Optional: Disable the campaign if needed.
- Type comments about the change in the Remark box.
- Click Update Campaign to save your changes.
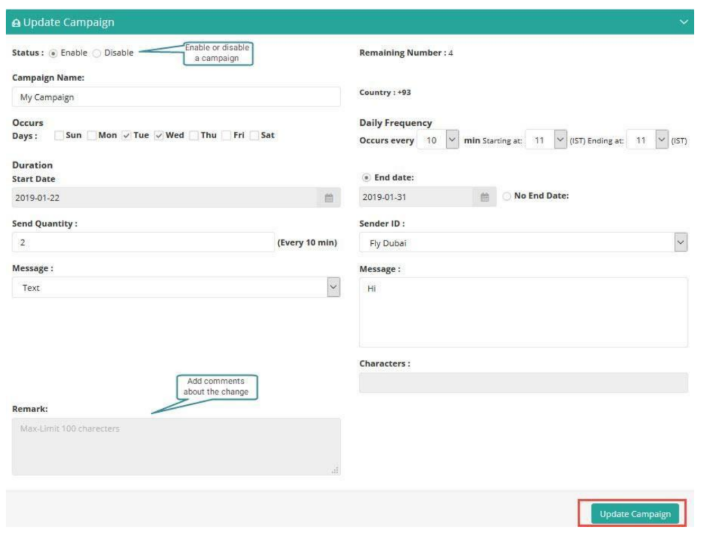
Update a Campaign
All changes, including comments, appear in the Campaign Change Log window.
Updated 11 days ago